A few projects ago, we framed the first and second floors of an octagonal house using a precut framing package that included I-joists, LVL beams, and LSL rim joists. Even though that project had a complex floor plan, construction went smoothly enough that I was eager to try the system — iLevel’s NextPhase JobPack — again. We had that opportunity last summer when we began work on a custom 4,000-square-foot home, located on a hillside site with a lot of wind exposure.
While we were developing the plans, the homeowners made it clear that they wanted a solid, noise-free house. To avoid squeaky floors, we usually frame with I-joists rather than sawn lumber or trusses. And while we typically use sawn lumber to frame our roofs, I thought LSL rafters would be a better choice for this project, especially when I learned that precut engineered roof framing had been added to the list of JobPack options. I like to maintain our local reputation as a builder willing to try innovative products and techniques, but I was also hoping — based on our previous experience with the octagonal house — that in addition to providing a solid frame, the precut floor and roof packages would save us a little money. This time around, though, results were a bit more mixed, for reasons I’ll explain in this article.
Three Sets of Plans
After the initial architectural plans had been approved by the clients, structural engineers John Higgins and Mark Johnson used them to produce a set of building plans. These were given to BlueLinx (bluelinxco.com), the distributor that provides the JobPack framing package in our area. BlueLinx imported them into iLevel’s proprietary Javelin design and fabrication software. According to iLevel, drawings in a variety of formats can be imported into Javelin.
The Javelin software produced the set of framing plans that the fabricator would actually use to cut our material, so we had to review those plans carefully before placing our final order. One thing we quickly noticed was that the rafters shown on them didn’t have rafter tails, a detail included in the original architectural plans for the house but not in the engineering plans. Instead, the initial set of BlueLinx plans indicated rafters that would end at the walls with a plumb cut, and no tail.
Applying rafter tails in the field isn’t my idea of a time-saving measure, so lead carpenter Matt Dyer worked with the fabricator to include the rafter-tail profile shown on the original plans. BlueLinx was able to cut this more complex detail, but it added costs to the roof framing package, partly because we then had to upgrade from I-joist to LSL garage rafters.
More problematic, the added profile changed the way the seat cut was made on the fabricator’s machinery. We’re still not sure if the error was ours or the fabricator’s, but we think that the software simply added the new profile to the end of BlueLinx’s existing rafter design rather than recalculating the overall rafter length. The result was that each precut common rafter was about an inch short, a problem we didn’t discover until we had already installed the structural ridges and started framing the roof.
Another problem we noticed during our initial review was that some of the beams in the engineering plans were missing or resized in the new plans. It wasn’t clear to us that the Javelin software had partially re-engineered the building, but we knew that structural changes that remained hidden in floors and walls could change load paths and potentially affect the appearance of exposed features — in particular, a prominent vaulted ceiling in the main living area — and would need to be carefully reviewed.
Since there wasn’t money in the budget for our own engineer to review the fabricator’s plans and resolve these discrepancies, that responsibility fell to us. The designers at BlueLinx were very cooperative, and we were able to work with them to correct most problems both before placing our final order and after the material was actually delivered, but there were still a few snags.
For example, a structural post had been added in an area that was supposed to be open all the way up to the roof framing, and a couple of support beams had been downsized by the software because the post erroneously reduced their spans. In another area, a 2×6 wall had somehow mistakenly become a 2×4 wall. Changes that we didn’t notice until after construction began took some consultation with the fabricator — and a Sawzall rather than a few mouse clicks — to correct.
In retrospect, it would have been best if we had included a line item in the budget for our engineer to review and approve the plans before we placed our order. In the end, we became responsible for any late revisions or errors in the plans, regardless of who made them.
Robert Reap
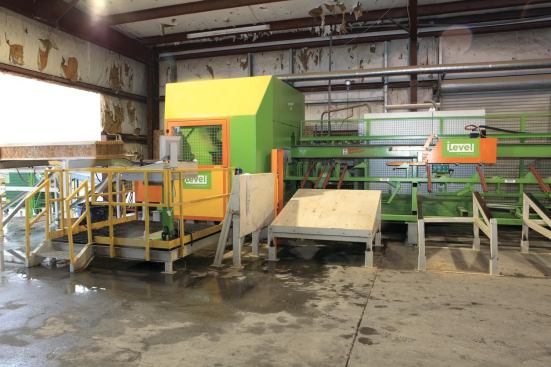
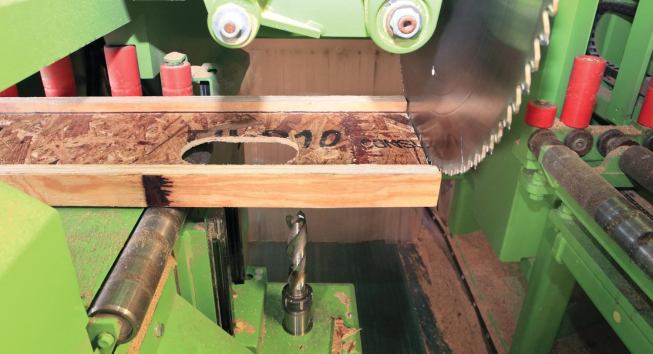
The engineered framing stock is cut with CNC equipment that can …
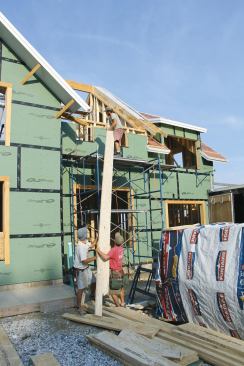
Material Delivery
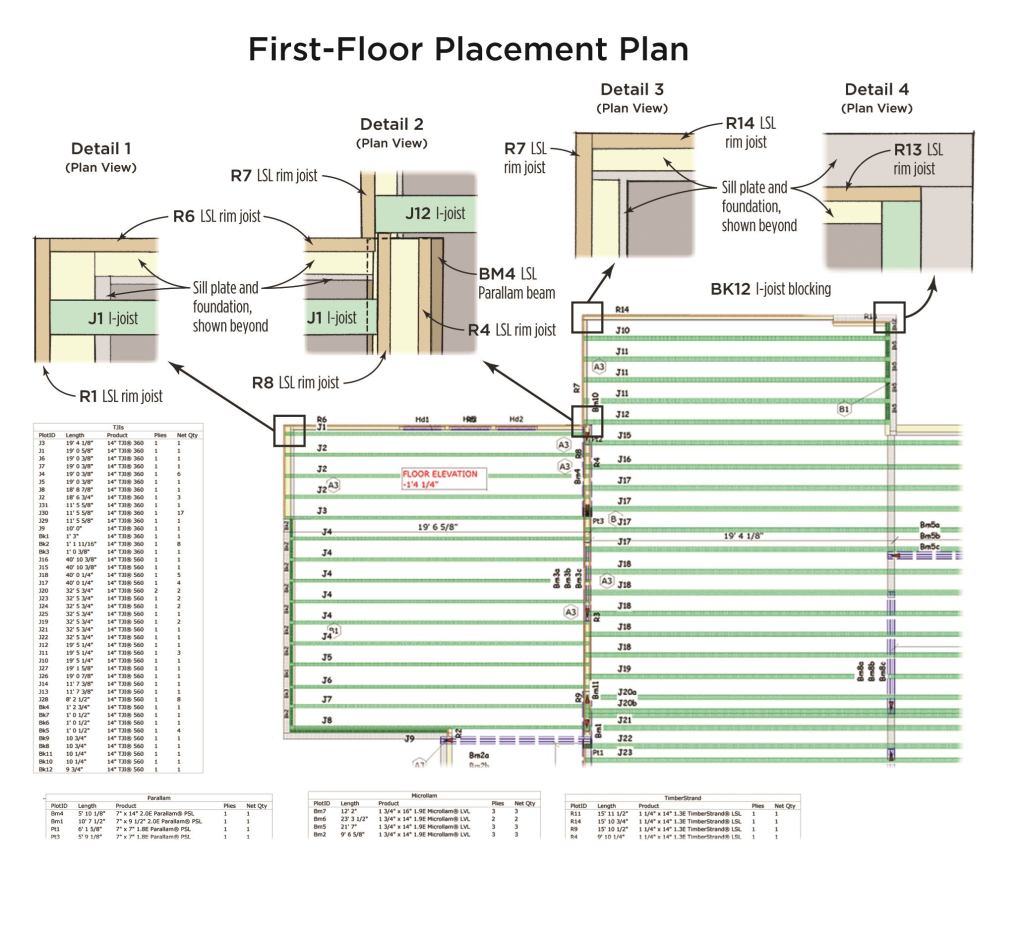
When the floor framing package arrived on site, we found that the I-joists, beams, and rim joists weren’t as logically bundled as they were when we used JobPack framing the first time. The plans for our first project were zoned and color-coded, with framing for each zone bundled together. On this project, the placement plans that accompanied the framing package weren’t zoned, though they were still very clear and easy to follow.
Without the zoned packaging, three crew members spent at least a half day sorting and organizing each floor’s framing material. We essentially created our own “zones” so that we could find the individual components quickly once we started working through the plans. We also had to repeat this procedure later when the roof framing arrived. On the positive side, the material was very straight and consistent, which always makes a framer’s life easier.
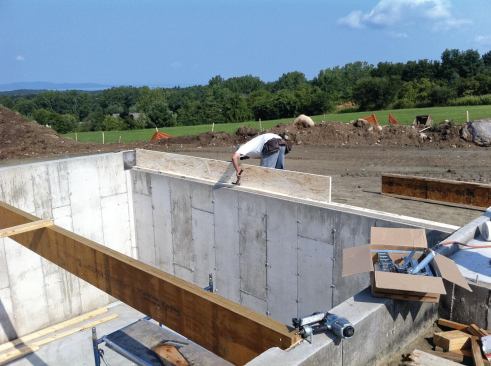
Foundation
When you’re framing with precut material, there’s not much room for adjustment to accommodate an inaccurate or out-of-square foundation. This could have been a problem on our project, which included 12-foot-tall poured concrete walls, a shelf detail rather than simple mudsills on top of some of the walls, and a sloped site. Fortunately, we were working with an experienced foundation sub who consistently delivers accurate and square foundations. According to iLevel, a field rep can provide squaring plans to the foundation subcontractor before the pour if needed, and check foundation dimensions afterward. If the framing plans haven’t been finalized before the foundation has been built and there are problems — such as bowed walls — component dimensions can be adjusted prior to delivery of the framing package.
A JobPack option we didn’t try on this project was precut hvac joist cutouts. We didn’t need them because our extra-high foundation walls create plenty of space for running ducts and other mechanicals without having to make cuts in the floor framing. Where finish ceilings are required, we just install commercial-style drop ceilings. If clearance is an issue and the project is very well-planned, the same CNC equipment that cuts the I-joists to length and mills the rafter tails can also make holes for ducts and plumbing runs.
Floor Framing
We started out by framing the basement studwalls and installing the Parallam columns needed to support the floor framing. The fabricator didn’t precut the parallel strand lumber (PSL) columns or beams that we used on this project, probably to allow us to field-check dimensions and because this material is so expensive. Unfortunately, the stock they delivered for each component typically measured about 3 feet longer than it needed to be. For our five 7- to 9-foot-high columns, for example, we ended up wasting almost 15 feet of material.
Some of the longer LVL beams weren’t precut either, which makes sense on a custom job like this since it allowed us to make sure we were accurately cutting this expensive material to length. But even though a few of the structural elements had to be measured and cut, we liked the way the placement plan allowed the crew to systematically locate, orient, and install each component with minimal headscratching or supervision.
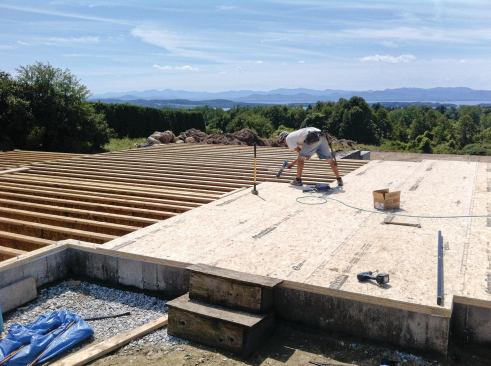
Once the girders and beams were in place, we began installing metal hangers — also included in the JobPack — and putting up joists. The joist layout was premarked on the structural supports and rim joists, so all we had to do was to find the starting point, which was indicated on both the placement plan and the framing, and work from there. Even the blocking was precut and marked on the plans (though we did have to supply our own web stiffeners).
After the floor framing was in place, we finished installing the remaining plates where the joists sat on shelves formed in the top of the foundation wall. Then we fastened down the sheathing — also included in the package, but not precut — and glued and nailed it in place.
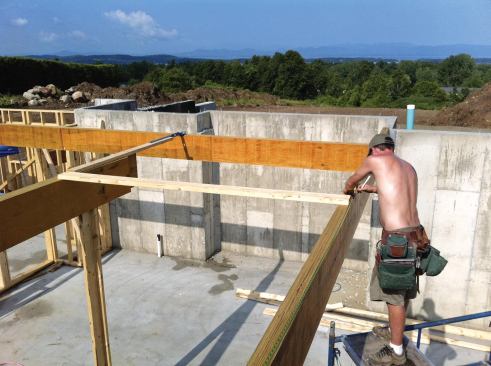
Robert Reap
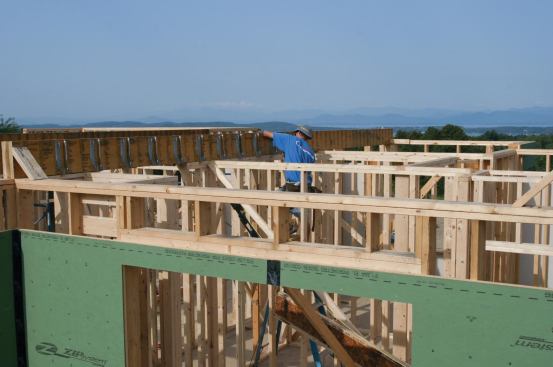
Once the first-floor walls were in place, the crew could install…
Wall Framing
Other new JobPack options that we didn’t try on this project were precut wall framing and panelized walls. Instead, we hired Catamount North, a local construction company with whom we’ve shared a lot of work lately, to panelize most of the walls on site. While Matt and our crew worked on the floor system, workers from Catamount North churned out the wall panels to keep the project moving along quickly.
Catamount framed the wall panels with 2×6 lumber and sheathed them with Huber’s new R-Sheathing insulated sheathing (zipsystem.com). We used LSL studs to balloon-frame the two tall rake walls, because engineered studs are much straighter and stronger than sawn lumber (we also used LSLs to frame critical interior kitchen and bathroom walls). We preassembled the eaves on the tall rake walls, then scheduled a crane to lift them and the first-floor walls off the stack and into place.
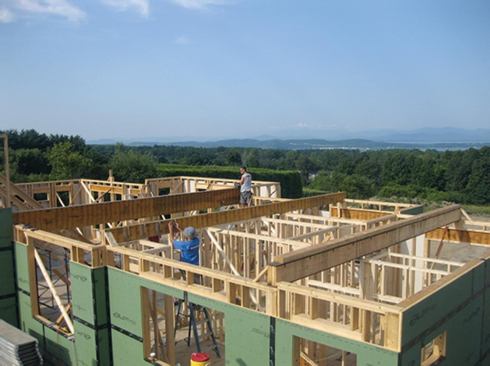
Next we began placing the supporting beams for the second-story floor joists. The framing plan for the second floor was a little more complicated than the framing plan for the first floor because of some elevation changes and vaulted areas, but joist installation went quickly as we became more familiar with how the precut package went together. Finally, after the second-floor deck was sheathed, we hoisted the remaining wall panels into place and got started on the roof framing.
Robert Reap
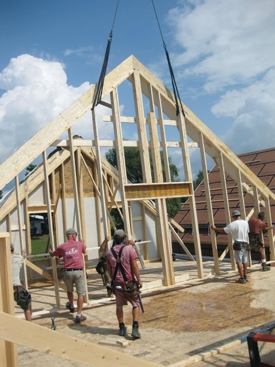
Since beveled valley rafters aren’t a JobPack option, the auth…
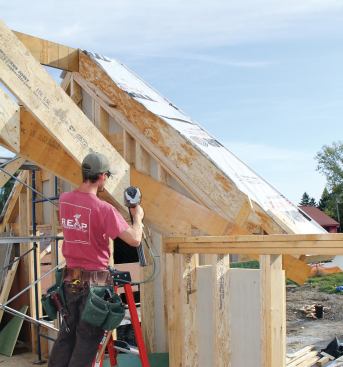
Roof Framing
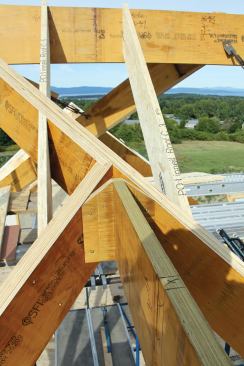
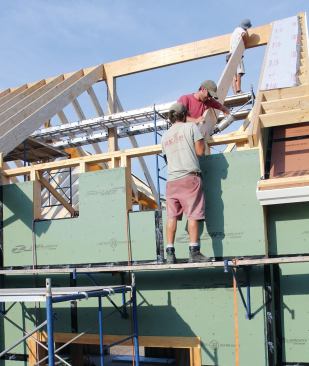
Before tackling the main roof, we framed the simple gable roof on the detached garage. This gave us a taste of the potential time savings that precut roof framing offers on the right kind of job, since it took only a couple of hours to put up the rafters on the 24-foot by 36-foot structure. The house roof, however, was much more complicated, with a stepped ridge, a couple of shed dormers, and a pair of large cross-gables with long valleys.
Framing this roof with precut framing took longer than we expected, for a couple of reasons. For one thing, BlueLinx couldn’t bevel the upper and lower edges of the LVL valley rafters to our specs. So before the roof framing package was actually delivered we went ahead and picked up the 13/4-inch-thick by 14-inch-deep LVL stock we needed at our local lumberyard and cut it ourselves on site. At the same time, we picked up enough LVL stock for the ridges, which allowed us to get these critical structural components in place and verify that the precut rafters on order would actually fit.
As it turned out, of course, the rafter lengths were off due to the issue I described earlier with the rafter tails, which we didn’t discover until the ridge was in place. To fix that problem, we picked up more LSL stock at our local supplier and cut new common rafters as needed.
The valley jack rafter lengths were short too. Not by much, but we still had to shift each jack rafter to the next-shorter position in the layout and trim it to fit, then cut the longest valley jack rafters from unused precut stock. In the end, we had to put a tape on each rafter and trim or recut almost every one of them. The lesson: A single small error on a complicated roof plan like this can have huge consequences.
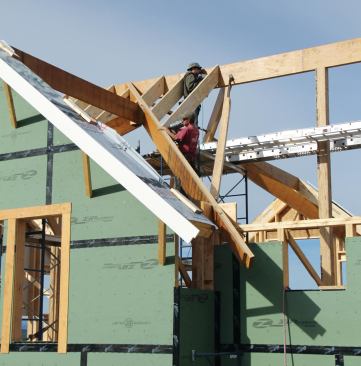
Keep in mind, too, that rafters cut from LSL stock are a lot denser and heavier than comparable rafters cut from sawn lumber. A roof that has been framed with LSLs feels really solid and is dead flat, but a 20-foot-long LSL rafter is very heavy and difficult to handle. It often took three workers to lift the longer rafters into position, and instead of a framing nailer, we had to use impact drivers and structural screws to fasten the rafters into place, which definitely slowed down the pace of the job.
Costs
We’ve estimated and framed a lot of conventional I-joist floors, so we expected that our estimated vs. actual costs to build the first and second floors with precut framing would be very close. And, in fact, they were, though since we lost a little time sorting the material we probably saved less labor than we hoped. On the other hand, we didn’t miss having to clean up a big pile of offcuts — there simply wasn’t very much framing material left lying around when we were done.
The precut roof system was more expensive than we expected, largely because LSLs cost significantly more than comparable sawn lumber in our area — about $1.28 per lineal foot for a 2×12, and about $3.25 per linear foot for a 11 1/4-inch LSL. Since we used about 2,500 lineal feet of rafter material, this added about $5,000 in material costs to the job. We also hadn’t included the extra cost of correcting the rafter tails or the upgrade from I-joist to LSL garage roof rafters in our initial estimate. With labor costs added in, I think that a conventionally framed roof would have probably cost about 20% to 25% less than this one. But then again, it would not have been as sturdy, which was one of the design goals.
Precut framing can save both time and money, but it has to be used on the right kind of project. I’m convinced of its value when framing even complex floors, and have seen how well it works on a simple roof. I’ll try precut roof framing again, but now that we know about the potential planning pitfalls, we’ll probably choose a simpler project.
Robert Reap is job-site supervisor and co-owner of Reap Construction in Richmond, Vt.


