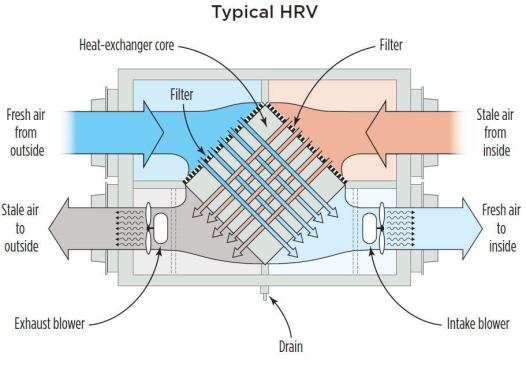
A heat-recovery ventilator (HRV) pulls in fresh outdoor air whil…
Alaskan winters are long and cold, so here in Fairbanks we build tight houses. In general, tighter houses have lower heating costs, but without adequate ventilation, they can also suffer from excessive humidity and poor indoor air quality. This problem, though usually associated with new construction, is increasingly cropping up in retrofit projects. The Alaska Housing Finance Corporation (AHFC) offers rebates for air-sealing and other energy upgrades, and mandatory before-and-after energy audits performed in the course of the program have found that many upgraded homes are too tight to meet AHFC ventilation requirements.
Meeting the standard calls for mechanical ventilation. In our climate, that means a heat-recovery ventilator (HRV), which pulls in fresh outdoor air while exhausting stale air from indoors. The streams pass, without mixing, through opposite sides of a heat-exchanger core, where up to 70 percent of the heat in the outgoing air is transferred to the incoming air. During the winter in this part of Alaska, outdoor air is very dry, so running the HRV also reduces indoor humidity.
Air-conditioned homes in humid climates, by contrast, are often better served by an energy-recovery ventilator, or ERV, which helps control humidity as well as temperature. The core of the ERV is permeable to moisture, so some of the humidity in the incoming air can cross over to the outgoing air stream, reducing cooling and dehumidification loads. Although running an ERV in an air-conditioned home in humid weather will bring additional moisture into the building, the moisture load will be lower than if an HRV had been used instead.
My company specializes in installing HRVs. Of the many brands on the market, we install Venmar, LifeBreath, and Fantech; these are top-quality products and are readily available in our area. We average between 75 and 100 installations per year — most of them retrofits — with a typical installation taking two to five days. Material costs don’t vary much from job to job, but the labor it takes to install ductwork in an existing building can vary considerably. Installed costs are typically between $5,000 and $8,000; in new construction or where air will be distributed through existing ductwork, they’re somewhat lower.
System Sizing and Design
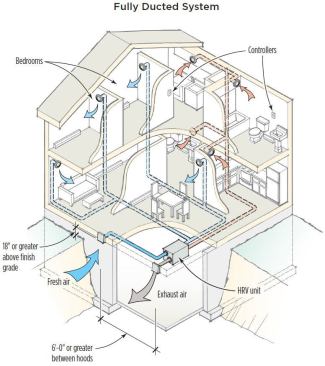
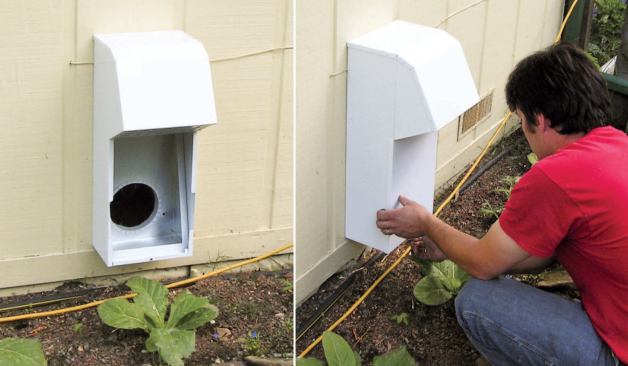
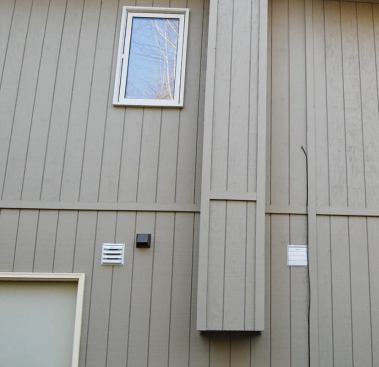
An HRV is connected to two pairs of ducts. The pair on the unconditioned side of the unit go to the exterior, with fresh air entering the building through one duct and stale air exiting through the other. The conditioned-side ducts are connected to indoor supply and exhaust registers throughout the house.
Exhaust and supply ducts. If a home has forced-air heat, the HRV unit’s warm-side ducts can feed in to the existing distribution system. But because most of the homes in our area have hydronic baseboard heat, we usually install fully ducted systems, in which every room in the house is connected to a dedicated duct. Habitable rooms, like bedrooms, living rooms, playrooms, and the like, each get a supply duct. Rooms where pollution is generated — kitchens, bathrooms, and laundry rooms — get exhaust ducts. Basements and unvented crawlspaces receive both supply and exhaust, while pantries and closets require no ventilation.
Multiple sizing standards. Most state codes incorporate some version of an ASHRAE or IECC ventilation standard. HRV manufacturers typically recommend sizing their products on the basis of an old ASHRAE standard that requires .35 air changes per hour in the house. The International Energy Conservation Code (IECC), on the other hand, requires 15 cfm of ventilation air for each occupant, assuming two occupants for the first bedroom and one occupant for each additional bedroom.
Under the most recent ASHRAE ventilation standard, ASHRAE 62.2-2007, the required airflow can be calculated using a formula or it can be taken from a published table. The table lists the required airflow for specified combinations of occupancy and floor area, while the formula requires 1 cfm of outdoor air for every 100 square feet of floor area, plus 7.5 cfm per occupant. Both the table and the formula count occupants the same way the IECC does.
In most cases, the number in the table will be equal to or higher than the calculation. It will only be lower if the house is over 7,500 square feet or has more than seven bedrooms. It’s up to the installer to consider both figures and use whichever one is higher.
In our area, things are slightly different. To receive rebates from the AHFC, we must comply with a modified version of ASHRAE 62.2-2004. Like 62.2-2007, that local modification gives us the option of calculating the airflow or taking it out of a table. The main difference between it and the normal 2007 version is that its cfm-per-occupant figure is set at 10, rather than 7.5 — a figure intended to reflect the greater tightness of Alaskan homes relative to those elsewhere.
To give a simple example, under the AHFC standard the calculated airflow for a four-bedroom 2,500-square-foot house would be 75 cfm: 50 cfm for the bedrooms (2 + 1 + 1 + 1 x 10 cfm) plus 25 cfm for the floor area (2,500 · 100 x 1 cfm). According to the table the house would require 90 cfm. Using the higher of these two numbers, we would install a 100-cfm HRV because it’s the closest size capable of providing the required 90 cfm of airflow.
Installation Requirements
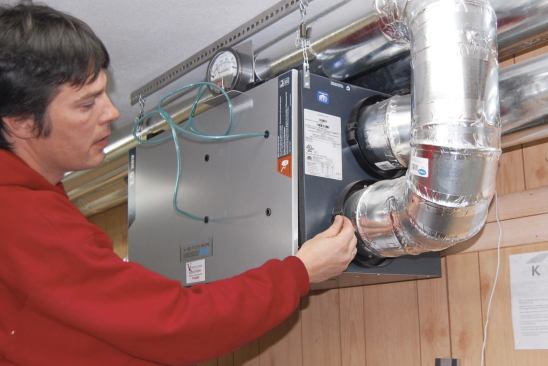
Finding a suitable place to install a retrofitted HRV can be a challenge. An HRV requires power, so it should be close to a 110-volt receptacle. We prefer to share a circuit that sees frequent use. That way, the homeowners will notice right away if the breaker trips. The unit must also be accessible for servicing and for periodic cleaning of the internal filters. To reduce energy loss and prevent freezing, it should be located in an area that stays above 50°F.
The HRV’s core produces a small amount of condensate that drains out through a fitting on the bottom of the housing. The installer connects the fitting to a drain hose that carries the condensate away. The IRC requires that this condensate be directed to “an approved place of disposal.” A floor drain, laundry sink, standpipe, or other open drain is our first choice. If that’s not possible, many inspectors will allow you to run condensate into a footing drain or French drain.
Utility room, garage, crawlspace. A utility room or laundry is an ideal location for an HRV — both are accessible conditioned space with power and a drain readily available. Closets can be an excellent option in new construction, but they’re less desirable for retrofits because they lack the necessary plumbing and electrical connections.
An attached garage can be a good place to install an HRV, provided it is at least partially conditioned. But extra care must be taken to completely seal the ductwork so that no auto exhaust or chemical fumes find their way into the house through the HRV. The 2009 IRC requires that both ducts in the garage and any ducts that penetrate the wall separating the garage from the dwelling must be made from 26-gauge or thicker sheet metal. Flex duct is not allowed, because it could burn through in a fire and allow smoke to enter the home.
We frequently install HRVs in unvented conditioned crawlspaces. The crawlspaces in this area are typically quite deep and provide easy access to joist bays and the stud bays in partition walls where we like to run our risers. By code, any equipment in an attic or crawlspace must be within 20 feet of the access point and have a level work area in front of it that is no less than 30 inches deep and wide. If the equipment is hung from the floor above, there must be at least 6 inches of clearance between the equipment and the ground.
Ductwork Options
We use the Air Conditioning Contractors of America (ACCA) Manual D to size the ducts and determine the equivalent duct length for various combinations of fittings. The manual typically requires 6- to 8-inch ducts at the HRV. At the far ends of supply runs, 4-inch duct may be permitted. But because it’s inconvenient to stock and handle every size of duct and fitting, we use 6-inch material even where Manual D would let us use 4- or 5-inch.
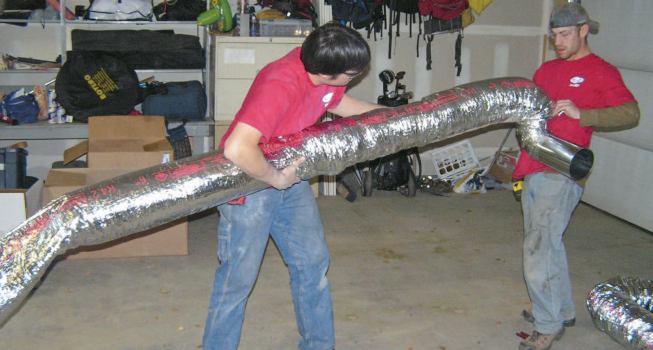
Easy on the flex duct. Flex duct impedes airflow, so we use smooth metal duct for the warm-side ducts wherever we can. However, difficult transitions in retrofit work sometimes force us to use short sections of noninsulated flex duct. Using a short section of flex duct between the metal ductwork and the HRV itself can also be a good way to dampen vibration.
Warm-side ducts need not be insulated except where they pass through unconditioned space. Cold-side ducts, on the other hand, must be insulated to save energy and prevent condensation in and on the ductwork. We typically use insulated flex duct for cold-side ducts and compensate for its effect on airflow by keeping the cold-side runs as short as possible. If the HRV is in the garage — where flex duct isn’t permitted — we use smooth metal duct covered by an insulating jacket.


