Load calculations, equipment selection, and duct design, done according to Manuals J, S, and D, respectively, are often required by code and sometimes even enforced. But one thing that’s not required anywhere is retrofitting the air filtration so that it not only protects the equipment from dirt but also does a good job improving the indoor air quality.
But what can you do about filtration in an existing home, especially if you’re not doing anything else to the HVAC system? You can’t just swap out a cheap fiberglass filter for a pleated, high-quality filter. You have probably heard this warning before—and it is justified, because most HVAC systems are not designed to handle the extra resistance to airflow that a high-quality filter will introduce.
What You Need to Know About MERV
Before I jump into the details of how to retrofit a forced-air HVAC system for better filtration, let’s talk about filtration quality. ASHRAE (the professional society for heating, air conditioning, ventilation, and refrigeration) developed a standard for rating the ability of filters to capture particles of different sizes: the Minimum Efficiency Reporting Value (MERV). This number goes up to 16, with higher numbers meaning better filtration quality.
A MERV rating gives you reliable information about how good a filter is at capturing one of the worst indoor air pollutants: particulate matter that’s 2.5 microns or smaller (particulate matter known as PM2.5). A MERV‑13 filter is supposed to catch 85% of PM2.5, so that’s a good minimum MERV rating to shoot for. Going to the high end of the range, MERV-16, brings you to 95% capture efficiency of PM2.5.
Unfortunately, not all filters have MERV ratings. Some use other rating systems, like Home Depot’s Filter Performance Rating (FPR) or 3M’s Microparticle Performance Rating (MPR). If you want the best filtration, I recommend buying MERV-13 or better and avoiding the others.
Assessing Filter Improvement Potential
The first step in a filter retrofit is finding the status of airflow in the current system and looking for ways to modify the distribution system to accommodate high-MERV filtration. The reason you shouldn’t just pop in a MERV-13 filter is that the current duct system probably already has a lot of resistance. But you don’t know how bad it is until you measure, so that’s step one.
There are two measurements—total external static pressure and filter pressure drop—you need to take to determine what the resistance is in the current duct system.
Total external static pressure. First, get a reading with a manometer of the total external static pressure (TESP), which is the pressure difference across the furnace or air handler. This number is fairly simple to get and is a measure of how resistive the whole duct system is. Once you know this number, you can compare it with the maximum static pressure recommended by the manufacturer. Most furnaces recommend a maximum of 0.5 inch of water column (i.w.c.), for example, so if the system you’re retrofitting comes in at 0.7 i.w.c., you shouldn’t add resistance.
Filter pressure drop. This measurement is also done with a manometer, but you measure the pressure difference across the filter only. The Air Conditioning Contractors of America (ACCA) recommends 0.1 i.w.c. or less, but many high-MERV filters have much higher pressure drops. A study in California found that systems where a 1-inch fiberglass filter was replaced with a 1-inch pleated filter averaged 0.28 i.w.c. of pressure drop. For a system that needs to stay below 0.5 i.w.c., that can be a problem because the filter by itself is using up half of the pressure to move the air through the duct system.
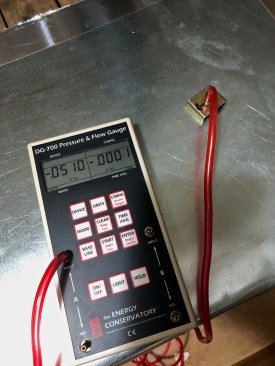
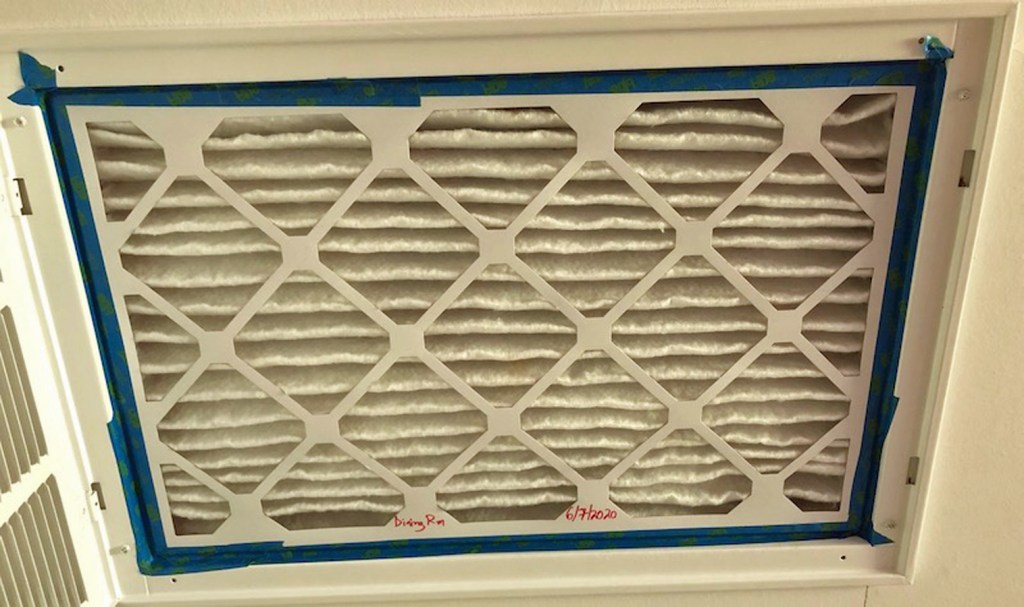
The pressure drop (0.0510 i.w.c.) across the filter shown on the previous page is about half the maximum pressure drop recommended by the ACCA (0.1 i.w.c.).
The static pressure and filter pressure drop together tell you how well the duct system is performing overall and how much resistance the filter is adding. Most existing duct systems are pretty bad, so your goal should be to improve both of these numbers with a filter retrofit, if you can.
Where to Put the Filter?
You have two choices for where to put the filter. You can put it in a cabinet near the air handler, or you can put it in a filter grille. You may also want to increase the number of filters because filter area is the key to low filter pressure drop. Whether you increase the number of filters, put in a bigger one, or both, putting the filter at the air handler is hard to do in many cases because of limited space. Sometimes you can bring return air into both sides of the air handler, and that allows you to add a filter. Often there’s just not enough space available for that to work.
The best place to put a filter is in a return filter grille. Even in new construction, you can’t always do that, but if you can, you definitely should. It’s usually easier to get more area in filter grilles than at the air handler because you can make filter grilles pretty big and you can have more than one. Having filters at the grilles usually makes them easier to change, too. Yet another benefit is that filters at the grilles keep the return ducts clean (assuming the ducts are sealed properly).
In our HVAC design work, we always try to use filter grilles. We make them all the same size for the convenience of the homeowner, who then can buy a box of filters all the same size. Unfortunately, this method doesn’t work well with a house that already has dedicated returns in each bedroom.
How Big a Filter?
The filter face area is the biggest factor in achieving low pressure drop. Many filters are sized for a face velocity of about 500 feet per minute. We size ours for 200 feet per minute or less, which works out to 2 square feet of face area per 400 cfm of air flow. (Since a ton of air conditioning corresponds to a nominal airflow of 400 cfm, this formula can be shortened to 2 square feet per ton.) This is the face area, length times width, not the actual filter surface area. Because of the pleats in the filter media, the filter surface area will be higher.
I like to size each of the filter grilles for 400 to 500 cfm of airflow. That makes the required filter size, using the rule of thumb above, 2 to 2.5 square feet. Common filter sizes with that face area are 12×24 and 14×25. I like to go even bigger when possible and use 16×25 or 20×20 filters.
Remember, 2 square feet per ton is the smallest filter you want to use if you’re going for really good filtration with low pressure drop. Using a larger filter reduces the face velocity and pressure drop even more. I put three 16×25 filters in my house, each filtering about 300 cfm. That works out to about 3.7 square feet per ton and a face velocity of about 100 feet per minute.
And what about filter thickness? We generally specify 2-inch-thick filters because they work well and, compared with thicker filters, they are less expensive and require less space.
Don’t Ignore the Space Around the Filter
One mistake I made with my house was not detailing what happens on the reverse side of the filter. The installers put the filter grilles in the ceiling and then screwed a piece of sheet metal directly to the back. The 14-inch round return duct then was attached at the center of that sheet metal backing. The problem with this configuration is that there’s almost no space between the 2-inch-thick filter and the sheet metal backing. The result is unnecessary turbulence and a higher pressure drop.
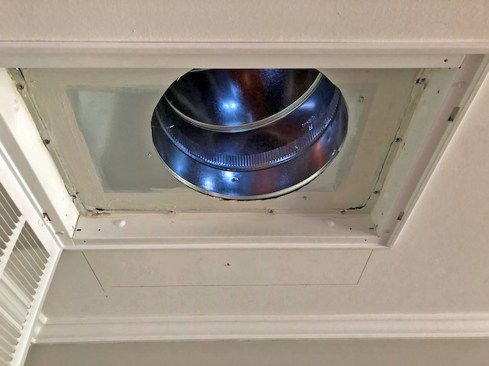
A shallow return (above) filter grille box results in a higher pressure drop across the filter. Replacing it with a deeper box (right) behind the filter succeeded in reducing the filter pressure drop by 30%.

When I added a bigger box behind the filter grilles, I was able to reduce the pressure drop by about 30% (see photos, above). With this arrangement, my filter pressure drops are all less than 0.06 i.w.c. And remember, this is with MERV-13 filters!
When you’re done with the filter retrofit, measure the total external static pressure and filter pressure drop again. By following the guidance here and upsizing the filter, you should find that both are lower. Retrofitting an existing HVAC system for good filtration is more involved than simply replacing the existing filter with a higher quality filter, but it’s certainly possible, and your clients will benefit with better indoor air quality.
Photos by Allison Bailes.


