Today’s builders, seeking to save energy, are building homes significantly tighter than those built 20 or even 10 years ago. This is admirable. But too often neither builder nor owner recognizes that these tight homes need controlled ventilation.
Historically, natural air leakage (infiltration) has ventilated our homes and controlled moisture levels, odors, and indoor air pollutants. The tradeoff has been that we’ve had to accept cold drafts and excessive heat loss. To get the best of both worlds, we need tight houses that have controlled ventilation systems, so that we, and not the weather, determine where, when, and how much ventilation occurs.
How Much Ventilation Is Enough?
ASHRAE publishes ventilation standards based on house volume, but requiring no less than 15 cfm air change per hour per person. But because sizing by house volume can lead to overventilation in a large home and underventilation in a small home, I prefer to design my ventilation systems based on number of bedrooms. This keeps the ventilation needs in line with the number of occupants the house is likely to hold, rather than square footage.
I also slightly oversize the system, and I provide a speed control that lets the occupants turn the system down below maximum capacity. Oversizing accomplishes several things: It provides extra capacity in case ductwork or other calculations aren’t perfect; it may provide enough capacity for more ductwork if the house is expanded; and since the oversized fan will usually be run at less than peak capacity, the system runs quietly. The extra cost for the added capacity is usually quite small, adding less than 5% to the system’s cost.
So how much is enough? A good rule of thumb is to provide exhaust capacity of 100 cubic feet per minute (cfm) in a two-bedroom unit and 150 cfm in a three-bedroom unit. The fan control should be either twospeed or, preferably, variable speed so that these peak capacities can be reduced when occupants are few or moisture levels are low. If a house is bigger than 2,500 square feet and four or five bedrooms, I usually go to a 200 cfm fan, which is large enough for all but the biggest abodes.
Ventilation Basics
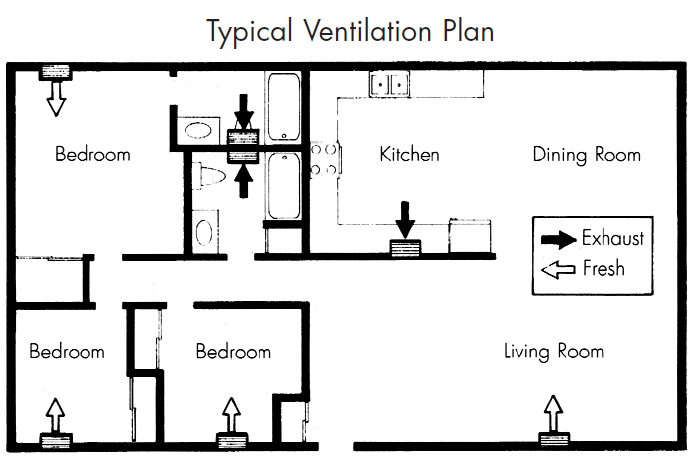
A ventilation system needs both an exhaust system and a fresh air supply. Stale air should be exhausted from rooms likely to have high moisture or odor content, such as the kitchen, bathrooms, laundry, or specialuse rooms such as darkrooms. Fresh air should be supplied to the bedrooms and living areas where people spend most of their time. The goal in locating inlets and exhaust grilles is to create airflow paths from inlet to exhaust that will ensure good distribution of fresh air throughout the habitable areas of the home.
You can do this with an air-to-air heat exchanger (with both intake and exhaust fans). That can be a good choice when the budget allows it and heating fuel cost is high. But buying a heat exchanger is an economic decision, rather than one of occupant health or building durability. You can effectively ventilate a tight house with a modest amount of heat loss with any of several whole-house ventilation systems that use exhaust fans only. This article describes how to create such a system and what the options are for fresh air intake and stale air exhaust.
Breathing In
In exhaust-only systems, fresh air supply is passive, meaning that it is provided by adjustable holes through which air is drawn as the fan-driven exhaust system removes stale air from the home. There are at least three variations of this method.
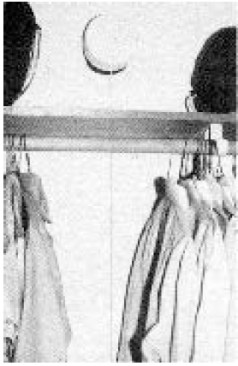
What looks like a closet light is actually a through-the-wall fresh air inlet. The pull cord opens the vent as needed for intake control.
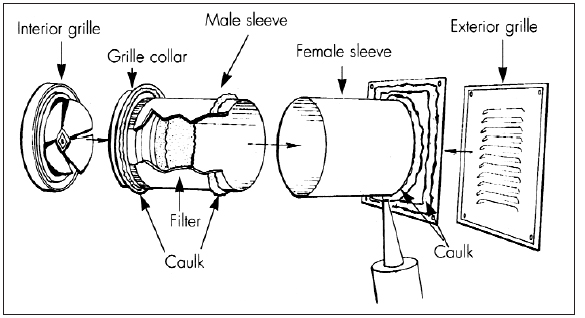
Through-the-wall vents (sold by American Aldes, 4537 Northgate Ct., Sarasota, FL 34234; 813/351-3441 and Therma-Stor Products Group, PO Box 8050, Madison, WI 53708; 800/533-7533) offer the simplest, lowest- cost solution. These have adjustable openings designed to admit from 5 to 20 cfm quietly and without drafts. Some have humidity sensors that increase the airflow opening as indoor humidity rises. In most cases, through-the-wall vents offer the most cost-effective fresh air intake.
A second option is a ducted system with a single inlet from outdoors supplying ductwork that carries fresh air to selected rooms. These ducts carry cold air, and therefore should have insulation and an exterior vapor barrier to keep moisture from condensing on the outside of the ductwork. This method costs more than the through-the-wall vents, but provides the future option of converting the entire ventilation system to a balanced heat recovery system with an air-to-air heat exchanger.
Houses with forced-hotair heating present a third option: duct the fresh air from a single dampered outdoor inlet to the heating system’s return duct. This is a tricky system to spec correctly, however. More details on this system, and an excellent treatment of non-heatrecovery ventilation systems in general, can be found in a videotape and instruction book, Installing Non-Heat Recovery Ventilation Systems, available from the Extension Energy Program, Oregon State University, Batcheller Hall 344, Corvallis, OR 97331-2405; 503/737-3004.
Other models offer adjustable intakes operated either manually or by humidity sensors.
In most cases, I recommend through-thewall vents, unless the owner is serious about later adding a heat exchanger. But whichever fresh air supply method I choose, I site the inlet point(s) away from outdoor pollution sources such as garages, chimneys, and plumbing vents. In addition, even though incoming air mixes with room air quickly, I site the intake points to minimize drafts — preferably high on a wall and at least 4 feet from any seating areas. Bedroom closets make ideal sites as long as any solid doors are undercut at least 3/4 inch.
Exhausting Possibilities
The exhaust side of the ventilation system is powered by a fan. There are three approaches you may take, depending on house size, budget, and how important you find the convenience of a packaged system: upgraded range hoods or bath fans; an in-line fan system you put together yourself; or a multiport system that comes complete from the manufacturer.
Upgrading the Range or Bath Fan
This least-cost approach works best in homes of not more than 1,500 square feet. In many homes, range and/or bath fans already exist to provide spot ventilation, so all that’s needed to create a whole-house fan is to upgrade to a fan of higher capacity and lower noise level.
Such fans must be rated for continuous service — this means high-quality bearings with permanent lubrication. Sound level ratings should be no more than 5.5 sones for the range hood, 2.5 sones for the bath fan.
Range hoods. A range hood serving as a whole-house fan should have a capacity of 200 to 350 cfm and a solid-state, infinitely variable speed control, so it can be turned down to barely audible ventilation flowrate levels of 50 to 100 cfm. Sears and Broan (Broan Mfg. Co. Inc., PO Box 140, Hartford, WI 53027; 414/673- 4340) both make this type of range hood, which costs about $225. Using the range hood as the whole-house ventilator has the advantage that the kitchen is the best location to use if only one exhaust pickup is provided. You should still have a bath fan in the bathroom for spot ventilation.
If you use an upgraded bath fan for the whole-house fan, use one that has the capacity you need (100 to 200 cfm, at 0.3 inch of water, depending on house size). Typical upgraded bath fans, costing about $80 to $100, are the Nutone QT series (NuTone Inc., Madison & Red Bank Rds., Cincinnati, OH 45227; 513/527-5100), the Broan Lo-Sone fans, and the Penn Zephyr series (Penn Ventilator Co. Inc., 9995 Gantry Rd., Philadelphia, PA 19115-1097; 215/464-8900). To ventilate the whole house, the bathroom door must be undercut by at least one inch to allow the fan to draw air from the rest of the house. If there is more than one bath, put the whole-house fan in the one nearest the kitchen.
Single-Port, In-Line Systems
The next step up in cost and performance is a central, single-port, inline centrifugal fan. This will cost about $125 for the fan and another $150 to $400 for the ductwork and grilles. This is my preferred choice in the typical three-bedroom, two-bath home. Such a system can effectively ventilate houses up to around 3,500 square feet, provided the ductwork runs aren’t too long or convoluted (see “Hanging It Up”). The housings of these centrifugal fans, which are manufactured by companies including Kanalflakt (1712 Northgate Blvd., Sarasota, FL 34234; 813/359-3267), Rosenberg (Rosenberg Fans, PO Box 130603, St. Paul, MN 55113; 612/639-0846), and Fantech (1712 Northgate Blvd., Suite B, Sarasota, FL 34234; 813/351-2947) mount easily in line with round ducts (typically 6-inch diameter, although sizes are available to fit duct diameters from 4 to 16 inches).
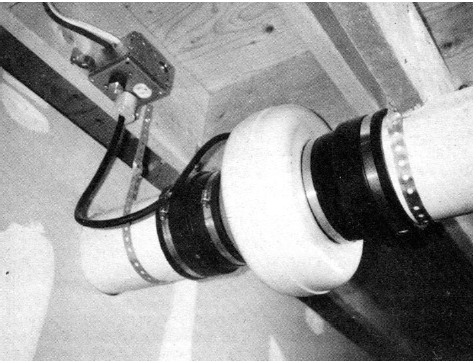
This single-port in-line fan, made by Fantech, is quiet, fairly inexpensive, and powerful enough to exhaust most three-bedroom, two-bathroom houses. The rubber boots on either side dampen the fan noise; the fan is light enough that simple metal straps easily support it from the joists.
In these systems, the single fan is hung from joists in the basement, crawl space, or (as a last resort) attic. The fan is fed by a single duct into which are channeled stale air ducts from the kitchen, all baths, the laundry, and any other odor or moisture producing rooms. The fan pulls exhaust air from these rooms and ejects it through a wall terminal equipped with a backdraft damper (a good 6-inch damper is made by Jenn- Air, 3035 Shadeland Ave., Indianapolis, IN 46226-0901; 317/545- 2271). I avoid attic locations whenever possible, because the chimney effect sends warm house air up the ducts, and also because frost may form in the frigid attic ductwork.
This single remote fan replaces any individual bath fans, but does not replace the kitchen range hood, which is still needed. Its principal advantage over the range hood or upgraded bath fan is that the remote mounting results in a quieter system, and one fan can serve multiple bathrooms. If the fan is adequately oversized, it can also handle a bath or laundry added later. The only additional cost would be for ductwork and a grille.
These systems, along with throughthe- wall vents or other fresh-air intake, can provide integrated, controlled whole-house ventilation for moderately sized houses — say, 1,500 to 3,500 square feet. They require sound planning and some running around to collect materials and components. But since the materials are fairly inexpensive as long as the ductwork is not too complex, the installed cost is usually lower than the third option, a multiport exhaust fan package complete from the manufacturer.
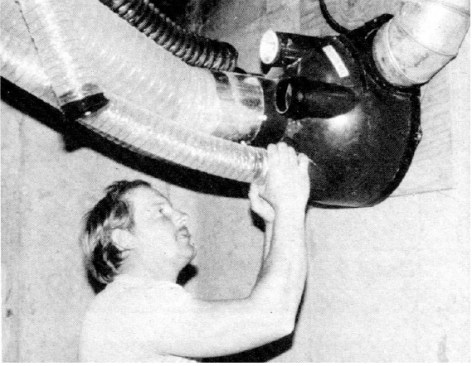
An Aldes multiport fan lagged to concrete. Large flexible ducting completes the kitchen run; the smaller ones come from baths. The galvanized duct is the exhaust to outdoors. Such systems, which can exhaust several rooms, can also be suspended by wire in either attic or basement installations.
Central, Multiport Systems These fan systems can be mounted in the basement, crawl space, or attic. The multiple stale air connections typically include a 6-inch connection for the kitchen and 3-inch or 4-inch ones for the baths and laundry. Most have twospeed fans and integrally mounted controls. Often the low speed is continuous or timer-controlled, and the high speed is an occupant-selected boost to clear the kitchen or bath. American Aldes, Fantech, and Therma- Stor Products all sell complete systems, including fans, controls, some ductwork, grilles, and wall jacks.
The fans alone are $200 to $300; complete systems start at around $500 (materials only). You pay more for one of these systems, but if you want to save the time of rounding up separate components, want to have the assurance of manufacturer support, or need to vent more than three or four spaces, it may be your best option.
Maintaining Control
A ventilation system’s controls should be readily accessible and easily understood. Multiport systems come with their own controls, some with on-demand switches as well as 24- hour or even seven-day timers, so that occupants can coordinate ventilation rates with the house’s use.
For range, bath, and single-port ducted systems, I usually recommend, at minimum, variable speed controls with manual on-off switches. Range fans can have these on the unit, since the kitchen is centrally located, but bath or remote ducted fans should have controls mounted in a central location. For added flexibility, you can wire any of these controls to a 24- hour or seven-day automatic timer. The timer will provide regular intervals of venting which can be overridden by the manual on-off switch.
Finally, you should provide each bathroom with a 15- or 30-minute crank timer or time delay switch. This timer should be wired in parallel to the central control so the bathroom’s occupant can select ventilation as needed.
Most of these control devices, as well as many of the fans and accessories, can be obtained from W.W. Grainger (6335 N. Basin Ave., Portland, OR 97217; 503/283-0366).
You can also control ventilation systems automatically with a dehumidistat (instead of a timer). In theory, this is an excellent way to control ventilation, except in very dry regions, where the ventilation will seldom come on. But dehumidistats have fallen somewhat into disfavor because field results show that few people understand how to use a dehumidistat or what a desirable humidity level is (usually around 40%), and so use them incorrectly.
Finally, I like to label all controls clearly and provide for the owner a “user’s manual” that explains the operation of the system and the function and importance of the various components.
Operating Costs
Operating costs for these systems consist of fan operating costs of about $7 to $20 per year, plus the cost of heating the fresh air intake. The added heating load (compared to an unventilated tight house) is surprisingly low, about $20 to $100 per year for a 1,500- to 2,500-square-foot house, depending on fuel costs.
A Note on Backdrafting
Powerful exhaust-only ventilation systems can reverse the flow of combustion gases in chimneys, creating a potentially lethal hazard (see “Backdrafting Causes and Cures,” 12/90). For this reason, I insist that any fuelburning appliances be sealed combustion models, which have their own air intake and exhaust systems. This completely decouples the combustion process from the house air pressure levels and prevents backdrafting.
Hanging It Up: Ductwork and Fan Installation
Multiport systems come with full sets of ductwork, hanging hardware, and instructions. In a single-port in-line system, however, you need to put the pieces together yourself. Installation is mainly a matter of hanging ductwork and fans from framing members and installing grilles in walls — pretty basic hvac procedures. Following a few rules of thumb can make the installation go smoother and help you maximize the system’s performance.
Installing Ductwork and Fans
Maximize airflow by making ductwork runs as short and straight as you can, with as few elbows and fittings as possible. To keep the ductwork simple, I like to make the plumbing wall 2×8, stack the baths, and serve both baths with one 6- inch thinwall sewer and drain PVC duct run up through the plumbing wall. I usually use PVC instead of galvanized duct because it goes in quickly, seals easily with PVC cement, and won’t rust if bathroom moisture condenses inside. The PVC hangs easily from joists or other framing with metal straps placed at roughly 10-foot intervals. Some installers may prefer to use regular galvanized hvac ductwork for its familiarity. (If you do this, make sure to tape all seams, transverse and longitudinal, with tape meeting UL 181A-P requirements; I like Nashua 324A, available from Grainger.) I often use both rectangular and round duct, joining them with transitional galvanized boots readily available at hvac suppliers. The schematic drawing below shows such a system.
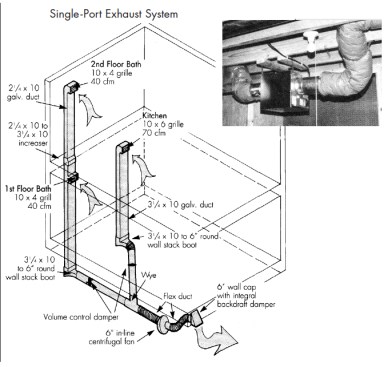
A. Single-port ducted exhaust system. A single rectangular duct exhausts the stacked baths; a boot at the bottom of its vertical run makes the transition from rectangular to 6-inch round duct. A separate, larger duct exhausts the kitchen. Both runs of duct have volume control dampers for finetuning the system after installation. Putting four to six feet of flexible duct on either side of the in-line fan (inset) minimizes fan noise and can help reduce sharp bends in the exhaust line.
I recently came across a product that looks promising: galvanized oval ductwork made by Southwark (16th St. and Washington Ave., Philadelphia, PA 19146; 800/523- 1052). It comes in what the company calls 5-inch, 6-inch, and 7-inch sizes; these are basically what you’d get if you slightly flattened round ductwork of those same dimensions to fit them into a 2×4 wall. This flattening somewhat reduces the cross section and flow capacity.
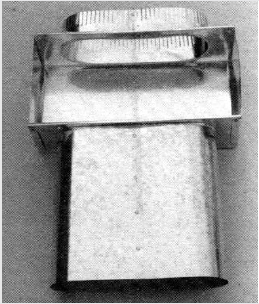
This stackhead with collar, made by Southwark, allows you to vent stacked baths with a single duct run.
The company also makes fittings that make putting a ductwork system together easier. Their No. 150 stackhead with collar, for instance, enables you to easily vent two stacked baths with one riser. For faster assembly, the ductwork comes in 100-inch lengths (as opposed to the 30-inch lengths common in rectangular ductwork).
There are two basic options to mounting the fan: You can attach it to plywood lagged to a concrete wall; or you can suspend it from framing, with ductwork runs on either side. I usually do the latter. The important thing is to isolate the fan’s vibration from the building’s structure and the ductwork.
Rubber boots such as those shown help reduce vibration and noise when attaching PVC pipe to fan housings. They are available from major suppliers, and come in sizes that let you step up or down from one duct diameter to another. They attach with standard hose clamps.
Transmitted fan noise can be a problem in very short duct runs. In these situations I like to use 4 to 6 feet of insulated flexible duct — called “flex duct” — on either side of the fan. This really quiets a system down. Be careful to hang flex duct so that it doesn’t have any kinks, which drastically reduce airflow.
If you use flex duct, you might want to opt for a fan that has hanging brackets attached, as shown in the photograph; this will make it easier to hang the fan. But you can still use one of the round, in-line centrifugal fans (such as a Rosenberg or Fantech), attaching the fan to the joists with plastic or rubber straps.
Sizing Ductwork
Size the ductwork according to the airflow it will carry. The table below shows my rules of thumb for ductwork as well as stale air grilles.
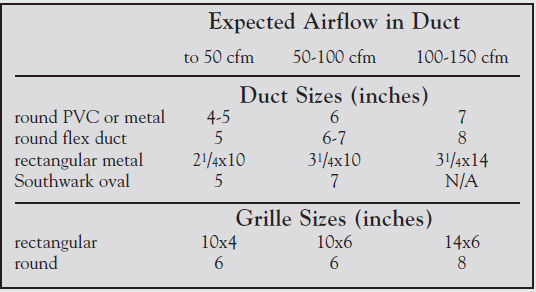
If you have trouble deciding between two sizes, use the larger one, as it will permit higher airflow. If your duct runs are long (over 40 feet or so), have more than two turns in them, or number more than three, it might be worthwhile to hire an engineer or systems designer to make sure everything is sized correctly


