Q: Our company recently landed a contract for a large Ipe deck. We’ve heard about this material for years, and it was recommended as a particularly durable alternative to cedar for coastal exposures. After ordering the material, however, we heard from another builder that it’s a nightmare to work with. He had a number of callbacks for extreme splitting (at the ends of boards and at all the fasteners) and finish problems, and he swears he’ll never use it again. Is there something to this builder’s claims that we should know about before moving forward?
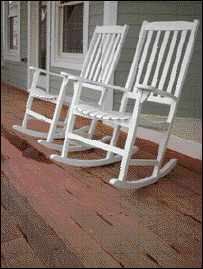
A: Ipe is certainly not for the uninitiated, but if you pay attention to a few key details, it’s well worth the extra effort. There is probably no more durable natural wood alternative than Ipe for a coastal deck or porch (Figure 1). The USDA Forest Products Laboratory rates the weathering performance (maintaining dimensional stability and resistance to warping, surface checking, and splitting) at about 25 years (vs. 10 to 15 for cedar and redwood). It’s a much more stable decking than pressure-treated wood, which splinters and face checks after only a few years in most coastal climates and is never very appealing to begin with. Tests by the Forest Products Lab to evaluate the natural resistance of woods to termites found Ipe to be more resistant to termite attack than any treated or untreated wood except Atlantic white cedar. The only decking materials that might outlast Ipe may be composites and plastics, but none of them quite match the appeal of a real hardwood.
Figure 1. The only decking materials that might outlast Ipe in a coastal environment may be composites and plastics, but none of them quite match the appeal of a real hardwood.
A large measure of this wood’s performance characteristics stems from its density, for which it’s earned the nickname “ironwood.” Ipe weighs almost 70 pounds per square foot (compared with 35 pounds per square foot for treated southern yellow pine or 30 pounds per square foot for western red cedar). But because of this density, it dulls chop-saw blades and drill bits quickly. Carbide blades are a must.
YELLOW MEANS CAUTION
Cutting Ipe creates a fine dust that is quite distinctive; it’s a bright, almost fluorescent yellow powder that seems at odds with the color of the wood itself. You notice it right away building up on blade guards and clinging to the edges of cut ends. Its bright color looks as toxic as it is.
Ipe’s natural resistance to decay and termites is helped by naphthoquinones — compounds that have natural antibacterial properties but that also can be quite irritating to skin and lung tissue. Ipe dust has been associated with contact dermatitis and is a known cause of occupational asthma. Wear a dust mask when cutting, planing, or routing this material, and if you notice itching and redness, cover your skin and wear gloves.
SEALING ENDS
The other very noticeable characteristic is that newly cut ends will split — sometimes within as little as 10 minutes after making a cut. This is largely a function of moisture content. The wetter the wood, the faster fresh cuts check as they dry. It’s startling to see this happen and disheartening, as it makes for unacceptable work. But there is an easy fix: Seal the ends immediately. This seems awkward at first, but if you set yourself up in advance with a small can of sealer and a foam brush near the chop saw, I don’t think it’s that cumbersome. The toughest part is keeping the sealer off the face, so it doesn’t interfere with the final finish. A quick-dry exterior polyurethane will work, but Anchorseal (www.uccoatings.com/uccoat) — a wax sealer developed for the lumber industry to prevent end checking of freshly cut logs — is strongly recommended by hardwood distributors supplying Ipe to coastal markets.
HIDDEN FASTENERS
Just as easily as the ends check, Ipe will split unless you predrill for fasteners. This means using a countersink bit with a stop collar that leaves the screw heads flush to the surface. A better option is to counter-bore with a 3/8-inch Forstner-style carbide bit and plug the holes. (If you don’t have a drill press, ask the hardwood supplier to cut rafts of plugs on the gnarly ends of some of the boards. Tapered plugs are also available in bags from a number of hardwood distributors.) Plugging becomes untenable for an entire deck of face-screwed boards, but is the best way to secure starter boards and the leading edges of stair nosings when using hidden fasteners.
In my mind, hidden fasteners are mandatory. It doesn’t make sense to me to invest in a pristine Ipe surface and then riddle it with stainless-steel screws. I’ve tried several hidden fasteners with Ipe. The types that you have to drive prongs into the edge of boards don’t work very well with Ipe; they split out the edges too easily. Eb-Ty fasteners — polypropylene “biscuits,” which are screwed to the joists at an angle through the board — work the best. These hold both edges of the board down but pin only one edge to the joists, allowing the boards to expand and contract with changes in moisture content. Eb-Ty fasteners also have a “keel,” or standoff, running down the center of each plastic biscuit that automatically spaces the boards. Standard spacing is 3/32 inch for 3/4- and one-inch stock, but larger Eb-Tys for heavier 2x decking are also available.
Eb-Ty fasteners can be time-consuming to install if you use a plate joiner to cut a single slot for each fastener. It’s much more cost effective to order Ipe grooved along each edge (Figure 2). Many hardwood manufacturers are prepared to do this, and many sell it as a standard option.
Figure 2. Eb-Ty fasteners (bottom) can be time-consuming to install. The most cost-effective way to use them is to order Ipe stock pre-grooved along each edge (top).
It’s important to check the moisture content before installing Ipe. I’ve often gotten it from a hardwood supplier at well over 20% MC. If you apply such wet material to the deck, those nice 3/32-inch gaps will shrink back to 5/32 inch or more as the material bakes in the sun. Many suppliers use shrinkwrap to secure bundles; it’s well worth the effort to break these bundles apart and sticker the material to let it acclimate to site conditions for about a week (or longer if it’s a cool season).
GLUING
Moisture content is even more important if you plan to glue up laminations to create curved railings or stair risers. Before gluing, the wood should be 11% MC or less. Don’t even try to guess; use a moisture meter.
Epoxy is the best way go. Resorcinol glue works, too, but I have more confidence in epoxies for extreme exposure conditions. MAS (www.masepoxies.com), System Three (www.systemthree.com), and West System (www.westsystem.com) all make epoxies that will work. (A good source for all three is Jamestown Distributors; 800-497-0010; www.jamestowndistributors.com) System Three and West System both sell epoxy manuals that are well worth consulting if you’re not familiar with these adhesives.
Ipe is pretty stiff, so curved laminations have to be pretty thin. Plan on enough material to experiment with lamination thicknesses that will work for the radius you are trying to get. Keep in mind you’re going to go through some table-saw blades cutting the laminations, and don’t expect to do this job very well on a portable model. With any epoxy, you also need to “tooth up” the binding surface with a belt sander using 60- to 80-grit paper. Here again, a stationary machine is going to give the most acceptable results, so this is often a job for a shop that has the tools and experience.
FINISHING
Perhaps the biggest advantage of Ipe is that it doesn’t need to be finished. It will weather to an elegant silver within a year or so, depending on exposure. This look is often compatible with the weathered aesthetic of a lot of coastal architecture.
If a client does want to maintain the rich golden brown of unweathered Ipe, this can be done. I surveyed hardwood suppliers from Long Island to Florida and most recommend a penetrating oil, such as Waterlox (Waterlox Coatings Corp., 800-321-0377; www.waterlox.com) or Deks Olje (The Flood Co., 800-321-3444; www.flood.com). Penetrating oils are easy to apply and redissolve when recoating; they won’t chip as they deteriorate as a urethane or varnish will. But take note: Any penetrating oil will have to be reapplied about every two years to maintain the original wood tone.
While Ipe is very stable and resists cupping, care must be taken with any wood deck to control ground moisture. Elevating the deck and providing a free flow of air is the best way to prevent cupping, which is caused by one face of the board absorbing more moisture than the other. But one thing you never want to do is back-seal the bottom surface of any decking. The top surface will inevitably break down quickly due to UV exposure, and once it does, the wood will absorb water. If the bottom surface is sealed, the boards essentially fill up like troughs, hastening the deterioration of the remaining finish and the wood itself.
A NOTE ABOUT TROPICAL WOODS
Ipe comes from tropical forests in Brazil and Central America where clearcutting and other destructive logging practices have accelerated the devastation of the world’s rainforests. While I have real questions about the need for sustainably certified woods in all cases, this is one species where I strongly believe it makes sense to buy from a source that carries third-party verification that it comes from a responsibly managed forest. Certification from the Forest Stewardship Council is one of the most widely recognized programs that tracks a wood’s “chain of custody” through the distribution chain back to the forest from which the tree was cut. Keep in mind that FSC certification is not a verification of lumber quality, or grade; it’s only a verification of the wood’s source. Most hardwood dealers will know exactly what FSC certification is all about and can special-order material if they do not already stock it. If you have doubts, you can find responsible sources in the Rainforest Alliance’s “Smart Guide to Green Building Wood Sources” (available online at www.rainforestalliance.org/programs/forestry/trees/activities/pdfs/green_building.pdf).


