In recent years, airtightness has become an increasingly important area of focus in residential construction. As of the 2012 International Energy Conservation Code (the “energy code” that underpins Chapter 4 of the IRC), builders must attain a minimum blower-door reading of 3 ACH50. However, our company’s goal is to meet or exceed the Passive House level of airtightness, which is 0.60 ACH50.
Many builders think that achieving an airtightness number this low requires a significant increase in budget due to costly materials and increased labor. But on the 1,100-square-foot home shown here, we were able to reach our initial goals with an extremely tight budget of $155 per square foot—which, for our typical practices and our market, is very low. We accomplished it by properly managing our materials and their installation.
Consulting Builder Program
When our clients initially approached us about building a responsibly sized and durable home for their small family, they had concerns about meeting their tight budget and building a high-performance home. In cases like this, my firm institutes our consulting builder program, where I consult with the clients or the project’s architect (or both) during the design phase to make meeting the performance and durability goals easier. The clients pay a consulting fee only if they decide to go with another construction firm. Otherwise, if the clients decide to hire my company, I simply absorb the fee into the construction price for the home. This process lets me build a relationship with clients before they have chosen a builder. More importantly, I no longer have to try to retrofit details like air-sealing into an existing design.
The architects with whom we work are open to designing more-energy-efficient homes and to having a builder involved in the design process. I can’t emphasize this enough: The one, simple step of being involved at the start of the design process is the single most important factor in our ability to remain profitable building high-performance homes. It has advanced both my firm’s budget management process and our ability to hit energy goals.
Our basic airtightness protocol is founded on our ability to develop air-sealing details that can be repeated easily and become part of our “universal” building toolbox. They have to be simple and cost-effective, and they must rely on methods that can be performed by any of our carpenters with materials from a well-stocked lumber supplier.
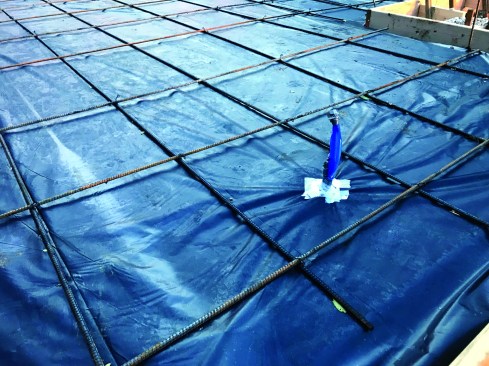
Sealing down low. Stack effect—the movement of heated air from the bottom to the top of a house on a cold day—tends to draw air into a home at the base, making air leaks low on the house among the most important to seal. The author’s crew accomplishes this in multiple ways. Before the slab is poured, all penetrations are sealed to the sub-slab poly, and the author keeps stub-ups separate so they can be sealed effectively (multiple stubs are nearly impossible to seal well).
Air-Sealing Starts at the Slab
The air barrier starts below ground level, under the building. Our first line of defense is 10-mil poly, which we apply directly over the under-slab insulation. We’ve found that the 10-mil thickness withstands traffic better than the code-required 6-mil and prevents damage that would require us to go back and make repairs. During the installation of the 10-mil poly, all the seams are lapped and taped to ensure an airtight installation. When it’s available, we prefer to use one continuous piece of poly.
While it’s not too likely that we will develop air leaks through the slab penetrations, we instruct our subs that each individual stub through the slab be taped to the 10-mil poly below the slab. This means each line that penetrates the slab does so alone and is not mated with a handful of other pipes—clusters of pipes are nearly impossible to air seal. By separating the stubs by just a couple of inches, however, we are able to properly seal them.
On this home, code required a 3-inch PVC line from below the slab to the roof for a passive radon vent. This radon line ended up being the only roof penetration. In general, we try to avoid roof penetrations, by using approved air-admittance valves for plumbing vents.
Framing Process
Once we are ready to frame a home, we have a crew meeting about our goals for the next steps of the project and the methods we will use, and we ask for objections or ideas. We do this on every project; it brings every crew member, no matter how green or seasoned, fully into the process. At this time, we assign one crew member to be in charge of all air-sealing, which will take place over multiple days and include various materials. This ensures we never run into “I thought that was someone else’s job.”
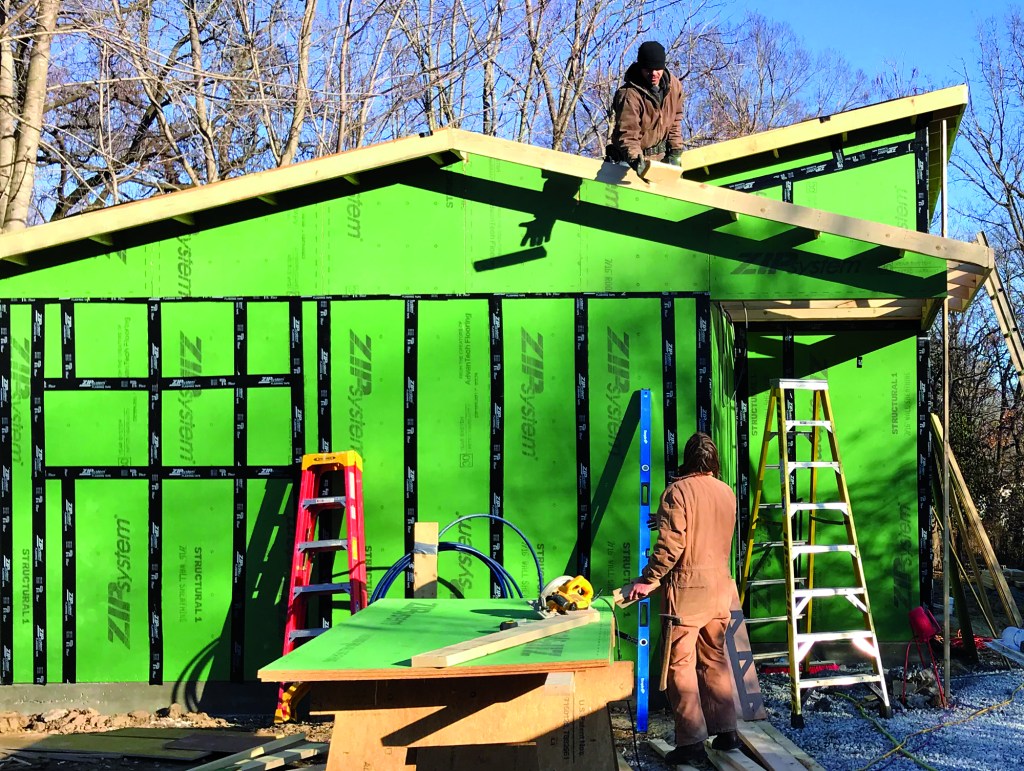
The Aarow Building crew leaves window and door openings sheathed for the duration of the framing.
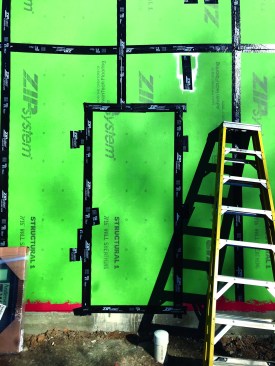
When the frame is complete, they’ll come back, fill in doors they left open for access, and run their initial blower-door test. Note the white spray paint above the door. All temporary nailers are painted white for easy identification so they can be filled prior to the test.
When it comes to sealing the sill plate to the slab, we not only use the standard foam sill sealer required by code as a capillary break below the pressure-treated sill, but we also add two beads of sealant. In the past, we have used Tremco’s acoustical, but on this home, we used Geocel from Proflex. Both products are supposed to have a long service life without curing to a hard finish. This is important, because when things become rigid, they tend to crack, creating leaks.
This home was our first attempt using Geocel. The decision to use it was driven by budget; the Geocel is about half the price of Tremco. Also, Geocel is readily available at our supply house. For the majority of homes we build, though, we prefer to use Tremco because we know that its service life can be more than half a century.
We apply the two beads of sealant before we stand the walls. We apply one bead to the pressure-treated plate near what will be the interior, and then staple the sill sealer on like normal. The second bead of sealant is applied to the concrete slab near the outer edge. Placing the beads on opposing sides of the sill sealer creates a non-direct, “Z”-shaped pathway for air movement.
Each joint in the plates is detailed with enough sealant that it squishes out once pushed into place. If it doesn’t squish, we pull things apart and add more. Each of the foundation bolts also receives a large glob of the sealant, just in case. I have found that stressing the idea that the sealant is continuous is important to achieving our goals.
Zip-Tape Sealing
Now that the walls are standing, we start installing the sheathing. Our homes receive full sheathing using Huber’s Zip System. The seams are then taped according to the manufacturer specs. As with the liquid sealants, one crew member is responsible for all taping and rolling, which means everyone else can move on to other tasks. First, we tape all of the horizontal seams of the sheathing on the project and then all the verticals. This creates a shingled effect on all tape joints that will help to shed water from the tape and down the wall, without making a penetration into the envelope.
Corners are areas where Aarow Building ramps up the taping detail. On inside and outside corners, the crew uses three pieces of tape.
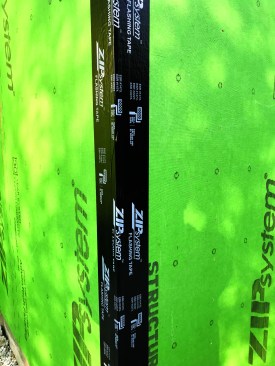
First, a single piece that bridges the joint between the meeting panels, and then, a strip on each side of the first piece. Huber makes a 6-inch tape that could work, but it is a special-order item for the author.
The only aspect of the Huber instructions from which we deviate is the inside and outside corner taping—we use three pieces of tape instead of the recommended one. We install one piece on the corner, bridging both sides, and roll it. Then we install a strip on each edge of the first piece, as insurance. Make sure to roll the first piece before installing the others; otherwise, air can easily become trapped behind all three layers. We started using this practice because it was difficult to run tape in a straight line in corners, and the three pieces ensure full coverage. Huber makes a 6-inch tape that would work perfectly for this; however, our supply house doesn’t stock it and we find it easier to have a method that doesn’t require special-order items that can delay the schedule or be overlooked because they’re not on site.
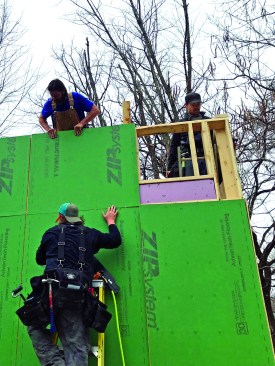
For this home, we didn’t remove the window or door sheathing during framing, so we could test the envelope before installing the windows. We taped and rolled those openings as if they didn’t exist at this stage.
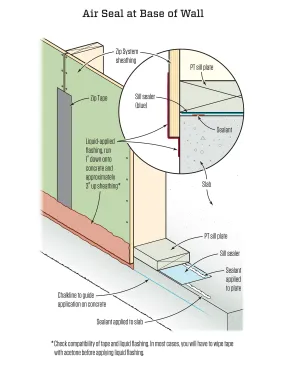
After all the walls are up, we return to the slab-to-wall connection. On this project, we used FastFlash, a liquid flashing product from Prosoco; I also think the fluid-applied sealer from Huber is a superb product. We chalk a line 1 inch down from the top of the slab as a guide, to avoid applying the product too far down for the siding to properly conceal it. Then we apply the Prosoco FastFlash, bridging from the Zip sheathing down to the foundation (see “Air Seal at Base of Wall,” above).
Flashing the base of the wall requires more attention to detail than anything else discussed so far. It’s messy, you’re often in the mud, and the area is low and hard to see. But it is an important spot. Of all the air leaks, those low and high on the wall draw in the most air due to stack pressure. If you’re going to invest your time on air-sealing, those are the areas to concentrate on.
The wall-to-slab connection is also difficult to detail because the slab concrete is never completely flat or straight. Hence, it requires a lot of added effort to create a solid seal. Keep in mind that leaks here will be impossible to repair after construction is complete, so getting them right the first time is critical.
Sealing the Lid
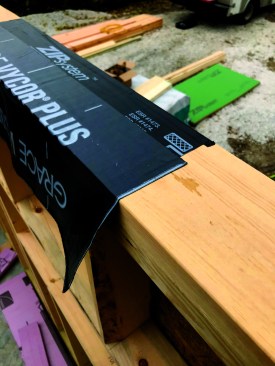
On this home, the ceiling drywall is part of the air barrier, so we needed to make the transition from the Zip System sheathing to the drywall at the top of the wall. For this transition, we use two different tapes: Zip seam tape and 9-inch Grace Vycor Plus with a split backing. We first tape from the wall sheathing onto the top plate. Depending on the wall height, this may take two runs of the Zip tape.
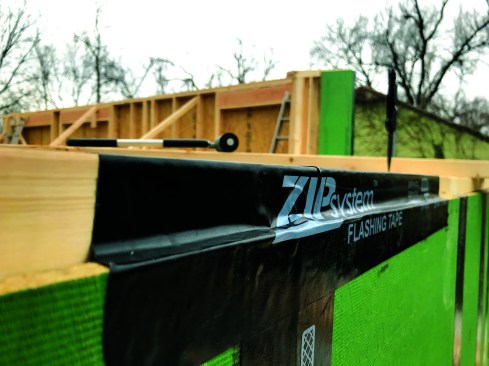
Continuous air barrier. Air leaks at the top of the wall are sealed with a combination of Zip Tape and Grace Vycor Plus. First, the sheathing is taped to the top plate.
Strips of 9-inch Vycor Plus lap over this tape.
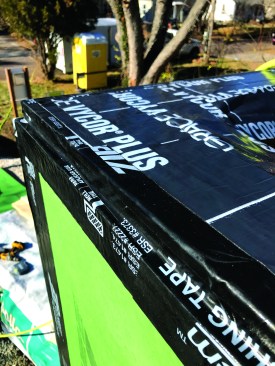
The Vycor Plus strips extend inside. There, they will be taped to strips of OSB that will be installed at the perimeter of the ceiling, forming the air barrier for the lid.
Then we install the Grace Vycor. We leave half of the backing on the tape and let it hang into the building so we can connect to it after we’ve installed the ceiling joists or rafters.
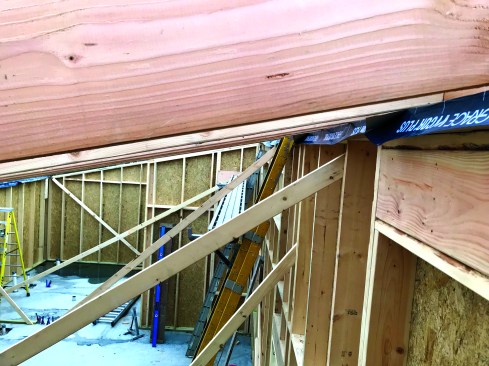
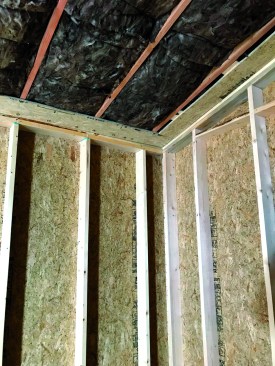
After completing the taping, we finish framing the structure and even install the roof sheathing. We strap the interior ceiling with 1×3 pine to create a channel for wiring. This strapping also helps flatten the ceilings.
Around the exterior walls, we stop the strapping short, and we fill in with ripped 8-inch-by-8-foot strips of AdvanTech subflooring. We now take the Grace tape that we had left hanging, and we roll it onto the top side of the AdvanTech and nail it to the bottom of the rafters, providing continuity in the transition from wall to roof. The combination of the AdvanTech and the strapping gives us an even plane on which to install drywall. It also allows the drywall ceiling to be fastened 16 inches on-center when we are framing 24 inches on-center. The tighter fastening schedule helps to prevent sag in the drywall over time.
At ceiling penetrations, we install blocks of AdvanTech in plane with the strapping. We drill through the blocks for any lines that pass through the ceiling, giving us a good surface to seal to.
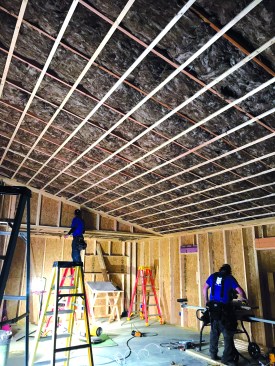
Ceiling strapping helps flatten the ceiling – a particularly important detail on this sloped ceiling, which will be raked by daylight from clearstory windows.
At the perimeter of the ceiling, the crew installed strips of OSB. The Vycor installed across the top plates adheres to the top of this OSB and drywall is secured to the bottom to complete the air barrier across the lid.
We attempt to keep as much plumbing, electrical, and HVAC inside the air barrier at all times; however, there are always some things that must penetrate the envelope. To preserve the air barrier, we have developed a system for our subs: They are given spray paint (blue for plumbing, yellow for HVAC, and red for electrical) and are required to mark with their paint any hole they wish to drill.
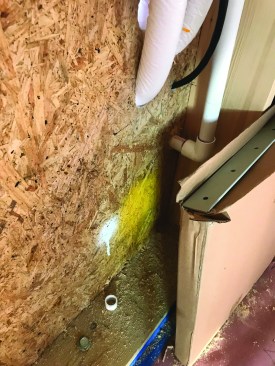
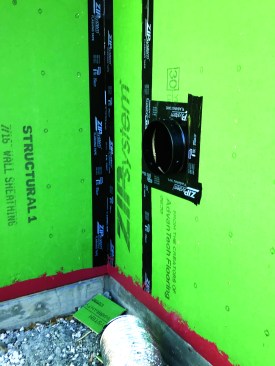
To avoid subs randomly cutting holes through the envelope, the author asks subcontractors to mark hole locations with spray paint. This AC line-set has been marked yellow by the installer and marked as “approved” with white paint by the author.
Once all of the subs have marked holes, we return with white paint and approve their openings. If a sub drills a hole that we did not approve, they cover the cost of repair—which could be substantial depending on where they drill. We also tell them that each penetration can hold only one item. So on this home, the mini-split units used for conditioning each have four penetrations (two coolant lines, power, and a drain). That may seem like a lot, but air-sealing two pipes in one hole is nearly impossible.
Before the ceiling can be installed, any trades that will need to be above it must perform their work. Again, all holes must be marked and approved and there must be only one item per hole. To keep the trades moving efficiently, we mark all future wall locations on the floor as well as provide laser levels to transfer marks to the ceiling. Many items like gas lines and home electrical runs still have to find their way into the ceiling assembly and any mismarking at this stage will cost a lot to fix.
Because we are using the drywall ceiling as an air barrier, we prefer to install the ceiling in one mass without wall penetrations. The building is engineered to not need interior partition walls; therefore, we can frame the entire envelope and drywall the ceiling before any interior partition walls are installed. This process is key to keeping the system simple and envelope leakage manageable.
Verifying Framing Tightness
As a standard practice, our company executes multiple blower-door tests during the sequence of construction, to progressively identify air leaks as we proceed. We own a blower door, and as a builder of high-performance homes, we believe the blower door is just as important a tool as any of our saws.
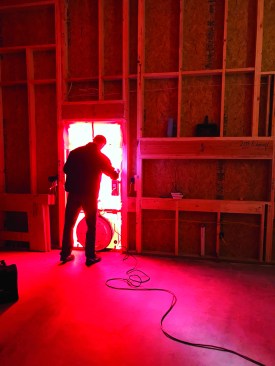
Blower-door testing before insulation allows the crew to easily identify leaks in the shell before they get buried.
We performed the first blower-door test on this home once we were done with the sheathing and had installed drywall on the ceiling. This test was done before the door and window rough openings had been cut. We filled in the doors we needed for access, as well as the attic hatch, with Zip System sheathing, taping it in place. This allowed us to test the integrity of the primary air barrier—the taped sheathing and drywall lid. The result was 0.31 ACH50 Pa, roughly one-tenth of the allowable leakage by code in our market. It is equivalent to a cumulative hole less than the size of a business card across the entire envelope. Not a bad start.
Systematic Air Barrier
We now have a system that is continuous from foundation to ceiling and back. We can visually inspect almost any part of the 4,700 square feet of envelope—almost the entire air barrier; only the top plate assembly is inaccessible.
The way we find errors in the air barrier is with the blower-door testing. If the numbers on the blower-door test seem off, we can inspect with the blower door running. Every member of the crew and all of our subtrades have the opportunity to go back and correct a seal along any section of the wall or any penetration. This first test also gives us the ability to compare numbers with the next blower-door test that we perform, after the window installation. That gives us a metric for judging how well we installed the windows and an indication of any possible problems that we should correct.
Set procedures like approving penetrations by trades and assigning one crew member to take responsibility for all air-sealing have made the process of achieving a tight envelope as simple and cost effective as possible, while setting us on the path towards an extremely energy-efficient home.
The next blower-door numbers, after the doors and windows were installed, tested out at 0.91. This number was a bit higher, but that’s to be expected after cutting in all the openings. We hope this number will improve slightly. But one thing is sure: We will learn what works, and what doesn’t, and can adjust accordingly on out next build.
Photos by Jake Bruton


