The performance of attics and roofs covers a big subject area, so this is the first of two articles addressing this topic. In this first article, we get everyone on the same page, explaining the science and options available to builders and remodelers. In Part 2, we will look at the even thornier issues of the evolving building code, real-world roof performance, and some exciting new research in residential roof performance.
Vented, unfinished attics usually work great as built-in moisture buffers. By the word “buffer,” we mean the space that allows indoor moisture to be whisked away on air currents or to condense on the underside of the roof sheathing where it harmlessly evaporates away (“dries”) or is absorbed into the sheathing and framing before it eventually dissipates (again, “dries”). The unfinished attic makes it easy to inspect your roof from the interior.
But it’s just so tempting to take back that attic space; you can use it for mechanicals, for storage, or even as a place to banish teenagers to. We routinely configure walls without such a buffer space. So why do we run into roof moisture problems way more often than we run into wall moisture problems? To answer this first question, we need to work our way through a pretty long list of questions about attics and roofs.
What Are the Options?
The wide variety of attic and roof configurations is one way that roofs differ markedly from walls. I number them here in order of preference from a moisture-control perspective. As Steven Baczek is fond of saying, “You vent until you can’t.”
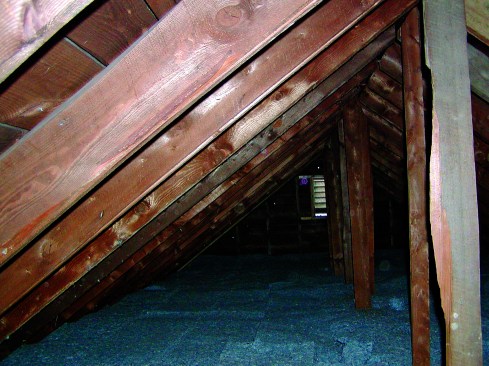
photo: Peter Yost
1. A vented attic with gable end vents is the most forgiving type of roof. This photo (above) shows part of the author’s gabled gambrel home with a vent in each gable. Note also the gapped roof-sheathing boards, which support a slate roof. There is quite a bit of drying potential for the entire space and assembly.
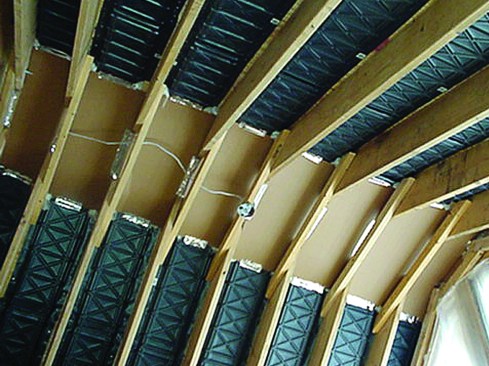
photo: J&R Products
2. Vented cavity. An inexpensive option shown above is to vent a cathedralized space using continuous vent chutes spanning the entire length from soffit inlets to ridge outlet.
photo: Steve Shirber
3. Top venting. This roof assembly (above) has an “over-roof”— the 2×4 furring supports nailbase sheathing for the roof cladding and creates soffit-to-ridge venting on top of the unvented roof assembly below.
photo: Peter Yost
4. Unvented roof assembly. The photo above shows a SIPs roof on the kitchen addition of the author’s home. The insulated roof panels have no venting, and the standing-seam-metal roof will be attached directly to the panels.
1. Vented attic. The most moisture-forgiving attic-roof assembly is a vented attic. Properly built, a vented attic requires continuous air and thermal control layers at the top-floor ceiling with soffit-to-ridge or gable-to-gable venting.
In terms of driving forces, you gain a big advantage with soffit-to-ridge vents, or high-low venting (supported by stack effect).
2. Cavity-vented insulated pitched roof. If you can’t give up the attic space to moisture management, then the least expensive way to vent and protect the roof sheathing is to vent within the roof framing space, but that takes up valuable real estate within the cavity that could otherwise be filled with insulation.
This configuration requires continuous air and thermal control layers at the roof line with soffit-to-ridge venting within the roof framing cavities.
3. Top-vented insulated pitched roof. If you can’t give up either the attic space or the framing cavity spaces to venting, then you can add venting on top of your roof sheathing, but that comes at a significant added cost.
This configuration requires continuous air and thermal control layers at the roof line with soffit-to-ridge venting topside of the roof structural sheathing.
4. Unvented insulated roof. If you make your roof geometrically complex enough that you can’t achieve soffit-to-ridge venting—or you make your roof a low enough pitch that there is no driving force from soffit-to-ridge—you will be forced to give up on venting and go unvented, as your last resort. An unvented insulated roof still must have continuous air and thermal control layers at the roof line with no venting (for any roof pitch or slope).
Note: Our industry, particularly in cold regions, likes to call unvented roofs “hot” and vented roofs “cold.” The logic is that vented roofs move cold, dry air up the vent chutes, while unvented roofs get hot without the vented air. Obviously, the terminology belies climate, weather, time of day, and the direction the roof slope faces. (Just venting here …)
Why Continuous Control Layers?
In every description of the typical roof options I listed above, I used the terms “continuous” and “control layers.” The goal is to create an unbroken line of defense against water penetration, thermal losses, air leaks, and vapor transmission—with an emphasis on unbroken, or “continuous.”
The essential “control layers” include (prioritized in this order):
1. A continuous bulk-water control layer. The roof cladding or underlayment must be properly weather-lapped and connected to flashings at all penetrations.
2. A continuous air control layer. An air-impermeable insulation or sheet good must be properly sealed or connected to all air-sealing at penetrations and connections to the exterior-wall air control layer.
3. A continuous thermal control layer. Continuous insulation eliminates or significantly reduces thermal bridging. (Thermal bridges in roof assemblies include structural through-members, such as rafters that extend from the inside ceiling plane to the exterior sheathing plane. But they also include timber-frame rafters that extend from inside the building to outside for eaves overhangs.)
4. Dedicated, directional drying potential (vapor profile). All layers of the roof assembly are selected based on vapor permeance such that drying in one or both directions is possible, encouraged, and achieved.
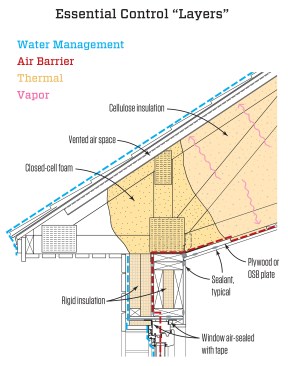
Control “layers.” Each colored line in the illustration above shows the continuous water, air, and thermal control layers, while the wavy arrows indicate directional drying of the vapor profile. This architectural detail is based on a design by Steven Baczek. In this design, the drywall serves as the air barrier for most of the ceiling. At the edges, it transitions to plates that are installed in plane with ceiling strapping. These plates provide a surface for wide peel-and-stick flashing that laps over the wall top plates and adheres to Zip System sheathing—the air barrier for the walls. For more on this air-sealing technique, see the article by Steve Baczek and Jake Bruton, “Air Sealing That Works,” Apr/18. (Illustration: Tim Healey / Steven Baczek)
Problems actually arise when we do not honor the prioritization of these layers.
A bulk-water leak spells major trouble no matter how airtight the roof assembly, how well it is designed to dry, or how continuous the insulation is.
Condensation caused by air leakage in a roof assembly cannot be overcome by drying by diffusion or—in many cases—even by roof ventilation. And elimination of thermal bridges must include thermal bypasses involving leaking air. Essentially, you can’t vent your way out of an air-leakage problem, especially for north-facing roofs that see so much less solar energy than the other three cardinal directions (for examples of this, see photos below).
Drying potential is more important to design in than a thermal control layer because a thermal bridge not involving air leakage may not involve condensation or, if it does, it can be managed or corrected from the interior. An assembly that lacks drying potential cannot be “redesigned;” the assembly is more likely to stay wet if it gets wet.
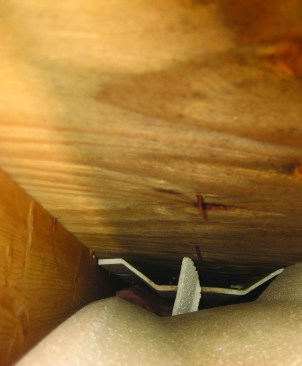
photo: Rick Roberts
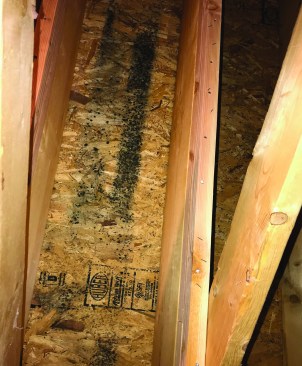
photo: Peter Yost
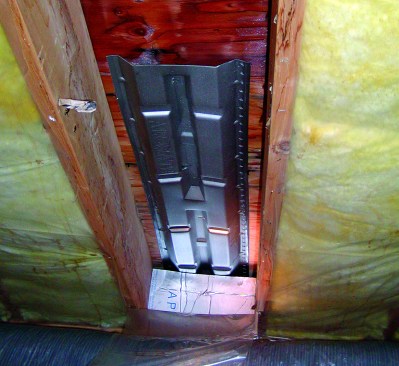
photo: Peter Yost
Poor air control. Each of the three photos above show vent channels that are supposed to be directing cold, dry, outside air from the soffit to the ridge, but because there is no continuous air control layer in the ceiling plane, the vents are directing leaking warm, moist air up against the cold underside of the roof sheathing.
How Many Ways Can the Roof Dry Once It Gets Wet?
1. Weather-lapped drainage is how we move bulk water—our biggest threat—off the roof. Drainage relief is immediate and complete; it’s the best! Once water soaks an assembly, we can’t drain it to dry it, at least not as a performance strategy (although we might drain a flooded building cavity as an emergency measure).
2. Convective drying is what happens when dry (or drier) air moves past wet materials in a building assembly. Roof assemblies with air flowing from soffit to ridge are often said to be ventilated (not just vented) because there is actual air flow (rather than just diffusive air movement). Active air movement by convection is many times more powerful as a drying force than diffusion. Convective drying by ventilation is powerful and fast, but its speed and effectiveness is based on how much energy is driving the airflow.
3. Diffusive drying. If an assembly gets wet, our last line of defense is to rely upon diffusive drying. If building materials get wet, they can slowly dry by giving up their moisture content as vapor. Here we have two pathways:
- Vapor moving through materials that allow drying to the exterior, where the world at large takes away that moisture without notice
- Vapor moving through materials that allow drying to the interior, where space-conditioning systems work as the primary way to manage the moisture.
Building scientists call designing and selecting materials for drying “doing a vapor profile” (see “Conducting a Vapor Profile,” below). Diffusive drying is slow and may not be fast enough to keep a moisture problem from becoming a mold, mildew, or even a rot problem. Moving from a moisture problem to a mold problem is often determined by how wet an assembly gets and how long it stays wet.
Bottom line. Focus on the continuity of your bulk-water and air control layers so you don’t have to rely on your last resort: directional drying by diffusion.
What About Low-Slope or Compact Flat Roofs?
There really is no such thing as passive ventilation in low-slope or compact flat roofs, since there is no soffit-to-ridge configuration to drive any pressure difference that would support airflow. William Rose, in his book, Water in Buildings (Chapter 7 “Attics,” page 189, Wiley, 2005), is unequivocal on this front:
“Tobiasson (1986) showed that low-slope roof system[s] should not be constructed as vented cavity assemblies, as the difficulties in actually getting flow through a horizontal cavity by natural means are considerable.”
Is Power Venting Effective or Needed?
Powered attic ventilators often create more moisture problems than they solve, particularly with air-permeable roof cavity insulation or with the lack of a continuous air control layer at the top-floor ceiling or roof framing assembly.
Does The Type of Roof Cladding Matter?
You bet. Some roof claddings are made and installed in such a way that there is little to no air or vapor movement that encourages drying. Roof membranes certainly don’t allow any air movement through them and many have very low vapor permeance (Class 1 retarder). You would think that the lapped installation of asphalt roofing shingles would permit at least some drying by way of either air or vapor movement, but they don’t. Asphalt roofing shingles constitute a Class 1 vapor retarder. Standing-seam-metal roofs are made of Class 1 vapor-retarding metal, and when they’re installed in direct contact with the roof assembly below, there is little to no air or vapor movement.
Roof claddings that are made or installed to allow air and vapor movement include barrel tiles, slate, corrugated metal roofing, and wood shakes and shingles. While there is no dedicated soffit-to-ridge channel in these materials and installations, there can be enough air moving through the installation and enough vapor permeance in the materials themselves to provide varying levels of drying potential to the exterior.
Conducting a Vapor Profile
A vapor profile is a qualitative method to determine what sort of drying potential a building assembly has, based on the vapor permeance of each layer of the assembly. There are four steps:
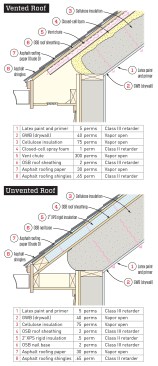
illustrations: Tim Healey / Steve Baczek
What's your answer? Based on your read of the vapor profile for each roof section shown above, how well would they dry? In which direction would the vapor flow? In Part 2 of this article, we will return to the two vapor profiles shown in these two illustrations and examine how well each roof would dry in a given direction.
1. Determine the vapor permeance of each component or layer of the assembly. You can determine vapor permeance by using Building Science Corporation’s Building Materials Property Table or by obtaining the information from individual product manufacturers and standardized test results for ASTM E96.
2. Assign a class to each layer, based on this information”
a. > 10 perms – vapor open: little to no restriction to drying
b. 1 – 10 perms – Class III retarder: very limited restriction to drying
c. 0.1 – 1.0 perms – Class II retarder: substantial resistance to drying but still some drying potential
d. < 0.1 perms – Class I retarder: little to no drying
3. Assess the extent and direction of prevailing vapor drive. This means taking into account the vapor drive associated with the climate, and moisture levels associated with the type of building and number of occupants. A home for a retired couple living in Hawaii in a 5,000-square-foot masonry-based home experiences very little vapor drive or pressure while a 1,200-square-foot multifamily, wood-framed dwelling unit with six occupants in Ottawa, Canada, experiences extreme vapor drive or pressure.
4. Identify the least vapor-permeable component(s) and determine if that component or those components restrict drying of moisture-sensitive components. Concern should or will be high if the restricting component is a Class I retarder and still of some concern if the restricting component is Class II.
There are a lot of variables that heighten or reduce the need for drying potential of assemblies. The goal is to determine the directional drying potential based on a vapor profile. However, having limited drying potential does not translate to assembly failure should the assembly get wet. A lot depends on how much moisture the assembly sees, how much sun it sees, and how bombproof your water and air control layers are.
More To Come
So far, we have laid the groundwork for understanding the basic building science that governs how roofs get wet. It’s becoming clear from this Q&A that roofs aren’t just walls turned sideways. The venting options, configurations, materials and even the forces at work differ markedly from walls, making roofs more complex assemblies to keep dry. It gets even more interesting when we start considering all the different ways you can insulate the assembly, something we will tackle in Part 2. Also in the next part, we will dive into the code requirements that address the issues we have laid out here, and look at some emerging practices that can further help you avoid problems.


