I’m a general contractor in Williston, Vt.; my company does a mix of new construction and remodeling. Last fall I received a call from a prospective customer looking for a contractor to replace the siding on his house. He seemed concerned that the work be done as soon as possible, despite the fact that winter was fast approaching.
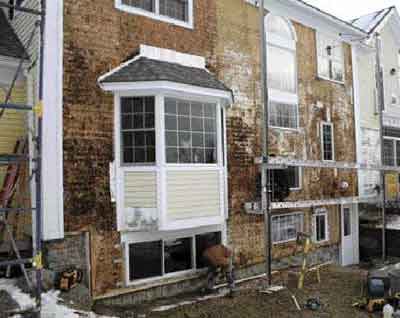
The reason for his anxiety became clear when I visited the site. The exterior of the house — which was located in a subdivision where prices start at around $600,000 — was a disaster. Behind the clapboards, the housewrap was stained and degraded, and the surface of the OSB below was black with mold and thoroughly rotted in places.
These problems, the owner told me, had come to light a few weeks before when, intending to make a small repair, he removed a section of rotted corner board. Noticing some damage to the OSB skin of the home’s SIPs, he started poking around with a screwdriver. When the screwdriver reached all the way into the home’s interior, he pulled off more trim and an area of clapboards. He was horrified at what he found, and hired a consulting engineering company to come take a look. The engineer determined that the home’s entire south-facing faade was severely water-damaged and in need of immediate repair.
Although he hadn’t inspected the rest of the house, the owner decided to replace all the siding. Given that the home was only 10 years old, it was a safe bet that the same shoddy workmanship that led to failure on its south face would be found everywhere.
Proceeding With Caution
Fixing the house would be a huge job, and it would be complicated by Vermont’s looming winter and the site’s 1,800-foot elevation, which was exposed to strong prevailing winds. But I was most concerned about the mold. I’d read about the seven-figure judgments brought against contractors in mold lawsuits, and — like any other builder — I was worried about the potential health risk to my crew.
With some prospective clients, I might have just steered clear of the job. But in this case, I decided that the owner was simply interested in repairing his home, and he seemed to understand the precautions I would need to take and the costs involved.
We agreed that I would hire an architect to design a repair detail and an environmental company to clean up the mold. The contract also stipulated that while I would do my best to keep the estimate within the budget, I couldn’t make any guarantees, because most of the home was still covered with siding and I’d seen only part of the damage.
What Went Wrong?
It appeared that a number of factors had led to the siding failure.
Incorrect flashing. To begin with, step flashings and window head flashings had been installed incorrectly — they were on top of the housewrap instead of tucked underneath. Also, at door and window openings, the housewrap had been cut out in a big X, with little effort made to seal the corners — a typical method when the house was built.
No back-priming. In addition, the 6-inch cedar bevel siding wasn’t back-primed. It’s possible that, at the time of construction, back-priming wasn’t specified in housewrap installation instructions. Later, after researchers had shown that the tannins in cedar could break down housewrap’s water resistance, manufacturers began to require that wood siding be back-primed (see “Can Moisture Beat Housewrap?,” Notebook, 6/97).
Solar vapor drive. Another factor in the failure was the home’s southern exposure. Although we repaired and re-sided the entire home, we found that damage to the OSB sheathing was limited largely to the southern side. This, according to architect Doug Viehmann, who designed the repair details for the job, was the result of solar vapor drive. Liquid water and water vapor always move from a warmer to a cooler surface, so when the sun heats the siding, it causes moisture to move upward in the capillary spaces — where the siding overlaps — toward the cooler sheathing. Because the tannins in the cedar allowed the water to move through the housewrap, the sheathing became soaked and began to rot.
The Prescribed Fix
Viehmann specified 30-pound asphalt felt for the weather-resistive barrier. Felt is an ideal choice: Not only does it absorb water and slowly release it when drying conditions are present, but it actually becomes more vapor-permeable as it gets wet. This means that water and water vapor are less likely to get trapped behind the felt.
On top of the felt, Viehmann specified vertical 1×3 strapping 16 inches on-center, and on top of the strapping, back-primed A-grade cedar claps. To deal with the extra 3/4-inch build-out, he suggested a simple backband around the existing trim — a clean detail that allowed us to leave the windows in place and keep most of the trim intact.
<="" div="" height="221" width="152px">
Repairs
In retrospect, despite daytime high temperatures in the teens and one of the largest snowfalls on record, winter was not a bad time to tackle this project. Overall, conditions were dry and windy, which helped the shell air out. We started in mid-November, stripping off all the siding on the south side and measuring moisture levels in numerous locations with a Delmhorst J-2000 moisture meter.
We then called in an environmental contractor to clean the mold from the OSB. A crew of three workers — all wearing HEPA respirators, rubber gloves, and disposable coveralls — scrubbed the mold with a biocide and sanded down the swollen sections of OSB. This service cost about $3,000 for about 1,000 square feet of wall area.
While waiting for the walls to dry, we replaced any rotted trim and primed the clapboards in the garage. After about a week, the wettest sections of wall were down to about 10 percent moisture content, so we started the re-siding.
Patching the panels. Some sections of the OSB looked more like compost than lumber. It’s fortunate that the home was built with a structural timber frame and wasn’t relying on the SIPs panels as the primary structural component; otherwise, we might have had bigger problems with gravity loads in areas where the OSB had rotted away. The panels also have to provide important lateral strength to the frame, given the home’s wind exposure, but the engineer concluded that even with the damaged areas there was still plenty of lateral capacity.
Using utility knives and chisels, we removed the damaged material and made patches from new OSB, gluing them in place with polyurethane spray foam. We also filled in any gaps around windows.
Next, we patched most of the trim on the home’s lower portion and replaced the water table entirely. The original drip cap was finger-jointed wood, which in my experience never holds up. We ripped it out and replaced it with one made from clear stock, then covered the new cap with an aluminum cap.
Installing the Rain Screen
Following the architect’s design, we applied a 2-inch-wide 3/4-inch backband around all the existing window and door trim and along the edges of the frieze and corner boards. Then, after applying the strapping, we installed the preprimed clapboards. We used a 100 percent acrylic latex primer, and made sure to field-prime all cuts before installation.
Lessons Learned
This project has made me question the use of plastic housewrap. I’ll probably use felt in the future when the choice is mine — even though it’s harder to work with. I’ve always preferred plywood to OSB, anyway; it holds up better when wet, so I’ll also encourage future clients to use plywood sheathing, despite its higher cost.
Not counting the architect’s fee, the repair cost my client a little more than $80,000. What amazed me most on this job was that from outward appearances you could hardly tell there was anything wrong with the house. It leaves me wondering how many other homes out there have similar problems, but the owners have no idea.
Mike Goldfield owns Goldfield Construction in Williston, Vt.
Keeping Winter at BayNorthern New England — Stowe, Vt., especially — can be brutal in January and February. Given a choice, most carpenters around the area work inside and save the outside stuff for the warmer months. On the other hand, Vermont’s cold winter air is ideal for drying water-soaked walls. To keep working conditions bearable when daytime highs stayed in the teens, my crew erected a reinforced poly enclosure similar to those used for winter masonry work. Using a plate lashed to the top of pipe staging and a temporary ledger screwed to the home’s frieze board, they installed 2×6 rafters to support the poly roof. Framing lumber secured to the pipe staging with tie-wire provided a means to attach the poly walls with staples and cap nails. A 100,000-Btu propane heater kept the temperature inside at a balmy 40°F. Even though it was moved three times during construction, the enclosure held up surprisingly well. The only problem occurred during the Valentine’s Day blizzard, when almost 3 feet of snow fell in 48 hours and collapsed the roof in one section. We stayed home that day. |


