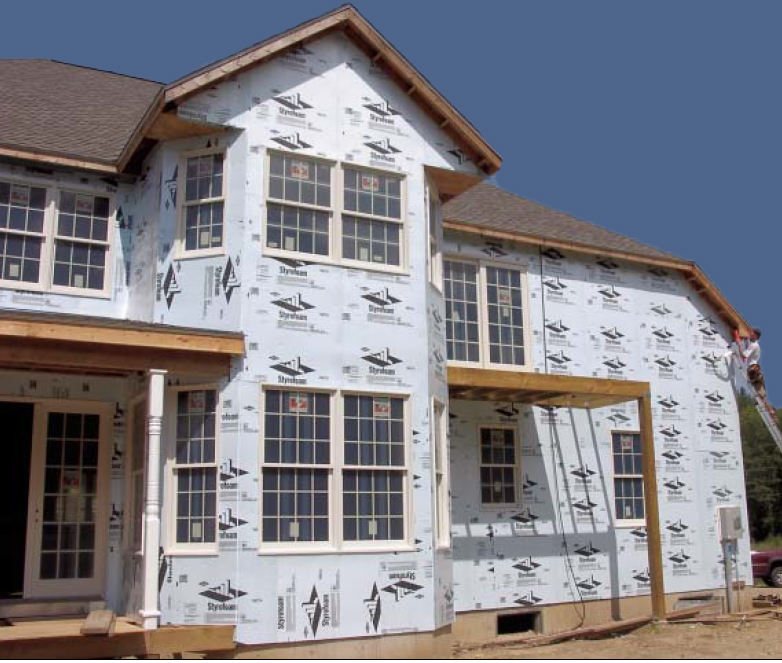
Because of its versatility and convenience, rigid foam sheathing has become more and more common throughout the U.S. Contributing anywhere from R-3 to R-7 per inch, sheet foam is a handy way to boost the wall’s total R-value without adding too much thickness. But foam sheathing does more than simply improve the thermal performance of a building: Located just inboard of the wall cladding, sheet foam can also function well as an augmented drainage plane to help keep wind-blown water out of walls, and it can act as both an air barrier and as a vapor barrier to defend against the intrusion of air and water vapor. These properties make it a good choice in most coastal climates — but only if you get the details right. A foam-sheathed wall system has to be designed and detailed with all functions in mind, taking into account the site’s climate and weather exposure.
Insulating Value
The various foam products on the market have different R-values:
Expanded polystyrene (EPS), an open-cell “thermoplastic” foam that melts at high temperatures, is made by expanding polystyrene beads with steam inside a mold. Its R-value varies from about R-3.2 to R-4.4 per inch, depending on the density of the plastic and the size of the cracks between the expanded beads (a typical value would be R-3.9).
Extruded polystyrene (XPS) is made with the same thermoplastic material, but the molten foam is squeezed through an extruder to harden into sheets. With closed cells and with no gaps or cracks, an inch of XPS reaches an R-value of R-4.6 to R-5 (1-inch-thick R-5 sheets are a common product).
Polyisocyanurate (PIR) is a “thermoset” plastic that cures by chemical reaction and won’t melt (although at very high temperatures it will char and burn). Typical polyiso sheets with foil facings stabilize at R-6.5 per inch.
When you’re designing a wall for thermal performance, foam sheathing gives you lots of flexibility. Homes in the Houston, Texas, market, for instance, are often built with 3/8-inch XPS sheathing over an R-11 or R-13 fiberglass-insulated stud wall, for an R-13 to R-15 assembly. But a superinsulated solar house in coastal Maine might use 2×6 framing with R-19 or R-21 cavity insulation and 2-inch R-13 sheets of foil-faced PIR, for a wall system rated at R-32 or R-34. Between these extremes lie a whole range of choices, with more than one way to meet or exceed energy-code R-value minimums.
Exterior foam serves many functions, providing thermal insulation, enhanced drainage, and protection from air infiltration and water vapor. It’s not structural, however, and should be applied over OSB- or plywood-sheathed framing.
Vapor Permeability
In addition to being a good insulator, foam sheathing resists vapor diffusion. Permeability varies — EPS is the most vapor-permeable and foil-faced PIR the least — but any foam you apply over the wall studs or wall sheathing amounts to an exterior vapor retarder.
Vapor retarders can be problematic. They work well when kept on the warm side of the wall, so that any vapor they stop will stay warm and won’t condense into liquid water. But predicting which side of the wall is the warm side can be tricky when the climate changes. Water vapor wants to move from warm, high-humidity areas to cool, low-humidity areas, so the direction of the vapor drive can reverse when the temperature and humidity change.
Foam, which acts as a vapor retarder, can work on the exterior in any climate, says building scientist Joe Lstiburek, as long as the foam’s R-value is matched to outdoor conditions — and as long as the wall’s interior face is vapor-permeable, so it can dry to the inside.
Match R-value to climate. In the Deep South, explains Lstiburek, an exterior vapor barrier works even if it’s not also an insulator. When you’re air conditioning (so the inside is cold and dry and the outside is hot and humid), the vapor barrier on the outside makes a lot of sense. As you move north, conditions change: Homes interiors are heated, and the outdoor design temperatures grow progressively colder. “At some point, the back side of the exterior foam [facing the interior] is going to accumulate or condense water in the wintertime,” observes Lstiburek. “So we want to increase the thermal resistance of that layer, in order to prevent condensation.” The foam must be thick enough to insulate the back side, keeping it above the dew point. “The farther north you go, the colder the outdoor temperature, the greater the R-value required, and the thicker the foam has to be. It’s simple,” says Lstiburek.
Dryable to the inside. Just as important, a wall should not have two vapor barriers, because that could trap moisture inside the wall (Figure 1). So if insulating sheathing is used, no poly vapor barrier should be attached to interior wall faces. But in very cold climates, says Lstiburek, Kraft-paper-faced batts are recommended. These facings are semipermeable, so they will slow vapor intrusion into the wall while still allowing moisture to escape into the heated space.
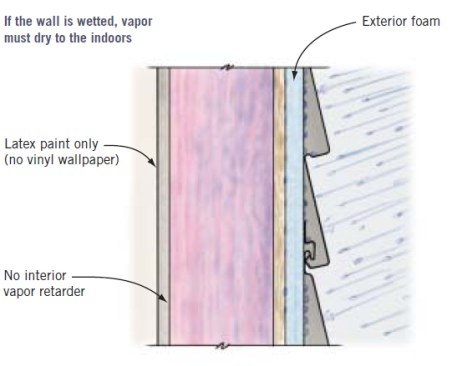
It’s inevitable that walls will get wet at some point — either during construction, from wind-driven rain, from a leak or a flood, or from elevated humidity levels. For this reason, all walls must be able to dry. With foam on the exterior, the only place to dry is to the inside, so it’s critical that no poly vapor retarder or vinyl wallpaper be installed on the interior and that the wall be painted with a breathable latex paint.
Foam Thickness
How thick should the foam be? That depends on the climate. In the most general terms, an inch or less of XPS will probably work anyplace south of Long Island. From Rhode Island through Maine, you might need to use an inch of PIR (R-6.5) or 11/2 inches of XPS (R-7.5) on a 2×6 wall. Of course, the thicker the foam, the more energy efficient the wall and the safer it is against condensation.
Lstiburek’s organization, Building Science Corporation (BSC), has spent years running detailed computer simulations to predict moisture conditions within walls and experimenting with different wall assemblies to verify the calculations. Eventually, the group settled on a simple way to specify exterior foam thickness: “You take the average temperature of the three coldest months of the year in your location,” says Lstiburek. “Take the average temperature for December, the average temperature for January, and the average temperature for February — and you average those, and use that average as your design temperature for outside. You set your interior design condition as 70°F and 35% relative humidity. Then you do a simple calculation to make sure that the condensing surface doesn’t drop below the dew point. As long as you don’t see 100% relative humidity at the interface between the foam and the cavity insulation, you won’t have condensation on the back side of the sheathing.”
Calculating Foam Thickness
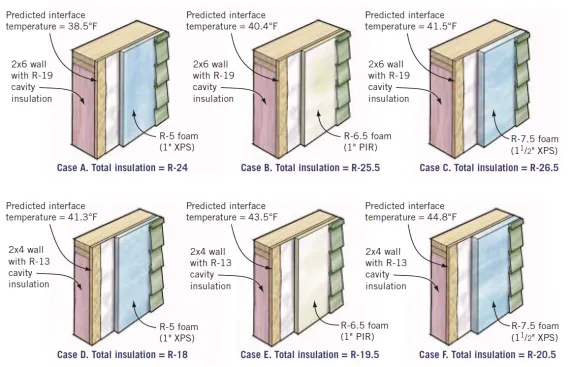
The illustrations below show the predicted temperatures within walls with insulated vapor-barrier sheathing in Boston, Mass. These predictions are based on a simple calculation described by Joseph Lstiburek:
Interface temp. = Indoor temp. – [(Indoor temp. – Outdoor temp.) X (Cavity R / Total R)]
The goal here is to find an interface temperature (the temperature at the inside face of the foam) that is above the dew point for the indoor conditions. If it falls below the dew point, there is a higher risk that water vapor will condense inside the wall and lead to moisture problems. In that case, increasing the thickness of the foam will better insulate the framed wall and maintain the interface temperature at a higher level.
For this calculation, the indoor conditions are assumed to be 70°F and 35% relative humidity — reasonable values if the rest of the house system is functioning well.
At this temperature and humidity, the dew point is 40°F, so the idea is to choose a foam sheathing R-value that will result in a calculated interface temperature above 40°F.
The outdoor design temperature is found by averaging the temperatures for the three coldest months for the year. For this example, in Boston: 33°F (Dec.), 28°F (Jan.), and 30°F (Feb.), for an average of 30.3°F. (Note: These represent monthly average temperatures, not monthly lows or average lows.)
After running the numbers, Case A is found to surpass the energy code, but risks condensation because the vapor-barrier temperature is below the dew point for the design indoor conditions. Case D does not risk condensation, but falls below the R-19 energy code minimum for wall insulation. All other cases satisfy moisture concerns as well as energy codes.
Lstiburek admits that his simple assumptions are not perfectly realistic. “When someone says, ‘Yeah, but that’s not really what’s going on,’ well, that’s true. But it’s a very good approximation — it gets us 98% accuracy with one easy calculation.” And he’s backed it up with lots of experimental work and lots of very detailed measurements and calculations. Anyone who’s not comfortable with it, he says, can always run a more detailed simulation for the particular structure — or simply increase the foam thickness for good measure.
Fastening foam. The thickness of the foam, of course, affects the fastening of the siding and trim. Foam by itself won’t anchor a fastener, so nails and screws have to be long enough to go through the foam into solid wood. According to Lstiburek, the practical limit for normal fastening through foam is between 1 and 11/2 inches. “For foam thicker than an inch and a half, I go to 1×4 strapping screwed through the foam into the framing or sheathing behind it,” he says. “We’ve done 8-inch to 10-inch layers of foam that way. The barn at my house [near Boston, Mass.] has 8 inches of foam on the outside, battened on using 12-inch screws.”
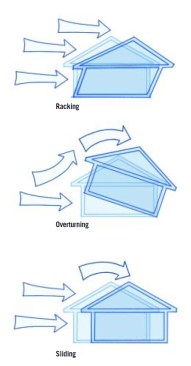
To resist the wind, as well as the possibility of a tidal surge, coastal homes must be stiff enough to resist racking, and they must also be anchored against sliding and overturning. The stiffness comes from plywood or OSB sheathing; foam isn’t enough.
Structural Performance
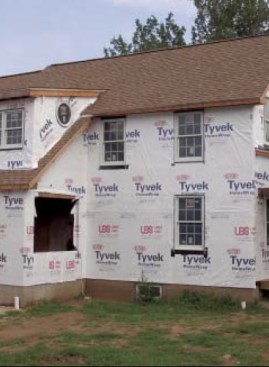
In some parts of the country, you can get away with rigid foam as the main sheathing, with OSB or plywood used only for bracing at wall corners, plus an occasional sheet at mid-wall. But that method won’t wash in high-speed wind zones by the ocean (Figure 2). In general, houses near the shore will need full structural panel sheathing under the insulating foam.
Racking resistance. “The main function of the wood structural panel sheathing,” explains Joe Lstiburek, “is to provide racking resistance. It also helps support the housewrap. So I don’t think you’re going to be able to build in [coastal] conditions without sheathing your entire building with plywood or OSB.”
In coastal states, homes in sheltered locations far from the water may be able to substitute foam sheathing for wood-panel sheathing. However, they’ll still need wall bracing — either a code-recognized method, or an engineered design (see “Wall Bracing and the IRC,” July/August 2006). The easiest way to do this is with fully sheathed walls. In many cases, this may require the addition of engineered shear walls as well.
Stabilizing the shell. Foam can also have a positive effect on the structural performance of the wall. By placing an insulating, air-blocking, and vapor-blocking skin between the house’s framing and sheathing and the exterior weather, foam sheathing lets the builder bring the home’s wood structure into a relatively protected zone that is closer to the conditioned indoor environment. Notes Lstiburek: “Wall frames move because of moisture-change differentials between the inside faces of the studs and the outside face of the studs. That moisture-content difference increases if the temperature difference is greater. When you put insulating sheathing outside, the wall frame sees more constant and uniform conditions, and you actually reduce drywall cracking and building-frame movement.”
Drainage Plan
e
s Just as important in any wet climate, foam serves as a building’s drainage plane for rainwater management. A “Guide to Insulating Sheathing” posted among the technical resources on the buildingscience.com Web site offers several ways to detail the foam skin under siding. But for the severe weather of coastal conditions, Lstiburek calls for a more robust system.
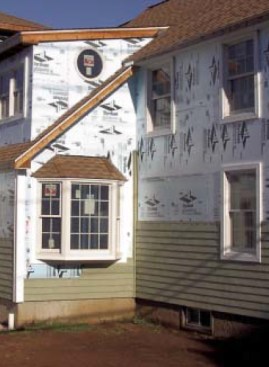
Fully sheathe the building, he says, and then apply a layer of drainable housewrap (Figure 3). “Attach the windows and doors directly to the sheathing, and flash everything just as if you weren’t applying the foam.” After that, the foam gets installed over the housewrap and flashings (Figure 4). Most rainwater will be deflected by the cladding or by the foam sheathing beneath it, says Lstiburek, but any water that penetrates further will be shed by the flashings and housewrap; and any minor, incidental leaks should be able to dry into the conditioned space.
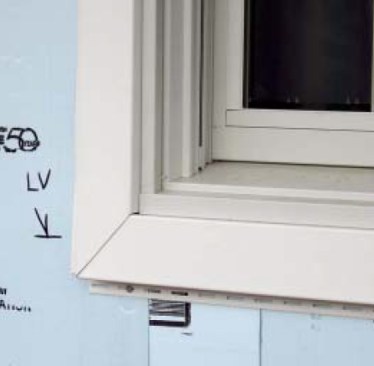
While foam is water resistant and provides a good barrier against the bulk of the weather, wind-driven rain can find its way around panels and through joints, so Caulkins relies on a housewrap and careful window flashing installed over a fully sheathed structure before installing the foam.
Contractor Craig Caulkins of Caulkins Building & Design in Niantic, Conn., routinely applies 1/2-inch or 1-inch Dow Styrofoam to home exteriors under vinyl siding.
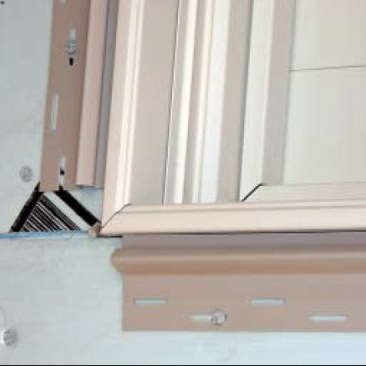
In combination with Andersen flanged vinyl windows, says Caulkins, no special furring or attaching method is required: Window flanges extend far enough from the wall to cover all foam edges. Crews flash the window openings with self-adhering membrane, fasten the window directly to OSB-sheathed wall, and then apply a two-piece window surround from CertainTeed.
The base piece of the window surround is nailed through the foam into the window rough frame (left), and the matching top piece snaps into place over it.
Robust performance. The field experience of others supports Lstiburek’s recommendations. Dennis McCoy of Ram Builders, Inc. (www.rambuilders.com), a specialist in the repair of failed stucco-clad walls, says he’s observed that foam sheathing can improve the weather performance of wall systems and protect against moisture damage. McCoy’s company has torn apart and repaired or rebuilt thousands of moisture-damaged stucco walls in the hot, humid, coastal climate of Houston, Texas. “Walls with foam sheathing, in our experience, show less moisture damage, especially when the interior plastic vapor barrier is omitted from the walls,” notes McCoy. Even if there is only one layer of building paper on the wall (good stucco practice requires two layers), walls with foam sheathing generally do better than walls without, he reports.
Ideally, McCoy would like to see stucco-clad wall frames protected by two layers of building paper and flashing, then a layer of foam, before the lath and stucco are applied. “We call the building paper a secondary weather barrier,” he says. “The stucco cladding is the primary weather barrier. But if you include the foam, now you actually have a third weather barrier to help handle rainwater.”
In cases he has investigated, McCoy reports, the foam indeed seems to protect against both exterior rain and interior moisture. “The walls don’t get condensation on the back side of the OSB sheathing,” he says. “And where there are leaks, they seem to be able to dry to the inside as long as there’s no plastic vapor barrier in the way. I can’t explain the science, but it works. It’s a hard sell to customers, especially after all the trouble that has happened with EIFS [exterior insulated finish systems]. But if someone’s willing to pay for it, I’d like to put exterior foam insulation on every wall we fix.”


