
Wainscoting projects were always something that my partner and I looked forward to. In a relatively short amount of time, we could transform uninspired rooms, hallways, and stairwells into eye-catching spaces. The basics I was taught include molding (or chair rail) set horizontally at one-third of the wall height up from the floor and equally spaced panels or a sheet good such as a beadboard on the wall below the molding. While this is a common look, variations in materials, heights, and paint choices all fit under the general term of wainscoting and allow a great deal of design creativity.
Layout
I’ll start by going over some basic approaches to installing wainscoting that apply to most applications, using a typical dining room as an example, then expand on the topic from there.
As with most carpentry, the first and most important step is layout. I make a pencil mark on one wall, usually between 32 and 36 inches from the floor, depending on ceiling height. This is a common layout but not the only option; shorter wainscoting will enhance the feeling of height in a room, while a taller setting will create the impression of a lower ceiling.
Then I set up a laser level to check whether my mark is a consistent distance from the floor all around the room. Here, I am looking for variations in level in the floor. If the distance varies by more than an inch, I raise or lower the line so that the panel sizes are not too squat at one end or too tall at another; sometimes, I choose a happy middle. With decorative trim in general, I find that if it looks right, then it probably is.
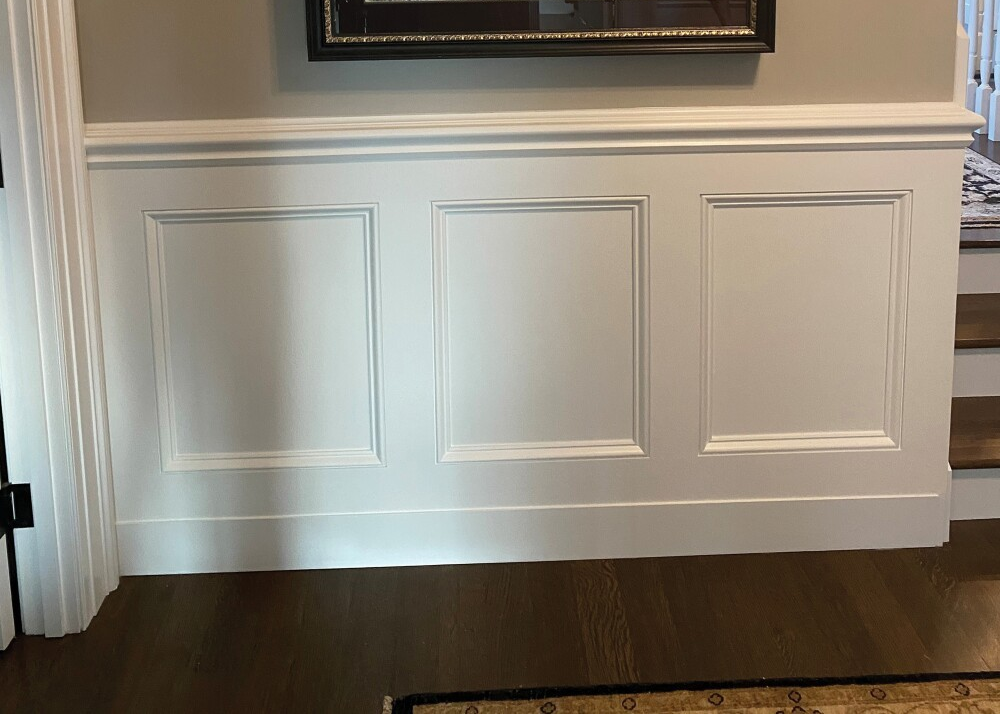
On a raised-panel style of wainscoting, rails form boxes, and profiled trim tops hardboard panels.
Using the level line from the laser, I mark the walls in a few places so that when I put up the chair rail, it is straight across the whole room. This is important because that line will be about eye level for anyone sitting in the room and any wave will stand out. At this time, I also mark where the studs are along the wall.
Next, I measure up the walls to lay out the panels, or boxes, starting with the longest wall. For the applied molding shown in the illustration below, I measure the total length of the wall and then subtract 6 inches to allow for a 3-inch space (can be blank wall or a rail) out from the corners; I’ll also allow 3 inches up from the baseboard and down from the chair rail.
A few factors help me decide on the number of boxes for any given space. I don’t want the boxes to be too narrow, as that gets busy visually and makes it difficult to avoid outlets. Large boxes can work, but the look will differ from what most people picture as wainscoting.
Let’s say the wall is 126 inches long, and I subtract 6 inches for spacing from each corner. With 120 inches left, four or five boxes will divide the space well. Before I start putting more lines on the walls, I usually draw the layout on paper so I don’t miss anything. If I go with four boxes, I need to account for the three spaces between them:
120 inches – (3 x 3 inches) = 111 inches.
To find the width of each box, I divide 111 by 4, which equals 27¾ inches. The center of the space between the two middle boxes will be in the center of the wall. If I go with five boxes, each box will be 215/8 inches wide and the middle box will be centered on the wall.

The illustration shows a simple wall layout for applied molding. This same layout could be used with raised panels with added layers of trim elements.
Now it comes down to a design choice. Taking quick measurements of the other walls, I see which box size would roughly work on them. The boxes don’t have to all be the same size across the room, and probably won’t be, but similar is better.
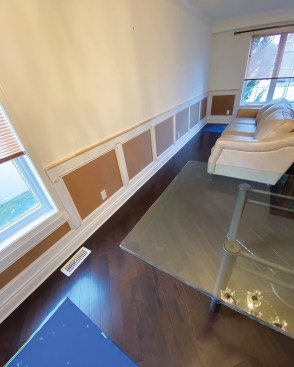
Another consideration is outlets and other service boxes; ideally, these should be inside a panel or in the middle of a stile. For applied molding projects, I refrain from “celebrating the switch” and don’t wrap the molding around the outlet. The better option is to stop and start the molding on each side of the outlet or adjust the layout so that the outlet lands completely in a box (as in the photo, below) or completely between boxes.
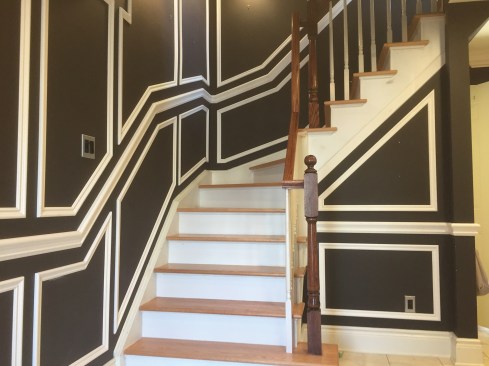
Applied molding can look complicated, especially with a high-contrast palette, but most of the layout here was created using a 3-inch block along the chair rail, baseboard, and ceiling. Then we filled in the vertical lines at the desired spacing.
With my layout chosen, I draw the final layout lines on the wall while my partner batch-cuts the moldings. As the boxes are the same size for each section, stops can be set on the miter saw to speed up production. I found that having one person cut and the other person lay out and install was efficient and maintained consistency.
Installation
Installation for the project shown above begins with the chair rail and, in the projects pictured below, it starts with the top rail; in all cases, apply a bead of adhesive on the back of the rail, hold it on the level lines, and nail at the stud markings. For adhesive, ordinary latex caulking is sufficient and cost effective. Whether you use caulking or a heavy-duty construction adhesive, the bond is going to be able to pull the paper off the drywall. I’d rather not spend more on unnecessary strength while inviting a more challenging cleanup of any squeeze-out. With the boxes or panels, you won’t hit studs for much of the installation, so the adhesive is important.
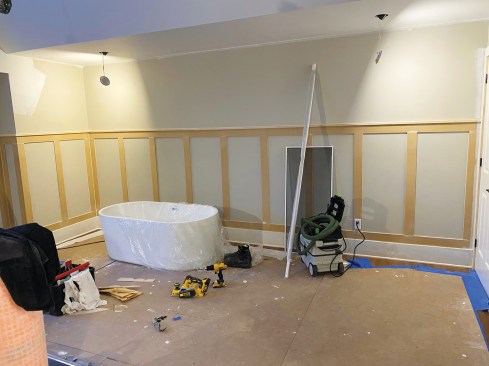
A taller but simpler design divides the wall space with applied stiles and rails.
In this example, the material applied to the wall for the stiles and rails has a profiled edge on both sides.
For nails, more and longer is not better. This is trim, not structural framing; use enough nails to hold it in place while the caulking sets. A 23-gauge nailer often works well for the panels, especially for thin moldings.
I keep a 3-inch-wide block of wood in my pouch to use as a spacer between panels and down from the chair rail as I nail, while also checking for plumb with a level. Consistent spacing is more important between the panels and the chair rail than between the panels and baseboard. A variation in the floor rising or falling by 1/2 inch isn’t noticeable between the panels and baseboard, but the lines between the panels and the chair rail need to be spot on.
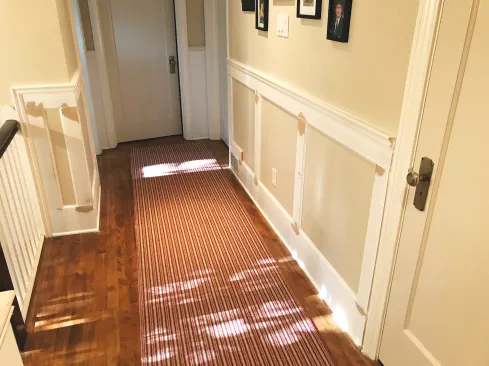
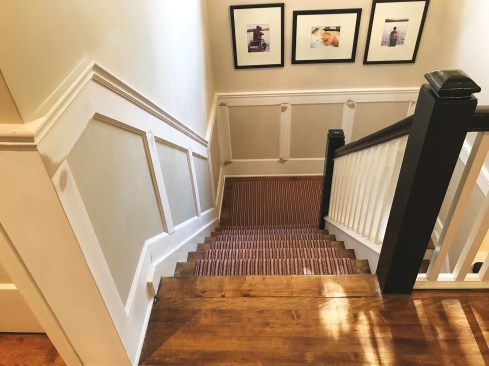
Stairways
A room or a hallway is a straightforward project, while stairways involve a bit more planning. Curved walls, elevation changes, and the like add to complexity but also have a much larger impact visually. The layout basics remain the same, with setting the chair rail to start and then working out the panel spacing and sizes, but some of the methods are different.
This type of material provides the look of a raised panel but is faster than installing a secondary molding inside each of the “panel” spaces.
For chair rail height, I use a story pole with the desired height marked on it to transfer marks to the wall. That height may be different from the other horizontal runs to allow for handrail mounts to land centered on a stile or rail or within a panel. Holding the stick plumb with a level, I make a series of marks that represent the top edge of the chair rail. Each mark consists of a vertical plumb line and a line at the desired height.
Another method is to put masking tape on a level and mark that at the length you want to set your marks. In either case, the vertical height is measured from the top of the exposed stringer or, if that is not present, off the nosing of the stair treads. The marks are then connected with a straightedge or, if the wall is curved, used as reference points that the molding needs to touch as you install the chair rail.
Determining box size uses the same method of measuring length and dividing as discussed earlier. Taking measurements can be tricky on curved walls and usually needs two people to keep the tape on the walls. With stairs, we took extra time to draw out the boxes. Often, we used masking tape to represent what the finished product would look like and to confirm the layout with the homeowner or designer. As an added benefit, it helped us double-check our calculations.
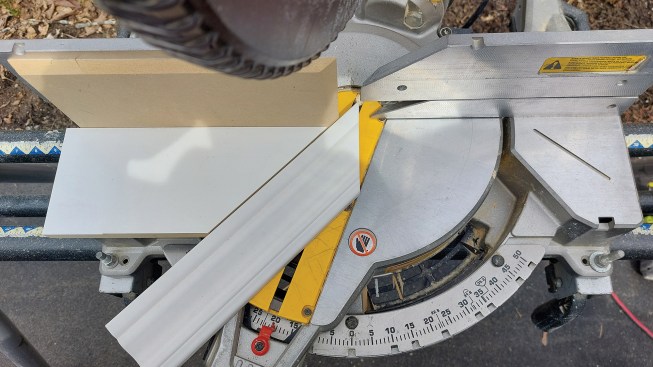
Many of the angles will be greater than what most miter saws can cut normally. In photos below, I’m using a jig mounted to the saw to create these sharper angles. The jig is at 45 degrees, but by holding the molding to it and adjusting the miter angle on the saw, I can cut angles greater than 45. Let’s say the miter needed is 65 degrees. Subtracting 45 (the set angle of the jig) from 65, we get 20. Set the saw to a 20-degree miter while holding the molding tight to the jig, and you are left with a 65-degree cut. There are commercially available versions of this setup, but I just use my own.
A site-built jig to cut angles above 45 degrees is affixed to the saw fence.
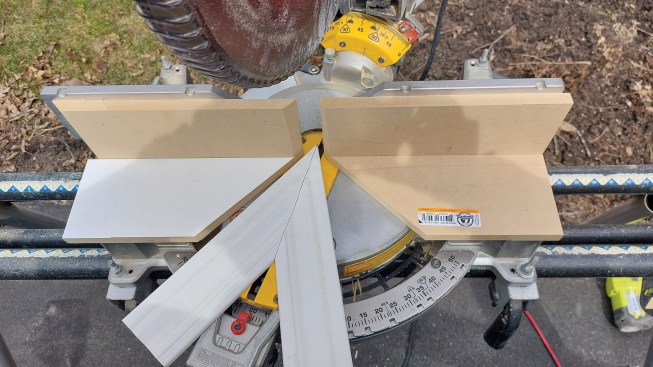
Cutting a 45 on the end of the board first makes getting sharper miters easier.
For installation of moldings on stairways, as with any room, careful nailing to framing where possible and the use of adhesive are important. Issues with stairs include handrails and light switches. While running lines for the chair rail or panels, be prepared to adjust heights or sizes to avoid running into those features.
As you can see in the photos, not all of these projects are “traditional” wainscoting. There is a wide range of layout styles and molding choices. At the core of any decorative molding project, time and attention to the small details make a difference. Allow yourself the time to properly lay out the design. All miters should be glued, joints patched and sanded, and nailing limited to only what is necessary. The carpenter should always have an eye toward ensuring the best base for the painter to work from. With those steps done correctly and consistently, you will be left with satisfied customers who will be happy to show off their transformed space to your future clients.


