It’s often said that trends start on the West Coast and gradually work their way eastward. One example is the conversion of garages into places where homeowners can enjoy automotive and DIY hobbies; by adding cabinets, slat wall, and durable floor finishes, contractors can transform ordinary garages into enticing recreational spaces.
After years of watching this specialty grow, I decided the time was right to bring it to northern Vermont. My company, Garage Outfitters, specializes in garage conversions and is a Slide-Lok dealer (800/835-1759, www.slide-lok.com). Slide-Lok distributes the cabinets, slat wall, and organization accessories I install and the concrete-slab floor coatings I apply. It’s not a franchise, but the arrangement provides me with referrals and a protected territory. In addition to floor coatings and cabinets, I can install appliances, lighting, automotive lifts — virtually anything the client wants.
The following project is typical of the work we do. The client had recently bought a brand-new Corvette and he wanted a good-looking, well-organized place to keep it. He also uses his garage for storing lawn and garden tools, sporting goods, and anything else that doesn’t fit inside his suburban split-level.
Floor Coating
As is typical, the first part of this project consisted of preparing the floor for the Flexmar polyaspartic coating (724/339-1442, www.flexmarcoatings.com). This two-part paint — which is often confused with epoxy — offers some significant advantages over epoxy coatings. For one, it dries much quicker, so it can be installed and put into service faster. In warm weather, we can usually walk on the first coat within an hour or two, and we typically complete the entire three-coat process in one day. The client can drive on the floor 24 hours after we finish.
Polyaspartics also have a wider working temperature range than epoxies; they can be installed in temperatures from 140°F down to -30°F, while many epoxies need temperatures of 55°F or higher. Polyaspartics also perform better than epoxies in ASTM tests for color retention, adhesion, wear resistance, and flexibility. The manufacturer suggests a calcium chloride test before application and won’t guarantee installations with vapor transmission rates exceeding 3 pounds per 1,000 square feet (see “Testing for Moisture in Concrete Slabs,” 6/07).
The coating carries a lifetime guarantee against fading and yellowing and a 15-year warranty for peeling, flaking, and excessive wear. It comes in three main colors, with numerous custom options available. I keep the various components in inventory; you won’t find these products at your local paint store.
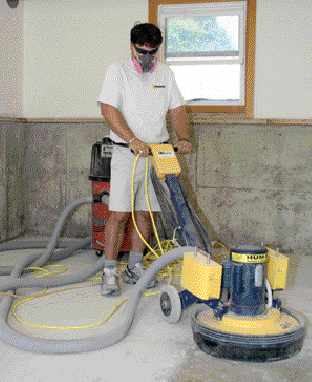
Preparing the Slab
We start out by grinding the floor with 50-grit diamond pads in a dust-collecting upright grinder. For edging, we use a smaller grinder mounted on a three-wheeled cart; it too has a dust-collection system. The slab should be free of adhesive and solvent residues. We learned this the hard way on one of our first commercial jobs, a showroom with glue-down carpet. The adhesive residue clogged the diamond pads and made for slow going and long workdays.
Once the slab is ground and any remaining dust vacuumed, we patch cracks and pockmarks on the surface with a two-part patching compound combined with sharp-edged silica sand. Since the liquid patch hardens within a minute or two, we make small batches to minimize waste. We pour it over the sand, let it cure, and then grind it with a diamond cup wheel in a dust-collecting grinder.
Color Prime Coat
Before mixing the colored prime coat, we make sure we have all the materials and equipment on hand, because once the two parts are combined we have only a half-hour or so of working time. We cut in around the edges with a 3-inch chip brush and use a 3/8-inch nap roller in the field. An 18-inch-wide roller covers a lot of ground with each pass.
The polyaspartic coating is extremely thin, like water, so it really seals and penetrates the surface — unlike more viscous epoxies, which tend to stay on the surface. We roll the floor in one direction — usually front to back — and then roll on another coat in a side-to-side direction. Our goal is even coverage with 3 mils of wet thickness and no lap marks.
When the floor is all covered, we speed the drying process with a pair of squirrel-cage blowers.
Clear Chip Coat
With the blowers running, we prepare for the next step — the clear chip bed coat. The chip coat is what gives the floor its distinctive appearance.
We begin by applying a clear coat of the polyaspartic paint to the floor, working much as we did with the first color coat, but with spiked overshoes so we don’t track up the finish. When about half the floor is covered with the clear coating at 2 mils thickness, we start spreading handfuls of vinyl chips.
It’s important to work fast; if the coating dries, the chips won’t stick and we’ll have to redo this step. The job requires a two- or three-person crew. With two people, one cuts in and rolls and the other spreads the chips; with three, one person cuts in, another rolls, and the third spreads the chips.
Once the floor is completely coated and the chips are applied in an even layer, we start the blowers again and head to lunch. If we start a job by about 8 or 9 a.m., we can usually go to lunch by 12:30 or 1 p.m. — but we won’t leave before this step is completed.
Top Coat
After we get back to the job, I use an electric leaf-blower to gather the excess chips into a corner, so we can pick them up for reuse. Then we scrape off any remaining loose chips with floor scrapers (the kind used for removing vinyl flooring).
The final step is to apply two clear finish coats. (Since clear polyaspartic coatings won’t yellow with time, they are ideal not only for this application, but also for protecting stained and dyed concrete in both interior and exterior settings.)
As with the color coat, we mix two parts in a one-to-one ratio. We pour some of the mixture onto the floor and spread it with the roller and the chip brush. We roll the two coats in opposite directions to ensure uniform coverage; the final thickness should be 6 mils. Then we clean up and head for home.
Slat Wall and Cabinets
The next day we start installing the slat wall, which is a lot like putting up lap siding: You start at the bottom and work toward the top, making sure to land any seams on studs. Every garage is different, but we add framing and blocking as needed to provide flat, solid backing. We fasten the 8-foot plastic panels with 2-inch screws driven into the framing at every slot. H- and C-shaped moldings hide cut edges and provide a finished appearance.
Slide-Lok cabinets come in four colors and have a lifetime warranty. All are constructed with sturdy dovetail joints and plywood carcasses. Although they’re shipped knocked down, they are easy to assemble, requiring little more than a bottle of wood glue and a hammer to drive the nails that secure the back.
Once the cabinets are installed, we usually add a post-form countertop for a workbench and install a variety of organization accessories on the walls. The homeowners can contact us for additional accessories once they figure out what suits their needs.
The project shown here cost the customer about $6,000 and took about 40 man-hours over three days to complete. Now the owner has a great place to entertain friends and neighbors who share his interest in cars, and he no longer has to search for his tools and detailing supplies.
Jake Loeffler owns Garage Outfitters in Jericho, Vt.


