Radiant heat under ceramic and stone tiles has been in use for thousands of years. Architectural remains in Europe and the U.K. show how this was done: Roman builders constructed below-grade fire pits and extensive flue systems that carried heat to floors and bathing facilities. Even when compared with other ancient Roman excesses, these systems were models of inefficiency and gross consumption. Imagine a labor force of hundreds stripping forests, sawing and stacking cordwood, and stoking the fires just to keep one senator’s tush from getting chilled!
Today, radiant tile warming systems, when properly specified and installed, consume a relatively small amount of energy in exchange for the comfort they can provide. The electrical-resistance mat shown in this article, the SunTouch from Watts Radiant (888/432-8932; www.suntouch.net), has been tested to ASTM standard C627 by the Tile Council of America for use with ceramic tile. The mats come in a variety of sizes that can be combined to cover different room shapes and sizes, and are accompanied by clear electrical and tiling instructions. This article will not touch on the electrical part of the installation other than to point out how the main power supply cable is routed across the floor. Of particular interest to tile installers is a device available through the manufacturer that constantly monitors the integrity of the cable, sounding an alarm if either the cable or the resistance wire is damaged during the installation.
Bathroom Makeover
The project shown here is located in a hall bathroom that was covered with tiles from the ’70s; the chilly floor was kept covered with carpet — a practice that is neither practical nor sanitary. The remodel began with stripping the bowed wall coverings and removing the floor tiles and old underlayment. The tub walls would be finished with 3×6 glazed porcelain ceramic tiles, the bathroom walls with wainscot planking, and the floor with 1 3/8-inch unpolished marble mosaic tiles mesh-mounted into roughly 12-inch-square sheets.
Before & AfterFigure 1.The original bathroom was dark and carpeted. The new space is lighter and airier — and warm on the feet. |
Had tiles 10 inches or larger been specified for the floor, I would have installed the tiles directly over the electrical resistance matting with a medium-bed latex-modified thinset mortar, and saved the time and expense of encapsulating the matting with a self-leveling compound (SLC). At 10 inches or greater, a single tile can bridge over three or more resistance wires, which helps to keep all the tiles on a smooth, even plane. Smaller tiles, especially those that may only be able to bridge one wire at best, tend to tip to one side or the other, creating an uneven surface finish So on this job, I installed an SLC over the resistance matting and allowed it to harden before setting the tile. Another advantage of using the SLC is that it protects the wires from impact that could cause a break or other problem.
Because the bathroom would not be heavily used, I decided not to install any type of waterproofing membrane. On the other hand, because of the cycling of the radiant heating system, I still needed a perimeter movement joint, which would be concealed beneath the bottom of the wainscot behind the baseboard. At the tub and threshold, I would leave a 1/8-inch joint and fill it with a resilient caulk color-matched to the grout.
Floor Prep
After removing all the old nails and vacuuming the 11/8-inch-thick plywood subfloor, I began the installation by applying a primer — a companion product to the SLC used on this job — with a long-necked roller. This SLC, Level Quik RS (Custom Building Products, 800/272-8786; www.custombuildingproducts.com) has a high compressive strength — about 2,500 psi — but its bond strength is very low unless the primer is used. The primer soaks in quickly, so the work can continue as long as I don’t get any dust or dirt on the plywood.
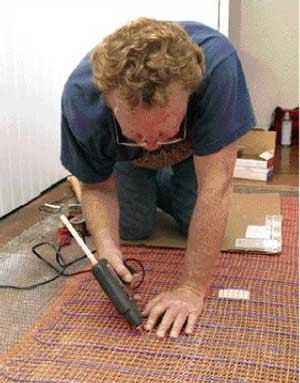
Floor PrepFigure 2.Before installing the heat mat, the author rolls a primer on the clean subfloor to ensure good adhesion of the self-leveling compound. After nailing down diamond mesh, he rolls out the radiant mat. |
I prefer to use an SLC that requires the addition of a reinforcing mesh, which adds considerable tensile strength to the installation and helps prevent tile cracking. The only downside of the mesh is that is sharp enough to damage the resistance matting if I’m not careful. Actually, this matting is quite strong and should hold up to the usual job-site abuses. Still, it’s a good idea to use the alarm device to make sure the wires are intact.


