All kitchens are out of level, with irregularities that need to be adjusted for during a cabinet installation. However, once a floor is off more than maybe 3/4 inch, the decisions get more interesting. Here are some methods we’ve used to achieve good results when working with the less-than-level floors common in our remodeling work. See JLC, “Dealing With Out-of-Level Kitchen Ceilings”, for information on working in kitchens with sloped ceilings (10/18).
Standard method. The easiest and most common method for installing base cabinets is to find the high spot in the kitchen and shim all the cabinets to that. We usually treat each run of cabinets separately, rather than trying to level up cabinets that aren’t connected; there’s less adjustment that way, and a slight difference across a kitchen isn’t normally noticeable.
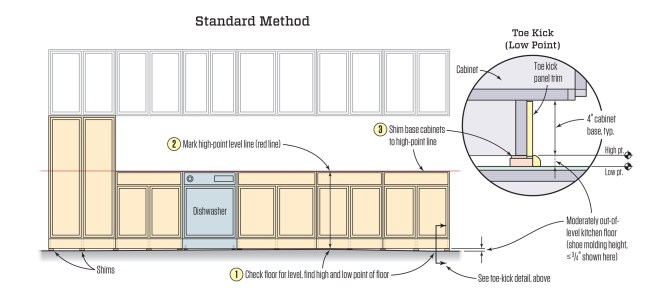
When kitchen floors are reasonably level, shimming cabinets up to match the high point is simple and quick. Under-counter appliances and full-height cabinets normally fit just fine.
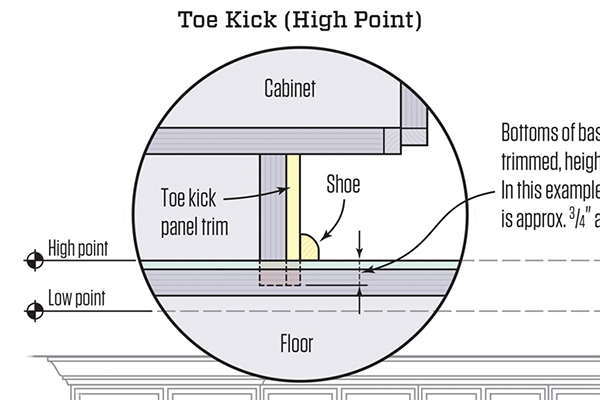
Cabinets usually have vertical toe-kick trim that can be scribed to an uneven floor to cover any gaps. Shoe molding can also be used to cover a small gap. Either method is easy and quick and leaves enough vertical room for standard under-cabinet appliances.
Shoe molding used to cover a small gap.
Cut some cabinets. Sometimes, shimming all the cabinets would create an unacceptable gap somewhere. For example, the low point could be so much lower that the gap is too high for shoe molding to hide. Cabinet sides usually don’t have separate toe-kick trim, so making them look good can be hard if a gap is big. And lately, many cabinets have “furniture base” decorative elements that run to the floor and do not gracefully lend themselves to trimming out the bottom. For example, decorative legs with round profiles in the 2- to-5-inch-diameter range wouldn’t look right with a curved shoe molding, to say nothing of time to execute such a solution. Similarly, some decorative toe kicks have angled shapes that don’t look good if trim is installed around them. In these cases, we often trim the bottoms off the cabinets at the highest point in the run, so the decorative parts can land on the floor. Sometimes, we even cut off the bottom of the furniture legs on part of the run; though not ideal, it looks better than adding shoe molding. If the high point is at the back of the cabinets (as it often is), we may not need to modify the fronts much at all.
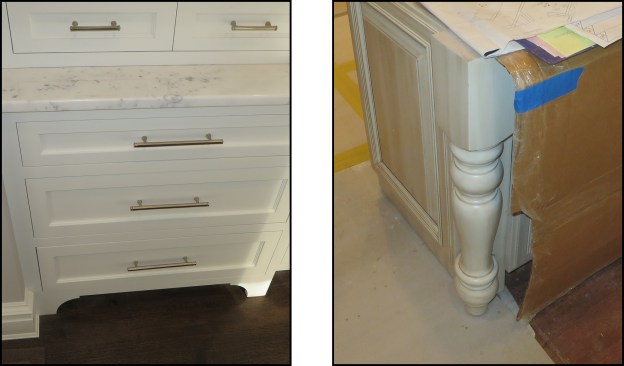
Many cabinets have “furniture base” decorative elements that run to the floor and do not gracefully lend themselves to trimming out the bottom (left). Decorative legs can be hard to adjust for floor heights (right). Adding shoe molding to a round post like this would be time-consuming.
Be careful with appliance spaces, though. Standard under-counter spaces are 34 1/2 inches tall, and when we cut cabinets, the available space gets smaller. Different appliance models can require different heights. The first kitchen I ever installed had a dishwasher that required 34 3/8 inches of vertical space, and when I installed the cabinets at 34 1/8 inches, it was a heartbreaker.
Another complication involves cabinetry that runs from floor to ceiling. Some trims, such as smaller crown or modern “reglet” reveals, don’t allow much vertical adjustment at the top. Cabinets can be trimmed or shimmed only so much below before we create a new issue above.
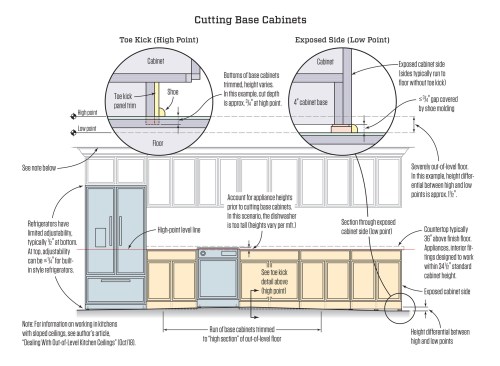
If the amount the floor is out of level is more than the height of shoe molding (typically about 3/4 inch), we usually trim the bottoms off some cabinets at the high point of the floor. It’s important to verify the appliances will fit. Cutting more than 1/2 inch can lead to trouble when appliances are changed out later, even if the model being replaced fit fine.
Install cabinets out of level. Let me say two things: First, this is something we do only when we have no other options. It’s more work, it introduces all kinds of complications to the install, and it’s easy to make mistakes. You forget how much you rely on level and plumb until you attempt to work without them.
Second, apologies if it just feels wrong to you. Yes, deliberately installing things out of level should be questioned, and alternatives should be found when possible. As remodelers of structures both recent and very old, however, we often find ourselves stuck with a building that is quite out of level and, for various reasons, can’t be brought to level. An example is a kitchen with a floor we’re not modifying at one end and an exterior door at the other end, in a historical building whose exterior isn’t permitted for modifications. We likely can’t add more than maybe 3/4 inch to either end of this hypothetical kitchen without changing the door (not allowed) or introducing a major step up or down at the existing floor (not desired by the clients). That’s before considering the expense of extensive leveling, which varies with materials and techniques but may not be worth it to the people writing the checks.
The first time I presented on this topic at JLC Live New England, I warily paused to check in with the carpenters in the room. That day, they were mostly from New England (where there are a lot of old, very out-of-level buildings) and all had used “out of level” installation techniques. So, depending on your common building stock, you may be used to the concept. If not, carry on installing level until you are stuck, and then fall back on this technique.
How to install out of level. We’ve found two basic approaches. The first is to tilt all the boxes out of level as you go along. The second is to install each box plumb but drop each one a little bit so the top corners are in a straight line that slopes up or down as needed.
I tend to prefer the first method. I strike a line on the wall at the angle needed, and run the backs of the cabinets to it, then level each side separately and watch the door reveals to be sure the cabinet face is square. As mentioned, it’s easy to make mistakes. The front of a cabinet can easily be 1/32 inch or even 1/16 inch different from the back, and we can’t easily check with our normal levels because the cabinet is supposed to be tilted so the level won’t read right anyway.
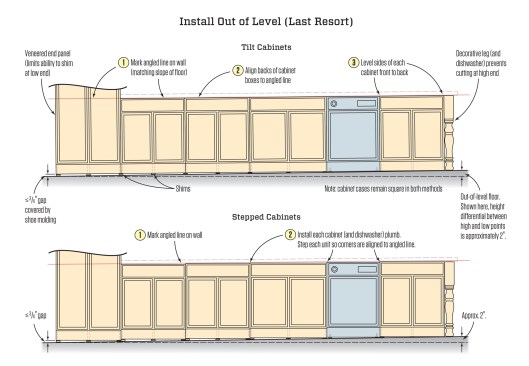
When forced to go out of level, we use one of two methods: One is to tilt all the boxes out of level as we go along; the second is to install each box plumb but step the units so the top corners are in a straight line that slopes up or down as needed.
I am lucky to work with Abidan Munoz, a fantastic carpenter who showed me the second method. He strikes his out-of-level line on the wall but installs each box plumb and square with the high corner touching the line. Adjacent cabinets don’t line up perfectly, but this can be finessed with a bead of caulk under the countertop, or with a belt sander. Either way, you can get out of a lot of trouble with this technique. I’ve seen Abidan use it on a 14-foot run that was about 1-5/8 inches out of level, with floor-to-ceiling cabinets at each end, furniture bases, and a crown that was difficult to adapt to height differences. He made up half the difference in the crown, and the rest in the boxes.
Photo by Doug Horgan; illustrations by Tim Healey


