I was a building contractor for many years, but now I work as a stair builder for Cooper Stairworks in Somerset, Mass. After many years of installing stairs in the field, I’m now one of the leaders of the production team in the shop. I was part of the team of stairbuilders on the project described in the article, ” Installing Manufactured Stairs” (9/00). A couple of weeks later, after the drywall was in, I went back to the site to install the railing system. This article describes that process. Like many other stair builders, we will send people to your site to install the stairs and railings if you need that. However, the packages we send out are complete enough that any carpenter can do the on-site work. In fact, even some skilled homeowners have installed their own packages. We do most of the measuring and fitting in the shop, so the site installation usually takes a day or less, depending on the complexity of the stair system.
Pre-Cut Pieces Simplify Things
Many of the pieces in the railing package are premeasured, pre-cut, and prenotched in the shop, based on the field measurements taken by our site rep. We cut each railing package at the same time as we build the stairs, using the actual stairs to guide us (see Figure 1).
Figure 1. The stair shop prefits each railing system to the actual stairs as the stairs are built, so that no complicated layout is needed on site. Here, a shop carpenter test-fits a post to a stair set (left), then checks the plumb cut on a railing (right). |
The posts are cut to the appropriate height, and notched at the bottom to fit snugly in place.Likewise, the treads on the stair itself are prenotched at the appropriate location to accept the posts. This means it’s hard to install the posts anywhere but exactly at the right spot. As long as you’ve positioned the stairs correctly and are careful to fasten the posts perfectly plumb, everything else should drop nicely into place.
Step by Step
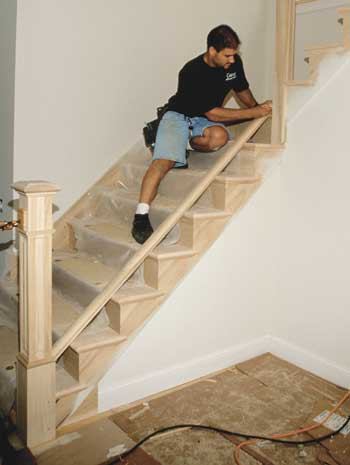
The job shown here was a straightforward post-to-post design. We had to run posts and rails all the way up the steps, which are open on one side, and also around the landing at the top, which is open to below. As always, I took the installation in phases: first the posts, then the landing treads and fascia under them, then the rails and balusters, then the baseboard at the mid-landing, and finally the necessary cove and cap moldings. In order to be efficient, I complete each phase before moving on: When I’m setting posts, I set all the posts. When I start to install rails, I do all the rails, and so on. That way I’m not running back and forth between different tools and setups. Posts. The first task is to set the posts. As I mentioned, the posts come prenotched and pre-cut to height, with the caps and any other trimwork already applied. But we drill the posts in the field because different builders use different methods of attachment (Figure 2).
Figure 2. Posts and stair treads are prenotched at the shop to ensure the proper post location and height, but the posts are drilled on site. |


