Kitchen Design
Most kitchen layouts start from the concept of a “work triangle” between the sink, refrigerator, and cooking surface (Figure A). For an efficient work triangle, follow these guidelines:
- No leg of the triangle should be less than 4 ft. or greater than 9 ft.
- The total distance between all three points should fall between 12 and 26 ft.
- Traffic patterns and cabinets should not obstruct any leg of the triangle. No leg should intersect an obstacle by more than 12 in.
- Never separate two primary work centers (such as the main sink and cooktop) with a refrigerator, a full-height, full-depth cabinet, a wall oven, or a pantry cabinet.
Daylighting. More than just about any other room in the house, the kitchen benefits from good daylighting. As a rule of thumb, the combined area of windows and skylights should equal at least 10% of the area of the kitchen (or of the living space that includes the kitchen).
Traffic. One key to successful kitchen design is making sure a kitchen layout handles traffic well. Avoid plans in which people have to pass through the main kitchen work area to get from one part of the house to another.
Entrances and walkways. Make entrances to the kitchen at least 28 in. wide (for a very tight kitchen). A better target is 32 in. wide (Figure B). Make walkways at least 36 in. wide (42 in. is a better target), and allow at least 36 in. of clearance for cabinet access (the distance from the cabinet front to a wall or obstacle).
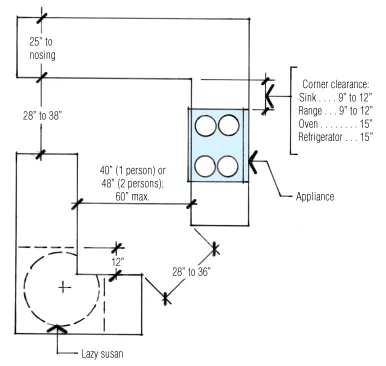
The minimum clearances shown here will work if floor space is very limited. But a good target in a one-person kitchen is 32-in.-wide work aisles (measured from counter edge to counter edge) and 36-in.-wide passageways.
To maintain enough clearance between cabinets for people to work and pass each other, draw all doors and drawers in the open position in the design phase. The HUD Minimum Property Standards (1980) stipulates a minimum clearance between cabinets of 40 in. for one person (42 in. is a more generous target) and 48 in. for two (a more generous allow-ance is 60 in.). Anything over 60 in. just means extra walking between one counter and the next, reducing efficiency.
Fixtures. For design rules relating to appliance and cabinet clearances, see Cabinet Design Requirements, below.
Basic Layouts
The layouts shown in Figure C make good starting points for a kitchen design.
In-line arrangements are the most cost- and space-efficient. Better suited to apartments than homes, an in-line arrangement is definitely a one-person kitchen. If enclosed by a back wall, as shown in Figure C, use the wall for a pegboard or for narrow shelving (depending on space) to compensate for the lack of cabinet storage.
Galley plans, also compact, add a second work center on an opposite wall. Besides adding more work space, this plan allows two people to work simultaneously if the space is wide enough. The open end presents no problem if it leads to a pantry or laundry room, but it invites conflicting traffic if it’s an entrance door.
L-shaped plans offer the most flexibility. They have plenty of easily accessible work surfaces and can be combined with an adjacent island, dining table, or dining area (off either end of the L) for auxiliary preparation space.
U-shaped plans make good use of limited space and have the added benefit of blocking through-traffic. The tradeoff is some loss in flexibility. You can’t, for example, stick a dining table in the middle without blocking the work triangle.
Two-Cook Layouts
In two-cook kitchens, each cook should have a separate triangle. The two triangles can share a leg but should not overlap. Usually, at least the refrigerator is shared by both cooks (Figure D).
When designing a two-cook kitchen, the goal is to avoid traffic jams. In addition to creating traffic paths that don’t intersect, walkways may be widened. To have enough room to just edge by, allow 48 to 54 in.; 58 to 60 in. allows more comfortable walking space.
Island Layouts
For an island to be really useful, it must serve some function. It’s a good place for the kitchen sink or the cooktop. Islands don’t necessarily work in every kitchen. One should never impede the flow of traffic or require a user to walk around it to go between any two points in the kitchen (Figure E).

A kitchen island goes from stepping-stone to stumbling block if it breaks the “work triangle” convention. Locate the island so that it doesn’t interfere with a direct path between the sink, stove, and refrigerator.
Island dimensions. An island used simply as a preparation center should be at least 36 in. long. If a sink or cooktop will be installed, a good working dimension for the island starts at a nominal 36×84 in. This provides room for a 36-in. sink base, one 24-in.-wide dishwasher, and one 24-in. base cabinet under the counter, and also allows the necessary working counter space on each side of the appliance or fixture.
While an island set at a standard 36-in. countertop height will work for most kitchen users, varying countertop heights adds versatility and visual appeal (Figure F). A multiple-level island works well when incorporated with an eating counter (for more on eating counters, see Kitchen Dining Areas, below). However, if your clients do a lot of cooking or baking, one continuous counter may be more useful. There is no “one size fits all” solution.
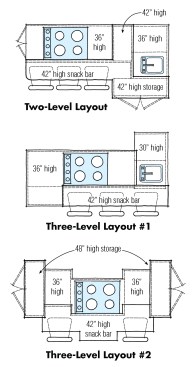
Lower 30-in.-high counters and cooktops assist shorter users, while a high counter can serve as a snack bar or tall storage and also screens the kitchen mess from outside view.
Toe kicks. When designing an island, toe-kick placement should be carefully considered. The rule of thumb is that a toe kick should be included at the base of any cabinet that one might stand in front of to prepare food, but it would not be necessary below a snack-bar counter, for example.
Sink venting. An island is an ideal location for a second sink. Consider placing a vegetable or bar sink at the end of the island, perpendicular to its length, so that the sink and faucets can be used comfortably from either side. If a sink is included, make sure to plan for proper sink venting. See Island Vents for more information on island venting.
Duplex receptacles. Electrical codes require a duplex outlet at each end of any island (see Receptacles for placement requirements).
Accessible Kitchens
Minor adjustments to a standard kitchen can eliminate many accessibility barriers. Better lighting can aid people with poor eyesight. However, wheelchair accessibility requires changes in both horizontal and vertical dimensions: Start with an open space on the floor that’s 60 in. minimum in diameter to allow a wheelchair to turn (Figure G).
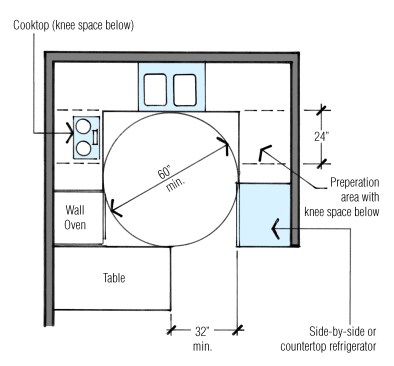
Wheelchair accessibility requires an open floor space of 60 in. minimum in diameter to allow a wheelchair to turn.
Counters should be 32 to 34 in. high instead of the usual 36 in. (Figure H). Because wheelchair users can’t reach work surfaces without wheeling under them, a kitchen needs open spaces at least 24 in. wide and 24 in. deep under at least three work centers — the cooking surface, sink, and preparation area.
The most flexible design is a counter that is continuously open below, closed only to accommodate the refrigerator and possibly a bank of drawers.
Base cabinets designed for accessibility typically have much larger toe kicks — 8 to 9 in. high and up to 6 in. deep. This raises the floor of the cabinet within easy reach and allows clearance for a wheelchair footrest (Figure I).
Cabinets and storage. Because people in wheelchairs can’t easily reach shelves higher than 48 to 54 in. or lower than 9 in., storage is tricky. Consider shallow shelves on the backside of cabinet doors, which are easy to get at when open. Shallow adjustable shelving and pegboards between the counter and wall cabinet will provide additional utility. Keep in mind that people in wheelchairs may not always be able reach to the back of a wide counter (Figure J).
Tall pantry cabinets provide storage within the optimal reach range of 15 to 48 in. above the floor, as well as accessible storage for users of varied height.
Doorways. Widen entrances and walkways in the kitchen. Interior doors should be at least 34 in. wide.
Refrigerators. Side-by-side refrigerators allow equal access to the refrigerator and freezer for users of varied height — better access than units with the freezer above. Small refrigerators mounted on top of a counter with knee space below are even better, though they limit storage capacity and would not be appropriate for a whole family.
Sinks. A recess below the sink improves knee clearance. Insulate hot water piping below the sink to prevent burns to the user’s legs. This leaves only 6 to 8 in. of vertical space, or depth, to accommodate sinks and cooktops (Figure K).
Consider a pull-down faucet, which has a single lever handle for easy operation with a closed fist.
Ovens, cooktops, and microwaves. A separate oven and cooktop allow flexibility for multiple cooks. Front controls on the cooktop eliminate the need to reach over the burners. Burner controls should be large and easy to grab for someone with limited dexterity.
Conventional ovens, however (even wall-mounted ones), are awkward for wheelchair users. Microwave ovens are safer and more convenient.
Kitchen Dining Areas
A sit-down table makes for relaxed dining but requires adequate space (Figure L).
Eating counters. If the kitchen has an eating counter, allow counter space at least 24 in. wide by 12 in. deep for each seated diner. Provide at least 12 in. of knee space under an eating counter that’s 42 in. high, 15 in. under a counter that’s 36 in. high, and 18 in. under a 30-in.-high counter (Figure M).
If a counter or table runs near a wall, provide at least 24 in. of free space to allow adequate room for seating. Increase the clearance to 36 in. if people will need to pass behind the diners.
Cabinet Design Requirements
Storage needs vary with family size and shopping and cooking patterns. People who shop once a week need more space than those who shop more frequently. Suggested cabinet storage requirements are summarized in Figure N.
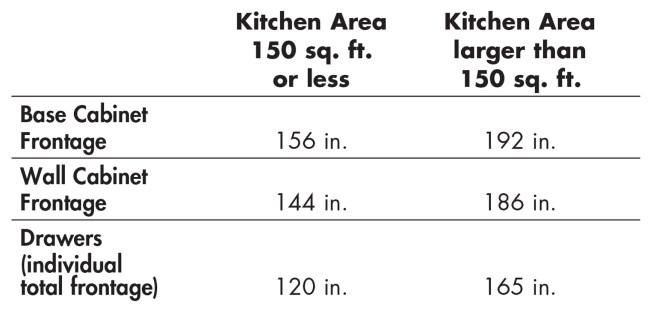
Kitchen cabinet storage will vary with family size and shopping and cooking patterns. The square footage of the kitchen and counter space requirements (Figure O) will also play a role in how much space is available for cabinets. The National Kitchen and Bath Association suggests the minimum cabinet frontage shown above as a starting point for kitchen planning.
Base cabinet frontage. Kitchens under 150 sq. ft. should have at least 156 in. of base cabinet frontage (cabinets must be at least 21 in. deep). For kitchens over 150 sq. ft., the minimum is 192 in. A lazy Susan counts as 30 in.
Wall cabinet frontage. Kitchens under 150 sq. ft. should have at least 144 in. of wall cabinet frontage. For kitchens over 150 sq. ft., the minimum is 186 in. (Don’t count hard to-reach cabinets over a range hood, oven, or refrigerator.)
Drawer frontage. Kitchens under 150 sq. ft. should have at least 120 in. of drawer frontage or roll-out shelf frontage. For kitchens over 150 sq. ft., the minimum is 165 in. (Example: A 21-in. base with three drawers or three roll out shelves counts as 63 in. Drawer cabinets must be at least 21 in. wide to meet this guideline.)
Countertop Design Requirements
In general, kitchens under 150 sq. ft. should have at least 132 in. of usable countertop frontage. Kitchens over 150 sq. ft. should have at least 198 in. Do not count corner spaces or countertops that are less than 16 in. deep.
Countertop height. Standard countertop height is 36 in. Wheelchair accessible countertops should be 32 to 34 in. high. Bar counters are typically 42 in. high.
Backsplash. Partial-height backsplashes are usually 4 in. (the most common) to 6 in. tall. A full-height backsplash extends from the top of the countertop to the bottom edge of the wall cabinets.
Pay close attention to the height of the backsplash in relation to receptacle boxes (see Electrical Rough-In). It’s better to raise receptacles well above the backsplash than risk a slight conflict with the cover plate.
Clearance above countertops. Leave 15 to 18 in. of clearance between the countertop and the bottom of wall cabinets or wall-mounted appliances.
Work-center requirements. Individual kitchen fixtures and appliances each require a certain amount of counter space for adequate work space (Figure O).
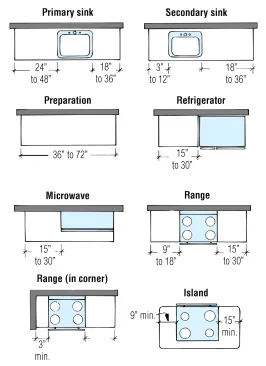
Provide a minimum amount of counter space near kitchen appliances and fixtures to create an adequate work space for each one.
Designing for Appliances and Fixtures
The following rules relate to the basic design layout of fixtures and appliances.
Refrigerators. Provide at least 15 in. of countertop on the handle side of the refrigerator or 15 in. on each side of a side-by-side unit. As an alternative, provide at least 15 in. of landing space no more than 48 in. across from the refrigerator.
Leave a few inches of clearance when a refrigerator is placed tight to a wall (Figure P). This will allow the door to open wide enough to fully open the refrigerator’s sliding drawers.
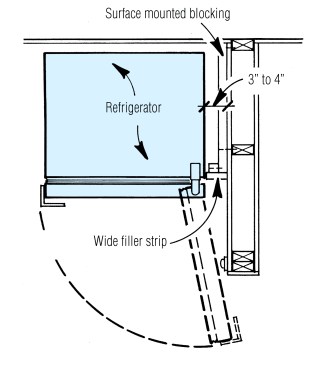
When the hinge-side of a refrigerator door is placed tight to a wall, the door may not open wide enough to allow full access to refrigerator compartments. Provide clearance using a filler strip supported by blocking.
Refrigerator dimensions. Refrigerators come in capacities up to 27 cu. ft. Models with freezer compartments above or below typically measure as follows:
- Width: 28 to 36 in. (30 to 32 in. are most common)
- Height: 65 to 68 in.
Side-by-side units typically measure:
- Width: 32 to 36 in.
- Height: 67 to 84 in.
Depth. High-end side-by-side refrigerators are designed to be installed flush with the face of cabinetry. Standard freestanding refrigerators, however, will project as much as 8 in. beyond a standard countertop. One solution is to recess the appliance into the wall. While it’s difficult to bring it flush with all the other cabinets, recessing a refrigerator often improves walkway clearance (Figure Q).
When recessing the refrigerator, plan for the electrical outlet. Oversizing the recessed opening and using a rough-in box on the return of the recess, or mounting the receptacle in a cabinet side wall, will provide additional space. Also, remember that built-in ice makers and cold-water dispensers will require plumbing.
Ranges and cooktops. Leave at least 9 in. of counter space on one side of the cooking surface and 15 in. on the other. Exception: If the cooktop goes against an end wall, leave at least 3 in. of clearance and protect the wall from heat.
Do not place the cooking surface below an operable window unless the window is 3 in. or more behind the appliance and more than 24 in. above it.
Range dimensions. Ranges vary in width from 20 to 24 in. for apartment models, 30 to 42 in. for residential freestanding ranges, and 36 to 60 in. for professional restaurant models. The most common freestanding range is 30 in. wide by 26 in. deep (front to back), though oven door handles may project to 28 in. Cooktops come in a wide range of sizes but are usually more shallow to allow installation within a standard countertop.
Overhead clearance. Code typically requires 30 in. above cooktops to any unprotected surface and at least 24 in. to a protected surface like a range hood (Figure R). An exception may be made for some microwave/hood combinations.
Ventilation hoods. All major appliances used for surface cooking must have a ventilation system with a minimum fan rating of 150 cfm.
Ceiling-mounted ventilation hoods offer the most design flexibility. With an under-cabinet hood, the installation will be easier if the hood is centered on a stud bay (Figure S).
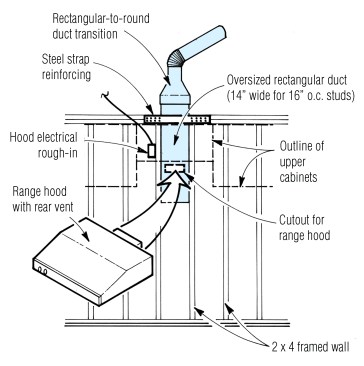
One way to locate the duct for a range hood is to frame a full stud bay in the center of the hood location, then install an oversized duct before drywall goes up. After the cabinets are installed, cut through both drywall and sheet metal to connect the range hood duct.
Microwaves. Provide at least 15 in. of landing space below or adjacent to a microwave oven. The bottom of the microwave should be between 24 and 48 in. from the floor (Figure T).
Avoid placing the microwave above a range or cooktop. Although often done, it’s usually too high for comfortable use, and it can create a hazard for children trying to reach the microwave.
Microwave dimensions. Microwaves vary in width; most are between 20 and 24 in. The majority of models are about 15 in. deep. Recessing them a full 3 in. into the wall puts the door in line with a 12-in. cabinet (Figure U).
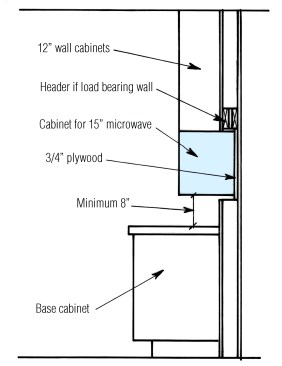
A recessed cabinet keeps the microwave in line with wall cabinetry. Locate the microwave at least 8 in. above the countertop so the space beneath is usable.
Pay attention to microwave ovens placed too near inside corners of upper cabinets, particularly if an angled corner cabinet is used (Figure V).
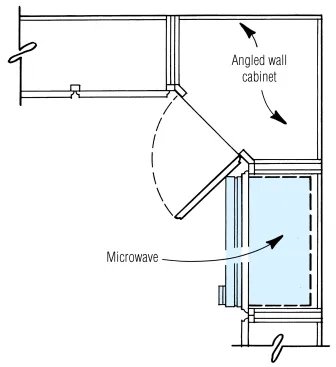
A microwave placed too close to an angled cabinet will not permit the door to open properly. Keep microwaves away from a corner cabinet a distance of at least one cabinet door width.
Wall ovens. Wall ovens typically require a 21- to 25-in.-wide cutout in a cabinet face.
Provide at least 15 in. of landing space next to or above the oven if the appliance door opens into a traffic lane. Alternative: The landing space can be across from the oven (no more than 48 in. away) if the appliance does not open into a traffic lane.
Sinks. The sink is a center of activity in most kitchens and requires generous adjacent counter space. Allow at least 18 in. on one or, preferably, both sides (Figure O). Increase the adjacent clearance space to 24 in. if a dishwasher is to be installed below.
Near corners, these countertop requirements will vary, depending on the layout (Figure W).
To provide adequate dish storage within easy reach of the sink and dishwasher, provide at least 60 in. of wall cabinet frontage within 72 in. of the primary sink centerline. As an alternative, substitute a tall cabinet of equivalent size, or provide base cabinets on the back side of a sink peninsula.
Dishwashers. Front-loading units installed under the counter to the right of the sink (for right-handed people) are the most common, followed by top-loading units that slide in and out from under an open counter space. When laying out the kitchen, sketch the unit showing the door in the open position to avoid awkward conflicts.
Allow for 21 in. of standing room extending from each edge of the dishwasher. Also, keep the dishwasher within 36 in. of the sink.
Be careful placing dishwashers too near inside corners, as the fold-down door can obstruct access to cabinets. If necessary, provide wide filler strips in corners for clearance (Figure X).
Garbage disposals. In homes served by septic systems, a disposal will mean pumping the tank 30% more often. If possible, keep drain lines lower than 17 in. from the floor to avoid pumping waste uphill.
Standard models are rated from 1/2 to 3/4 horsepower and require 120 volts of power. Noise plagues all disposals, but the better ones are quieter. The thin walls of stainless-steel sinks particularly amplify disposal noise. An optional coating on the underside of some sinks helps to deaden some of the sound.
Trash compactors. Standard 12- to 18-in.-wide units are 341/2 in. high and can slide under a counter. Residential units come with 1/2- to 3/4-hp motors that require 120 volts of power. The pricier compactors have odor and sound control devices.
Although the compactor’s location will probably be decided based on where undercounter space is available, the best location is often between the sink and the refrigerator, or near recycling bins. As with dishwashers, sketch in the position of the open door to ensure access and minimize traffic conflicts.


