Today’s kitchens are a marriage of modern-day mechanicals and storage methods with colonial and Victorian roots. Iceboxes, Hoosier cabinets, larders, and sculleries join with wall ovens, cooktops, plumbed coffee makers, refrigerators, dishwashers, range hoods that need makeup air, and countless other countertop appliances to create a space that is an expression of the cook’s workflow methods. For a homeowner entering a beautifully designed and well-appointed kitchen, it is easy to view the cabinets and their smoothly operating accessories as the heart and soul of the space, but any carpenter who has had to alter existing wall framing without damaging the wall finish on the opposing side to duct a range hood knows otherwise. The success of a kitchen remodel or install depends on perfectly laid-out mechanicals. Whether you are a jack of all trades who executes every step of a kitchen remodel or the lead carpenter overseeing a whole-house remodel, knowing the design and equipment specifications is critical to setting yourself or your team up for success.
Step Zero: Get the Specs
The majority of kitchens have specs that are relatively simple—same modular cabinets, same brand-name appliance package, and layouts that oscillate between the standard work triangle–based layouts of gallery, in-line, and U- and L-shaped. Custom-designed kitchens or those designed with the workflow methods of a professional chef in mind can contain an array of appliances with additional mechanical needs. Often, the design and specs are completed before the start of a kitchen remodel, and the lead carpenter would have time to review the details before starting work. However, a small remodeling company or a design builder can be the one who works with the homeowner to design the space and specify equipment. Either situation presents challenges that can be overcome by proper planning and by knowing the specs inside and out.
A carpenter who is involved in the design and specification of a kitchen has a slight starting advantage in a remodel because of their ability to steer design through their understanding of the existing conditions.
When the design is set long before the work begins, the lead carpenter is at the mercy of the design professional who provides the required drawings and specs, which, in my experience, focus on the aesthetic qualities of the kitchen first and the mechanical operation second. Quickly determining the accuracy of these drawings is a skill that is built over the course of one’s career.
My crew and I recently installed a remodel kitchen with furniture-style cabinets. Upon reviewing the drawings, which arrived only days before the cabinets, we found that to give the side-by-side refrigerator the room needed to open fully, the sink cabinet would need to be off-center from the window. When we contacted a field rep from the kitchen design company, we were told “our kitchen layouts always start by centering the sink cabinet on the window and making everything else fit.” Needless to say, the freezer door on that project opens only to 80 degrees. No matter where you are on the design-to-production chain, there is no substitution for getting your design specs early.
Organizing the Work
On top of building codes requiring things like outlets, each stationary appliance in the kitchen has mechanical needs of its own. And those needs must be met within the confines of the cabinet layout. Large-scale commercial and institutional projects will have mechanical-electrical-plumbing (MEP) drawings done by an engineer that lay out all the mechanicals and how they interact and share space. While that doesn’t typically happen on residential jobs, the information is no less important.
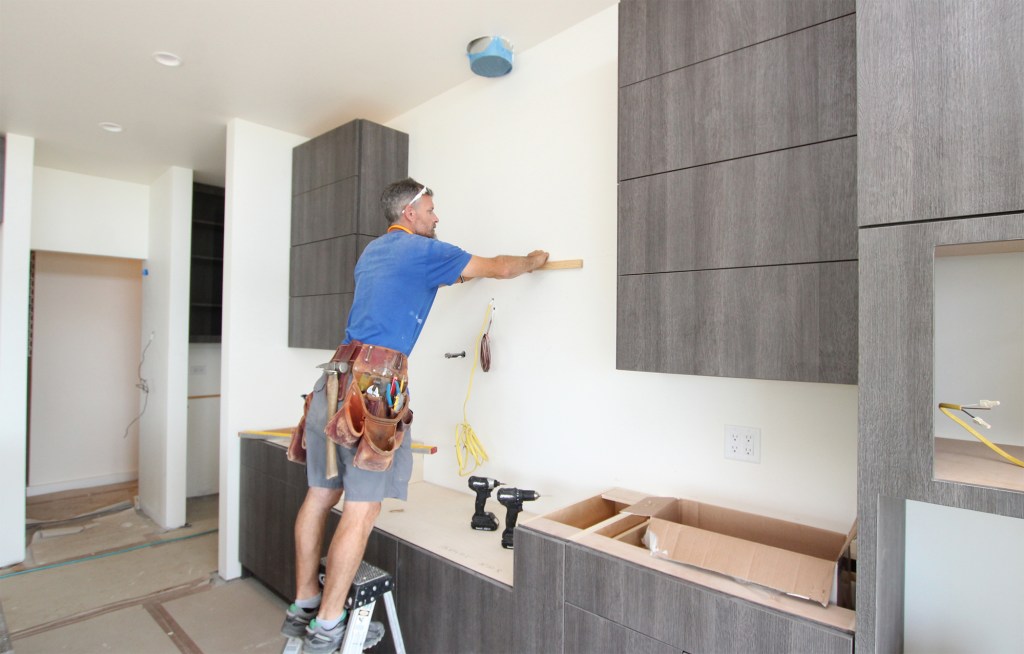
My go-to method for communicating this on a residential jobsite is to use a 12-inch-wide rip of cardboard floor-protection material cut to the length of each kitchen wall as a story pole on which I mark the layout for each cabinet box, appliances and their associated mechanicals, and tile (if necessary). This horizontal story pole is stapled level across the wall above the highest mechanical, and each trade plumbs their layout down from the story pole. Each wall also gets a vertical story pole cut from a rip of plywood to show the layouts from the floor up—top of base cabinet, top of counter, range hood, bottom of upper cabinet, undercabinet light wiring, and the like. I color-code the different items using markers or colored pencil. The cardboard story poles can be taken down, rolled up, and stored as they become living documents that guide the work from rough framing through to install. The horizontal story pole is created pre-drywall, so each end has the thickness of the drywall marked on it. Once the drywall is installed, this section is cut off the story pole. Finish floor is dealt with the same way on the vertical plywood story pole.
The story poles can have as much information as the lead carpenter and the mechanical trades deem necessary. I use this method for bathroom layout, as well, and have had plumbers comment that seeing the tile layout marked out is helpful in fine-tuning placement of showerheads and mixing valves. Wall-mounted faucets, outlets, and lights can be given the same center-of-tile or center-of-grout-joint layout on the kitchen story pole (see Roughing-In With “Story Poles,” below). Executing layout in this detail early on, though a time-consuming task, can save the lead carpenter time throughout the job when the mechanical trades buy in to the method and understand that they can rely on the story pole in the same way they rely on MEP drawings.
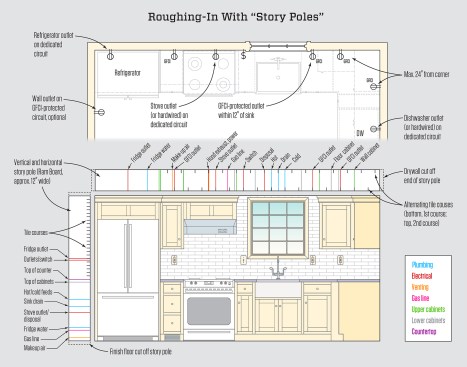
Residential kitchen design plans typically consist of only plan and elevation views like these; they seldom have a separate mechanical-electrical-plumbing (MEP) plan, though kitchens often have a convergence of MEP components that must be precisely integrated with cabinets, appliances, tile, and trim. The author uses color-coded story poles, cut from heavy floor protection paper, that can be taken down, rolled up, and stored as they become living documents that guide the work from rough framing through appliance install. The author takes the time to develop these story poles so he is able to keep track of fine-grained detail like the tile layout at the framing and electrical rough-in stages.
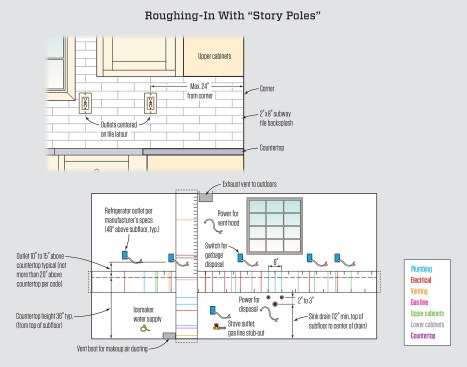
The illustration above shows the color-coded “story poles” are stapled to the wall to provide a laser-level reference for all the on-center spacing measurements of the MEP components.
Execution: Understanding Flexibility
The execution of a large-scale kitchen remodel often takes place over multiple months and can be at the mercy of the schedules of many different contractors. It is important for the lead carpenter to set mechanical service priorities early and give each trade the space they need to execute their work. My preferred sequencing is ventilation, HVAC, plumbing, electrical. While I separate ventilation from HVAC in my sequencing (for reasons that I’ll tackle later), I place these two scopes at the front of the line because of the lack of design flexibility of their behind-the-wall installs. The ventilation ductwork for a range hood or a pop-up downdraft vent typically must go where it goes. Plumbing drains and supplies have a bit more design flexibility if the framing has been laid out thoughtfully. Electrical work has the highest degree of flexibility once you achieve the minimum requirements of building code.
Ventilation hoods. On many of my larger kitchen projects, I am responsible for the range-hood ducting. For this type of work, I think it is important that the exhaust duct for the range hood and any associated makeup-air inlets get priority over the other mechanical installs.
The range-hood specs will give you the manufacturer’s recommended exhaust-duct size. Running the exhaust ducting through the over-the-stove cabinet and out the roof is often the easiest approach. A bit of flex duct may be needed to avoid a joist, but that’s usually the extent of the problems.
Owners or designers often prefer going straight out a wall because it doesn’t take up cabinet space, but it’s not always easy. Make sure the wall outlet on the exterior is farther than 3 feet from an operable window; this is typically required by code. Also, check and double-check the layout before cutting through the exterior. There’s seldom enough wall thickness to use flex duct if the inside and outside openings are offset; they need to line up perfectly.
Makeup air is required for any range hood that exhausts more than 400 cfm. On some jobs, we’ve felt lucky to have makeup air supplied to the kitchen or an adjacent space via an ERV that lets in tempered air. The HVAC contractor takes the exhaust hood into consideration when sizing the ERV, but otherwise, the kitchen plan is not impacted. On many jobs, however, the energy-efficiency afforded by an ERV, which tempers the incoming fresh air with heat from the outgoing exhaust, is not always as high on the priority list as the kitchen finishes. We often end up having to bring in unconditioned makeup air, and the placement of this inlet needs careful attention to avoid a stream of cold air blasting the cook when the range hood is turned on.
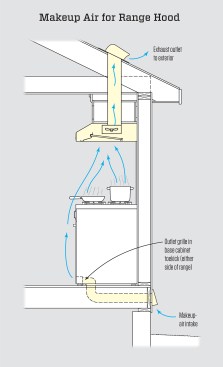
When makeup air is required for a kitchen range, the author prefers to bring fresh air in near the base of the stove. As fresh air is pulled up the exhaust fan, it creates a negative pressure zone on the cooktop that helps pull pollutants into the exhaust stream.
Typically, we locate the register for the makeup air near the floor on the wall behind the range, or in the floor under the range towards the back. This keeps the air stream away from the cook, and as it is pulled upwards by the exhaust fan and passes the cooktop, the airflow picks up air off the cooking surface—an effect called “entrainment”—that helps exhaust pollutants and moisture generated by the stove and cooking activity. The makeup-air inlet should include an electric damper that opens and closes to keep unconditioned air from leaking into the house when the range hood is not in use (see Makeup Air for Range Hood, above). Typically, this damper is wired to the switch that controls power for the range hood.
HVAC. Kitchens, being the gathering place they are for many homeowners and their families, can be complex micro-environments to heat and cool. Radiant heat, whether designed by a floor-panel supplier or by a technician on site using a modular product, will take into account the cabinet layout to provide an evenly heated floor surface. No matter how heating and cooling is delivered, involving the homeowner early on in the layout by asking the right questions—Do you use the sink to hand wash dishes? Do you favor one side of the stovetop for prep work? Is a portion of an island counter used for dining or as a kitchen office? Will hot or cold air blowing on you while you work bother you?—can provide a goldmine of information that can make or break the job in the mind of the client when they start using the space.
All of the questions above are ones that I, or a designer I have worked with, have neglected to ask. There is no feeling worse than putting a toekick supply vent in a sink cabinet and being told by the client during the final walk-through that, despite the $3,000 German dishwasher you installed, she hand washes most of the dishes and hates the feeling of air blowing across her feet. Had I asked the right questions early on, that toekick vent could have been easily moved down the line of cabinets to a less intrusive spot.
Plumbing. Cataloging the manufacturer’s specs for each appliance on site is an important first step in developing a scope-of-work checklist for each trade’s responsibility to each appliance.
From wall ovens with steam functions to plumbed coffee makers, many higher-end appliances now require plumbing where they once only needed power.
In kitchens located on exterior walls, these plumbing lines can be run up through the floor and the backs of the cabinets to keep the lines inside the conditioned space.
For the laying out of plumbing lines that will travel through cabinets, it is important to know if the cabinet houses any accessories that will compete for space with the mechanicals and their shut offs. Sink cabinets are excellent spots for pullout trashcans when the sink plumbing install accounts for them.
Drain plumbing often takes precedent over supply lines to guarantee adequate pitch and venting. The widespread use of PEX for plumbing supply lines has both made the work of the plumber easier and simplified the work of the lead carpenter or designer tasked with making an increased quantity of mechanicals fit without compromising in-cabinet accessories.
Kitchen drain lines must be low enough to fit a disposal. Most codes will limit the height to 12 inches minimum off the floor. The vents for sinks in islands can be challenging in a very large kitchen. Most codes require that a sink be no farther than 8 feet from a vent, so there may be only a small wall area through which to run the vent stack that intersects within an 8-foot radius from the sink drain. Automatic undercabinet vents or oversized drain lines typically are not allowed by code as vents. Bow vents are often the only option for large kitchens in which a vent stack needs to more than 8 feet away from the sink. I recommend that you work with your plumber early on to find out exactly how much cabinet space the vent will take up. Also, the plumber may need to get prior approval from the inspector. The inspector will be looking for two key features with a bow vent—a tie-in to the vent stack in the wall that is higher than the sink overflow height (usually 36 inches on a standard-height island) and a relief drain on the vent running through the floor. If a blocked sink drain ever fills the bow vent with water, the relief drain will drain away the water so the vent stays operational.
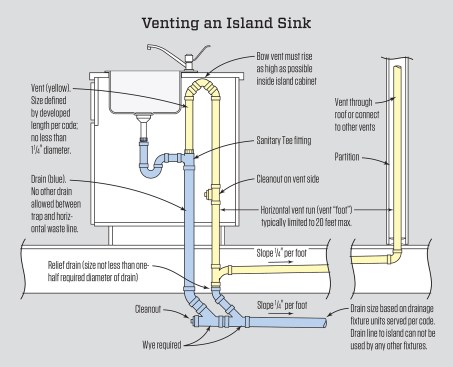
In most code jurisdictions, the only venting option for an island sink is often referred to as a bow vent. The length of the vent “foot” (horizontal section in the floor) is typically limited to 20 feet.
Electrical. Selecting appliances early in the process eliminates assumptions made by all the trades. In terms of the project budget, assuming that the electrical service of a house built in the 18th century has been updated so that it can handle modern appliances can lead to an unwelcome change order at a point when most budgets have been maxed out. Partnering with an electrician early in the design phase is helpful not only for evaluating panel capacity but also with reviewing requirements of the building code. Section E3901.2 through E3901.5 of the IRC can be used as a guide by a lead carpenter for laying out other mechanicals and even wall tile. E3901.4.5 states “outlets shall be located not more than 20 inches above the countertop,” giving a lead carpenter room to coordinate the tile selection with the outlet location. This finish detail, and the client who demanded visual perfection, was the genesis for the story-pole method I described above. E3901.4.1 “Wall Countertop Space” states: “A receptacle outlet shall be installed at each wall countertop and work surface that is 12 inches or wider. Receptacle outlets shall be installed so that no point along the wall line is more than 24 inches, measured horizontally, from a receptacle outlet in the space” (see again Roughing in With a “Story Pole,” above).
There are exceptions to this, outlined further on in the code, that include drawings in the explanation. Receptacle requirements for kitchen islands have changed to accommodate the ever-increasing size of island work surfaces. The code now calls for one outlet for the first 9 square feet, or fraction thereof, with an additional outlet required for each additional 18 square feet, or fraction thereof. At first glance, this may not sound like much, but many large islands and peninsulas will now require three outlets to satisfy code (see Island Receptacles, below).

The number of outlets on an island counter depends on the countertop area served. If a vertical surface exists above the countertop, the outlets must be placed there, and are not then allowed on the cabinet.
Commissioning and Completion
After the cabinets are installed, the lead carpenter again relies on the mechanical contractors to take part in the install and commissioning of the appliance package. If the appliances have been on site, the lead carpenter has the opportunity to visually inspect the units and their mechanical connections for damage or missing parts in advance of install day.
On high-end projects with expensive appliances, I have had good luck communicating with the manufacturer’s customer-service reps via phone and online chat (it is as much in the manufacturer’s interest as in the contractor’s that a $10,000 refrigerator operate flawlessly). It is important to save all manuals and warranty info for the client as well as any auxiliary mechanical parts like LP/NG conversion kits. Many companies that I have worked with catalog the operation manuals into a binder for easy access by the client. Once the appliances have been installed and commissioned by the mechanical contractors, it is important for lead carpenters to familiarize themselves with each appliance’s operation and to run a test cycle on each appliance. This is an important final step in the lead carpenter’s confidently turning over a finished product to the client and providing instruction on its use.
For many homeowners, the kitchen is deeply personal place within the home, and renovating that space from design through to completion is at best disruptive—and at worst, can cause high levels of anxiety. The lead carpenter who is tasked with bringing the abstract design to functioning reality travels a path that can be full of twists and turns or a path that can be straight and smooth if the lead carpenter understands their place as the conductor of an orchestra of tradespeople and the head coach of a dynamic jobsite team.
Photo and illustrations by Tim Healey.


