The term “production work” used to make me cringe, conjuring up images of low-quality materials, poorly fit joints, and a heavy reliance on caulk. But when my company bid on — and won — the contract to renovate 50 kitchens in a high-rise senior center last fall, I knew my three-man crew would have to adopt a production approach if we were going to be profitable. At the same time, I was determined to maintain our usual standard of quality.
Prior to this project, our multi-unit work had been limited to condo buildings of five stories or less, where we’d installed individual components — primarily windows — in one-off situations. By contrast, this job required the complete removal and replacement of all the cabinets and countertops, as well as drywall repair and painting, in 50 kitchens scattered throughout a 19-story building.
Bidding Strategy
We were invited to bid by a local architect whom we’d worked with in the past. His firm was responsible for the design and administration of the project, which was being funded with federal stimulus money. For bidding and scheduling purposes, 200 apartments in the building had been broken down into four blocks of 50 each; this bid was for the third of four phases in the overall project.
The building was owned by a local governmental housing agency, so past and present bids were all a matter of public record. We used this to our advantage, looking up the bid prices on the first two phases of the project and developing a baseline for our bid based on this information. We felt confident the winning bidder of Phases 1 and 2 would use similar numbers for his bid on Phase 3, but there was also one other contractor bidding, because federal law requires a minimum of three bidders for government-funded projects.
Although we couldn’t predict what the third bid would be, we could determine where we felt our price needed to be to win the work. Then we took a hard look at all of our numbers to see where we could trim expenses. The materials were specified by the architect, and since we’d already been provided with substantial volume discounts from our suppliers, there was little — if any — additional savings to be had in those areas. The only subcontract labor was plumbing and electrical (which we aren’t licensed or insured for), and we’d received what we considered to be fair pricing from those subs, so their numbers, too, we inserted as fixed-line items. That left our labor as the single largest line item; controlling those costs by working efficiently would be the key to making money on this job.
When we were awarded the contract, we had to secure a performance bond for the full amount of the job. Issued by an insurance carrier for a small percentage of the estimated job cost — about 2.5 percent in this case — a performance bond acts as a kind of credit check on the contractor, and guarantees completion of the project.

The author thought out every step of the process of renovating 5…
Job-Site Organization
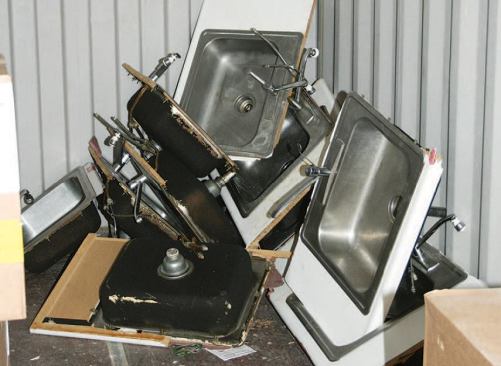
One of our biggest challenges was keeping enough materials, equipment, and supplies on hand without squeezing ourselves or the building’s tenants out of the limited space we were allotted to work in. We also needed to manage the small mountain of debris the work generated, including about 600 old cabinets, the packing boxes from the new cabinets, and 50 old countertops and sinks.
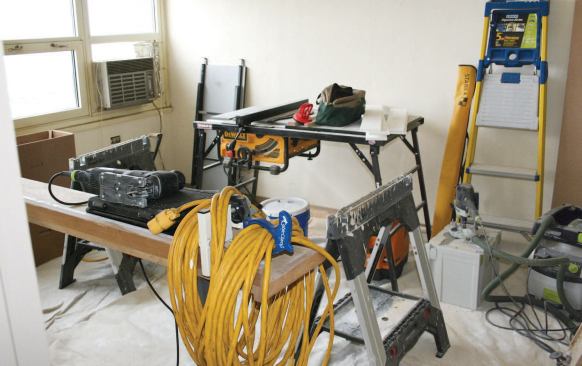
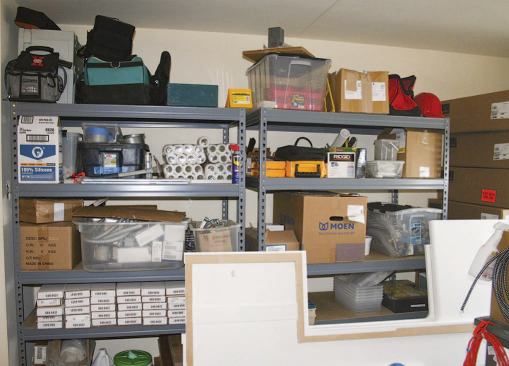
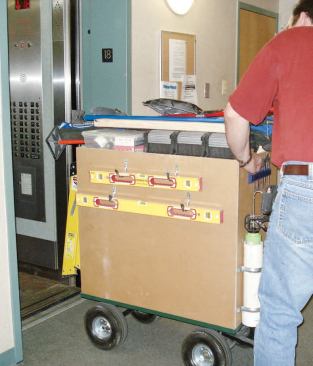
Office. To manage the operation, we were provided an unoccupied apartment on the 18th floor, which took us about a day to convert into a cramped but functional field office (see slideshow). After covering the floors with heavy canvas drops, we set up our table saw and miter saw in the unit’s bedroom, creating a central area for the operations that would produce the most dust. In the living room, we set up several large steel shelving units and a desk (two filing cabinets supporting an MDF top). This room became a mini warehouse, the place where we stored sinks, light fixtures, paint, sealants, and other consumables.
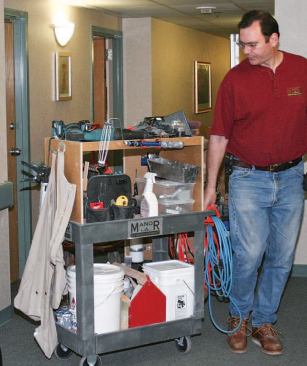
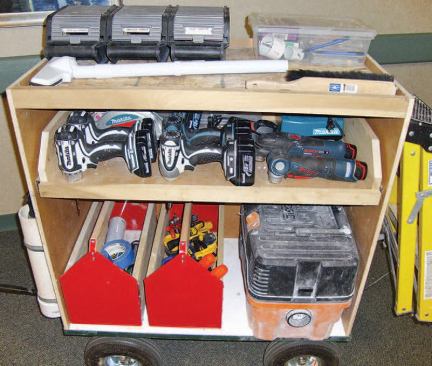
Job carts. To move all of our “stuff” through the building, we used a series of customized carts. Although well-organized, our first general-purpose cart — a 2-foot by 4-foot plywood box placed on a rubber-tired garden wagon — proved too unwieldy to maneuver in and out of the elevators. So we parked it in the field office, where it became a catch-all for miscellaneous gear, and replaced it with a smaller 18-inch by 36-inch version that could be easily rolled into position just outside the door of whatever kitchen we were working on. This “installation wagon” held the cordless drivers, hardware, and adhesives needed for cabinet and counter installation, along with a vacuum for cleanup. To avoid wasting time changing bits or searching for a specific tool, we made sure the cart was stocked with multiples of each tool.
Our next cart — a smaller 15-inch by 30-inch plywood box dropped onto a service cart — was a dedicated demo, prep, patch, and paint vehicle. In it, we carried all the tools and supplies needed to bring a unit from the demo phase to the point where it was ready for cabinet installation.
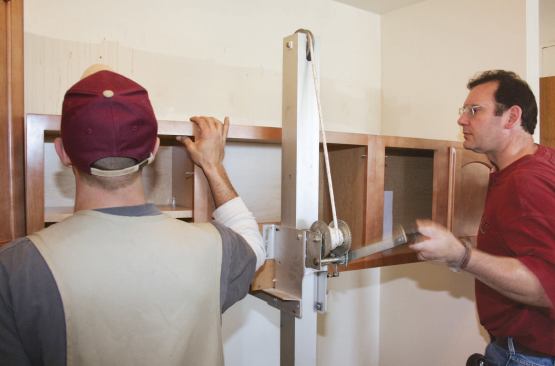
In addition to our customized carts, we used a drywall cart to wheel old and new counters in and out of the apartment building. Four-wheel mover’s dollies were handy for lugging around both old and new cabinets, and we used a convertible hand truck for appliances and other bulky items. We also had a cabinet lift for wheeling and lifting preassembled lengths of upper cabinets into position.
Storage. We used various bins and boxes to hold and organize small tools, fasteners, plumbing parts, shims, sealants, and other supplies; in fact, every item we used was stored in a specific location for the entire project. This approach cut down on time spent looking for things and made it easy to track inventory.
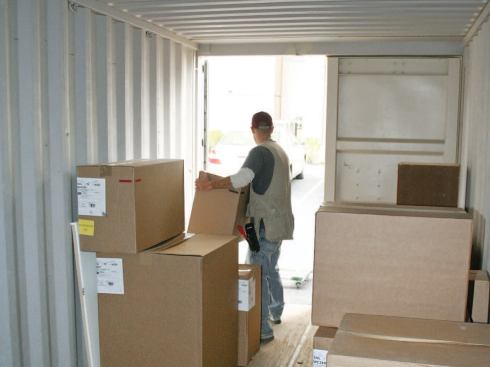
To warehouse bulk materials, we rented three steel storage containers and had them placed in the rear parking lot of the building. We located the 8-foot by 20-foot containers about 60 feet away from an exterior entrance that led directly to the building’s freight elevators, giving us easy access. Each container had a specific purpose: The first held base cabinets, the second held upper cabinets, and the third was our “recycling box,” where we placed anything that was to be recycled or reused.
To meet our goal of completing four kitchens a week, we needed cabinet and counter deliveries roughly every other week. When deliveries arrived, we had the truck back directly up to the storage containers, which made it easier to off-load and transfer the contents. We handled recycling the same way, scheduling pickups for Fridays to minimize interference with our Monday-through-Thursday workweek.
Waste management. We always try to recycle as much as possible, so we contacted a number of nonprofit organizations to see if they would be interested in taking the old cabinets. Habitat for Humanity Restores and another local organization picked up roughly 70 percent of the old cabinets and 80 percent of the sinks. The rest of the components were too damaged to be useful, so we recycled the stainless steel sinks and broke up the remaining cabinets and countertops and threw them into our dump trailer.
The job also generated well over 700 cardboard boxes, all of which were placed on the building’s loading dock for regularly scheduled recycling pickup. In addition to the sinks, we saved miscellaneous metals from the demo and construction process and brought them to a local recycling center at the end of the job.
On a job of this magnitude, recycling has very tangible benefits; we estimate we kept at least 15 tons of material out of landfills and saved thousands of dollars in hauling and disposal fees. We also ended up with cash in our pockets after recycling all the old metals. And since the organizations that received the old components held not-for-profit status, we will be able to write off the contribution of materials.
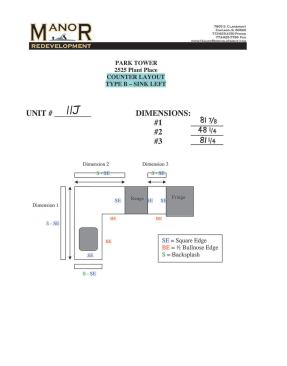
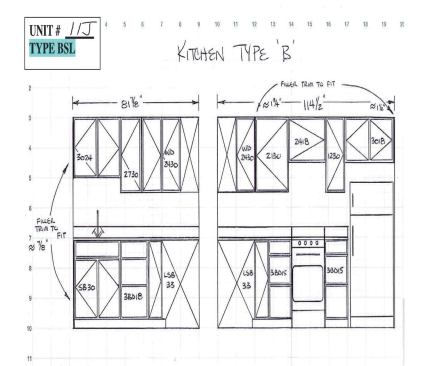
The project involved four basic floor plans: Type A-sink left, T…
Installation
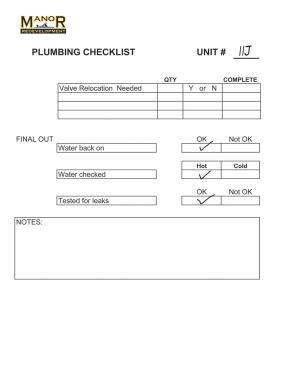
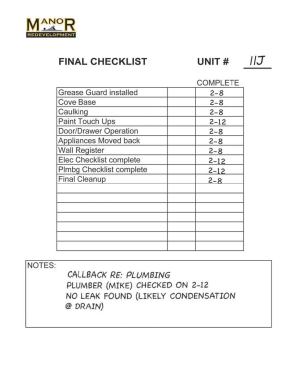
To determine the tools and incidental materials we would need, I wrote detailed outlines for each task before starting the job. Preparing these task outlines also helped me organize the workflow and delegate responsibilities to my crew.
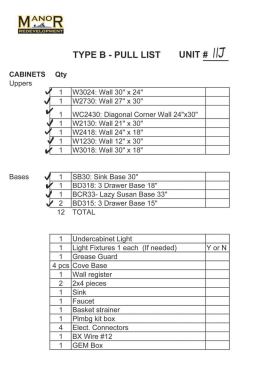
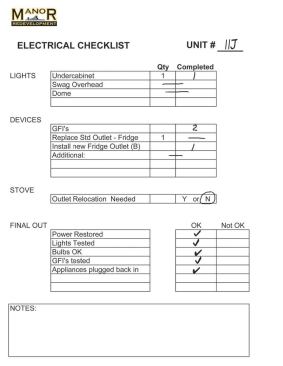
From these outlines, I created a series of forms that we bundled into job “packets” (see slideshow, previous page); when we started work on an apartment, we taped one of these plastic-sleeved packets to the door (see sidebar). Each contained layout info, pull sheets, checklists, and other information to help guide workers and subs and measure our progress. The packets also served as an indicator of where we were working — something we all quickly came to appreciate after realizing that every floor, wall, and apartment door looked alike from the hall or elevator.
Following the advice of several seasoned production carpenters (thanks to the JLC Online finish-carpentry forum), we worked one floor at a time, rather than focusing on a specific layout (the building consisted of four tiers, with the apartments in each tier sharing the exact layout as the ones above and below). Moving between floors can be a big drain on time, particularly if you have to wait for elevators. Adopting the floor-by-floor approach allowed us to stage materials in one hallway instead of several, minimized elevator trips, and made site protection and cleanup more efficient.
Schedule. We were permitted to work from 8 a.m. to 4 p.m. Monday through Friday, but the contract called for no kitchen to be without running water for more than three consecutive days (almost all of the apartments were occupied). So we tackled multiple kitchens at the same time, removing and preparing the first set of kitchens on Mondays, completing them on Tuesdays, and repeating the process on Wednesdays and Thursdays. Fridays were left open for deliveries, pickups, transfer station runs, and similar tasks.
The first two kitchens took approximately 14 1/2 man-hours each to complete, while the next two were closer to 11 1/2 man-hours each. With each successive kitchen, we tweaked and fine-tuned our methods until we finally reached a plateau of between eight and nine man-hours per unit from about the 10th kitchen on.
Shaving time off the schedule became a game of sorts. We looked at every aspect — from packing the elevators more efficiently, to using a heat gun to accelerate the drying of patching compound, to scheduling the subs tighter so that we could reduce their trips to the site. Boosting production allowed us to increase our weekly workload — first to five kitchens per week, then to six after the fourth week. We maintained this schedule for the remainder of the project, starting three on Mondays and Wednesdays and finishing them on Tuesdays and Thursdays respectively.
Lessons Learned
Since our original goal was four kitchens per week, this job turned out to be very profitable for us. Delegating specific tasks to certain crew members — something we’ve only experimented with in the past — certainly was a factor in our success, as was our focus on preproduction planning. Having good systems in place increased our production and made us more profitable, and now we’re developing similar systems for every part of our business — something we never really even thought about before this job.


