Q. While we’ve never had problems with our tile-shower installations, new surface-applied waterproofing membranes and waterproof backerboards have me wondering if it’s time to change our approach. We typically install cement backerboard over a poly membrane for the walls, and a mortar-bed floor over a flexible plastic shower-pan liner for the base. Is there a better way?
A. Contributing editor Michael Byrne, moderator of the JLC Online tile forum and an industry consultant in Los Olivos, Calif., responds: I prefer traditional mortar-bed construction for both floors and walls because it allows me to build showers with features like benches and curved corners. However, that doesn’t mean it’s the best method for everybody. Shower surrounds built with backerboard substrates can be perfectly serviceable, and traditional mortar-bed installations aren’t immune to problems; over the course of my consulting career, I’ve seen thousands that have failed.
The most important elements of a good installation — regardless of method — are the placement of the waterproofing, the selection of materials, and the quality of workmanship.
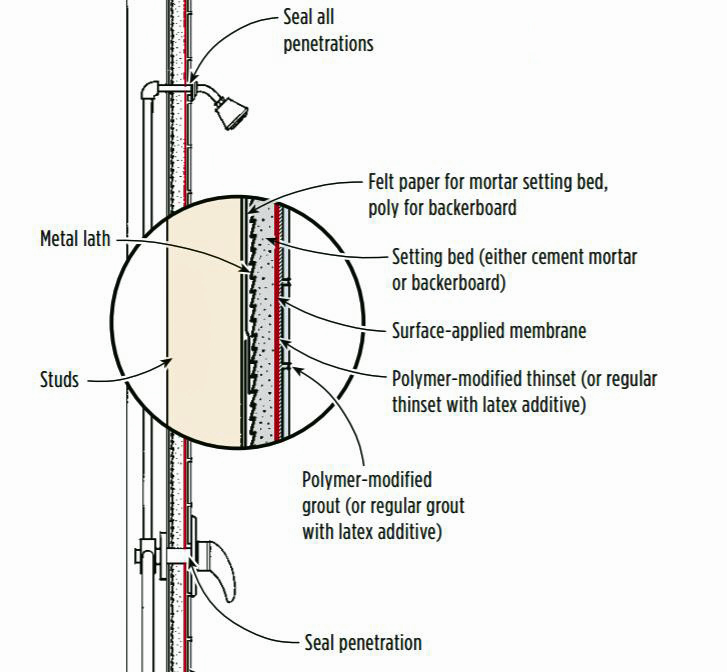
To eliminate most of the absorption problems associated with both mortar-bed and backerboard installations, install a sheet or trowel-applied waterproofing membrane on the surface of the setting bed. This helps isolate the porous setting-bed materials, preventing them from absorbing moisture and germs.
Continuous surface-applied waterproofing also simplifies the process of joining tile to bathtubs and preformed shower receptors.
Most backerboard manufacturers recognize surface-applied materials and methods and accept them in lieu of traditional behind-the-board plastic film or felt-paper membranes — which, after all, get punctured by the fasteners used to attach the backerboard to the framing. Surface-applied waterproofing seals all these fastener penetrations.
When building a mortar-bed shower wall, I first install horizontally oriented layers of felt paper laminated to a drywall base with a uniform layer of cold-patch sealing asphalt. This should not be confused with the waterproofing layer on the surface: The asphalt and felt-paper combination is required as a cleavage membrane to prevent excess moisture from wicking out of the fresh mortar and being absorbed by the drywall. After I float the mortar bed and allow it to cure, I still cover the entire surface with either a sheet or trowel-applied system, or a combination of both.
Tile selection is also important. Absorbent, textured, and grainy ceramic and stone tiles can hold considerable amounts of water, as well as dirt, oil, germs, and bacteria — all of which are part of the shower environment and promote mold growth. So for hygienic reasons steer your clients toward impervious or vitreous tiles, or stone tiles with similar properties. The coarse surface texture on some porcelain tiles — though ideal for slip resistance — makes them, too, a poor choice for shower-wall use.
The installation materials also should be as impervious as possible, to minimize absorption and saturation. Add high-quality latex additives to regular thinset mortar or grout, or use high-performance polymer-modified thinsets and grouts that need only water for activation. These materials absorb and transmit less moisture than regular mixes.
Finally, remember that there’s no quick fix for poor workmanship. An unusually high percentage of shower-stall failures occur because the installer did not follow specific manufacturer’s instructions or ANSI A108 tile industry standards. Among the most common problems are improper slope in the mortar-bed floor; missing movement joints; poor thinset mixing techniques; inadequate adhesive; lack of sun shields, which protect mortar and grout from the sun’s rays; poorly compacted grout; the use of too much water to clean grout; and inadequately cured materials. Another common error is allowing foot traffic on curing materials. Even when the best materials are used, any one of these installation errors can result in failure.


