I’ve never made nor worked on a perfect set of site-made stringers. Fast-moving framers can crank out a set of stringers in under an hour—and it shows. However carefully they’re made, both drying and humidity will ultimately distort the cutouts. If you expect to achieve a good outcome, rough stringers cut by the framing crew are probably not going to be usable in delivered condition.
A “perfect” stair stringer can be visualized as a series of precisely stacked and staggered uniform blocks, and that’s what I set out to create after the fact with the method that I’ll describe in this article. On a typical stair, this process takes me a solid day but makes the ensuing job so much smoother and the final product as good as what was initially promised to the client.
Stacking Blocks
I begin finishing a set of stairs from their rough stringers by finding the total rise and run, referencing plumb and level laser lines. First, I check for level across the stairwell at the top and bottom of the flight; I want the total height to represent the distance from the highest point at the top to the lowest point at the bottom. I then divide this distance to establish the riser height.
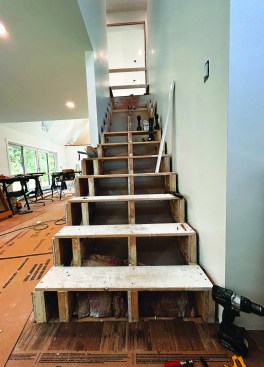
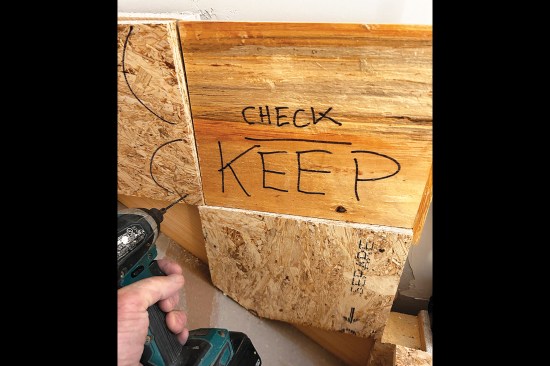
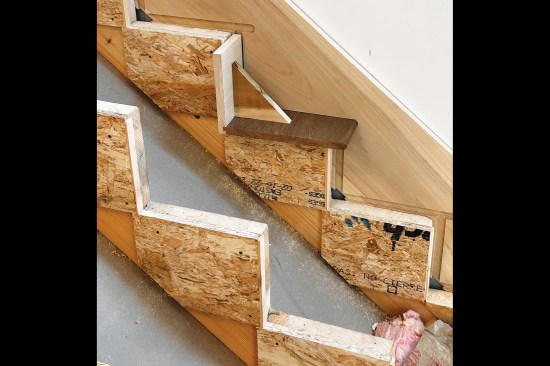
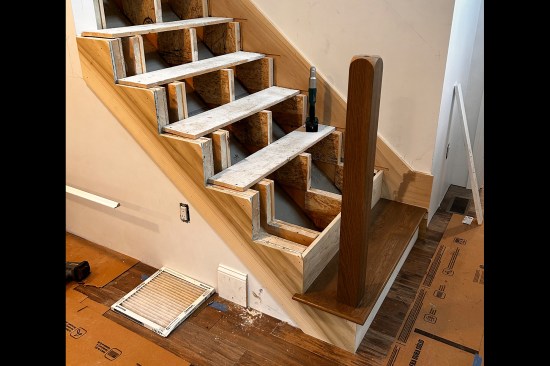
This staircase joining the first and second floors was built with site-made stringers (three main stringers and a fourth, outside stringer). The underside of the stair was drywalled and insulated with batts between the stringers.
In a home with 8-foot ceilings, a stair layout with 13 risers and 12 treads is common. On the stair shown in this story, the home’s ceiling was higher than 8 feet; the first flight had 13 risers and 12 treads and terminated at a dropped landing at the top (an additional riser to the left and to the right of the landing led to a second-floor corridor). The staircase was partially open, with the first six risers open on the left and the remaining seven risers between two walls.
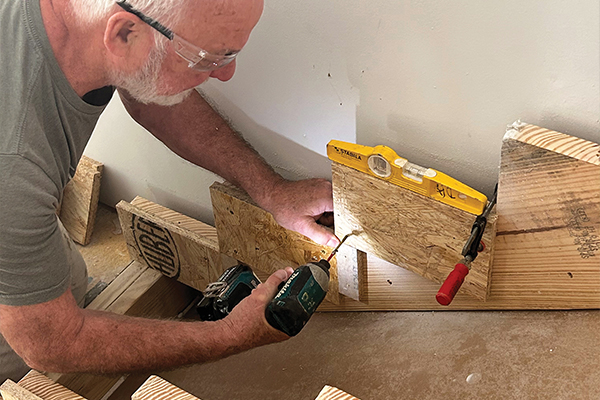
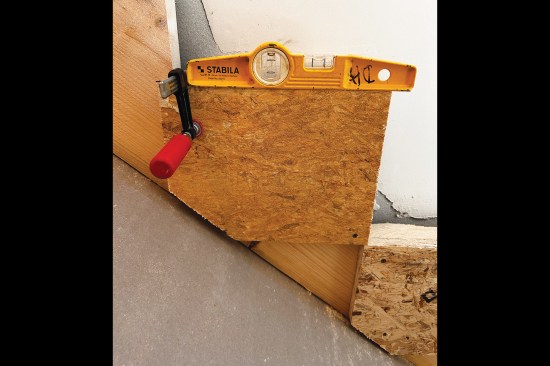
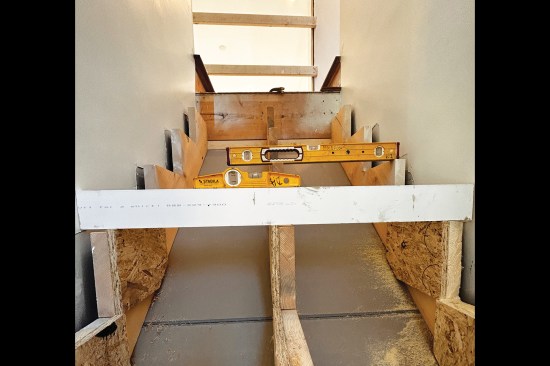
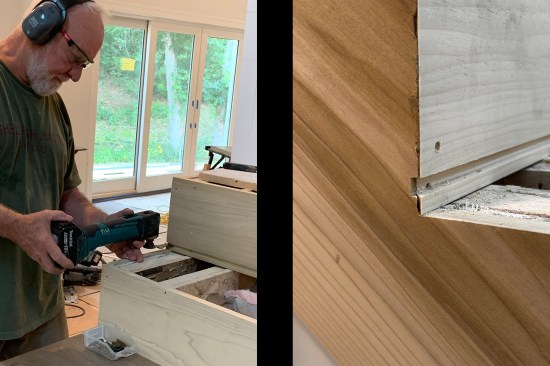
At the bottom of a stair, I typically shoot the plumb line from the starting riser and the level line from the highest point of the top landing and measure the total rise. I then measure the distance from the landing to the starting riser for total run and use the Buildcalc app on my phone to find the mathematical rise and run, which on this stair resulted in a 7 13/16-inch rise and 9 7/8-inch run. I cut a check-block template of plywood to those dimensions, making certain that its corners were perfectly square, and added a stop-piece to the riser edge to register it against sequential blocks. I also cut a dead-straight piece of 1-by lumber slightly shorter in length than the stair’s nominal width and used it as a straightedge to check the level and alignment of the stringers.
Corrective blocks. Next, I ripped 3/4-inch AdvanTech subflooring (you can use any good-quality plywood, engineered subflooring, or material with a solid core) at the 7 13/16-inch width, then cut the rippings to length against a stop on my miter saw at 9 7/8 inches plus 1/4 inch, or 10 3/8 inches. The extra 1/4 inch is for stacking at the back end, which I’ll explain below.
For a three-stringer stair with 12 treads, I need 36 of these identical blocks. They must be perfectly uniform to prevent cumulative, incremental errors from creeping in. If the stair is finished with drywall on its underside, as was the stair featured in this story, I chamfer one corner of each block for clearance. This stair had also been insulated with fiberglass batts, which I removed, then replaced before installing the finish treads and risers.
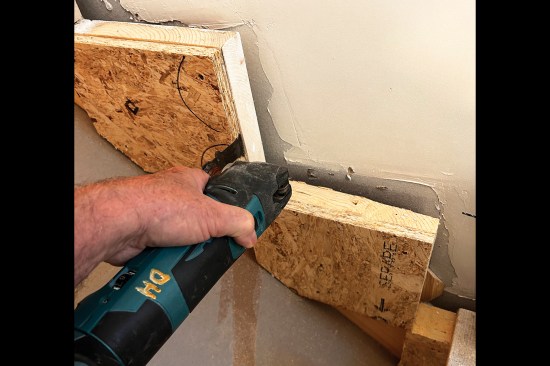
To correct the existing stringers, the author cut 3/4-inch OSB b…
Beginning at the bottom tread, I applied PL Premium adhesive to the face of a block and stuck it against the first outer stringer, adjusting it to align precisely with the plumb line on the wall. (If the bottom of the stair is open on both sides, you’ll need to establish a temporary, immovable reference for the plumb line.) The starting riser must be square to the supporting wall, or the entire layout will be out of whack. Stringer cutouts that aren’t aligned with each other along the flight are trimmed to the block edges later, as needed.
The adhesive adds grip while I check the block for plumb and square using a good torpedo level. I keep two drill/drivers at hand, one to drill a pilot hole and the other to drive 2-inch screws—I like GRK R4 multi-purpose screws. I often use a clamp to hold the block in place until fastened. If I were to simply shoot the blocks with a nail gun, I might struggle to correct for accidental shifting; with clamps and screws, reversal and correction are easy.
With the first block installed, I move to the opposite, outside stringer and repeat the process, again checking that the alignment is square to the wall or general stair layout. I straddle the two outside blocks with a torpedo level riding the 1-by straightedge, checking across the run, as well as front to back, for overall alignment. Errors can telegraph all the way up a stair, so I take my time. I then install the center stringer block, using the straightedge for reference on both riser and tread surfaces.
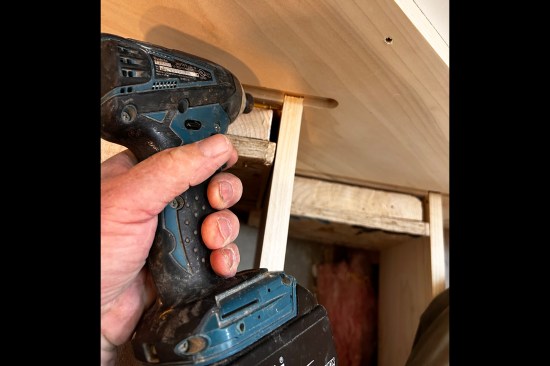
Once I’m satisfied that I have a precise and reliable starting tread, I move on up. This is where that extra 1/4 inch on the block comes into play, as it provides a small extension on which to rest the next block up. With it glued and set in place, I use the check block to ensure the tread depth is accurate, then predrill and drive the first screw close to this lower rear junction. (Although the GRK screws are self-drilling, they can still yank the piece around, so I drill first, then screw.)
When the block is plumb and level, I add three more screws, one per corner. Next, I use my multi-tool to trim away any portions of the stringers that project past the corrective blocks. The AdvanTech blocks become the bearing points for the finish treads and risers, so it’s not necessary to shim the stringer treads and risers if the new blocks run proud of them. I continue this process all the way to the top, removing and replacing the temporary treads on the fly.
Correcting the layout. When I reached the top of the stairs pictured in this story, I had to trim 3/16 inch from the last block because the landing hadn’t been built parallel to the stair layout. Rather than settle for crafting an irregular top tread, I added 3/16‑inch pack-out strips to the riser face of every block on the stair. Also, the dropped landing was out of level, which I knew from my initial inspection. To correct it, I added progressively thicker strips at 8-inch centers to support the oak flooring added later by the flooring installer.
Skirtboards
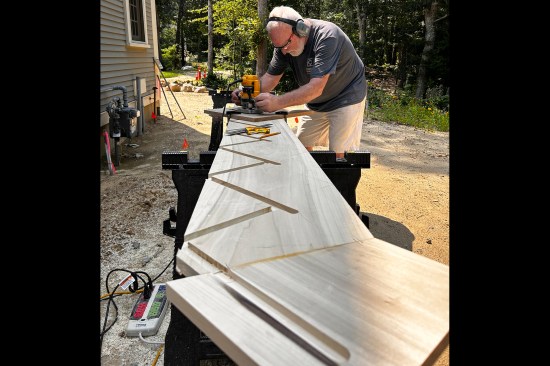
The method I used for this stair involved recessing, or “housing,” the oak treads and poplar risers into the face of the poplar skirtboards. (The top seven risers had housed skirtboards on both sides, while the lower six were housed on the right side with an open skirtboard on the left.) The ends need to be inserted only 1/8 inch to be covered, which is done by routing a deeper recess, inserting the end of the tread or riser on one side, then sliding it back in the opposite direction to cover the end on the other side. On this stair, I was supplied with risers that had a groove to accept the tongue along the back edge of the tread, highly complementary to this recessed approach. I cut the treads and risers singly, rather than all at once. Stairwells aren’t always truly parallel, growing unexpectedly wider or narrower mid-flight, so it pays not to get ahead of yourself.
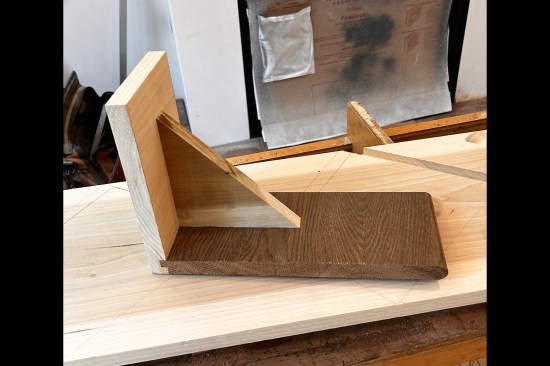
The author made a cut-off model out of the owner-supplied oak tr…
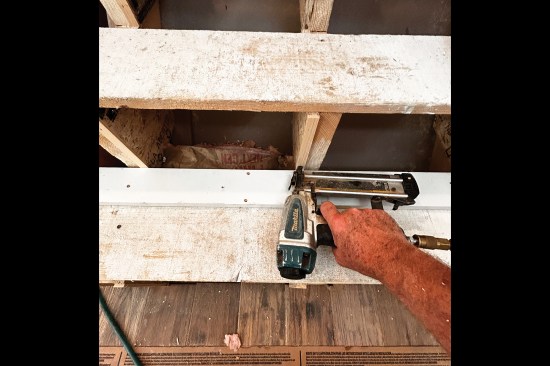
I began by cutting the skirtboards to fit, then screw-tacked them to the wall following a chalk line snapped on the wall at the rise angle. Then, using a cut-off tread-and-riser model, I traced its outline onto the skirtboards at each step, left and right, ensuring an accurate alignment for final assembly.
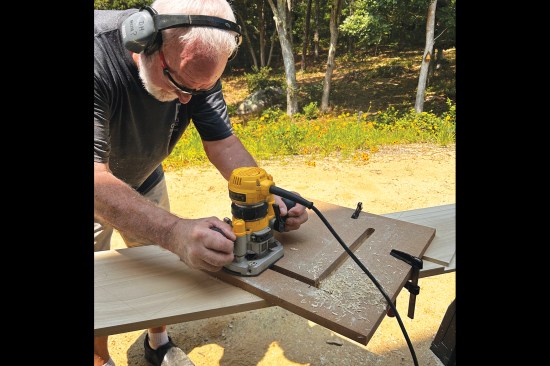
With the skirts marked, I used a basic router template and a top-bearing straight bit to cut the 3/8-inch-deep recesses. When I made the template, I allowed for a slightly loose fit to enable the treads and risers to slide in as needed. Any dark line showing around finish components gets filled with two-part compound and sanded flush. If these were natural-finish rather than paint-grade stairs, they would require a tighter fit and more of a struggle, but the method would remain the same.
When making the cut-off model, check to see if the finish treads have a standard width or if there is some variation (as was the case with the oak treads shown here). Unfortunately, I selected a tread at random that was 1/16 inch narrower than the others to make the model, which threw off my tracing of the nosing outline onto the skirtboards on some of the steps. If you do encounter width variation, rip all the treads to the same width prior to making the model.
When installing the routed skirtboards for keeps, I use the cut-off model to check at the top and bottom to make sure it, and therefore the treads and risers, will slide in as intended. I start at the top because it’s easier to position the skirt from there, rather than trying to push it up into position from the bottom.
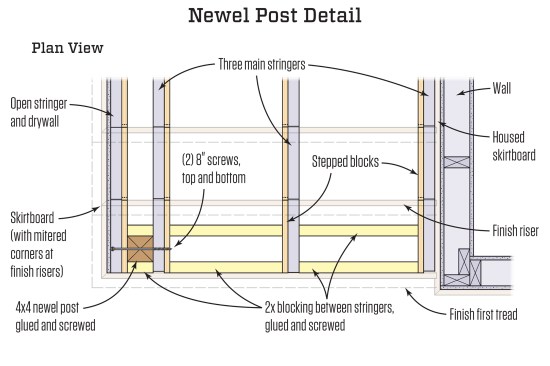
Open skirtboard. On this partially open staircase, there was a fourth, outside—or “open”—stringer that I bypassed in the initial correction phase. Its main function is not load-bearing but projecting the stair profile out to the wall surface. Unsurprisingly, its cutouts didn’t align with the corrected main stringers. I easily corrected them with six identical blocks that I referenced against the straightedge, trimming the stringers with a multi-tool as needed. However, I used the cavity between the open and the adjacent main stringer to capture the 4×4 newel post (more on this below).
I cut the open skirtboard to the rise-and-run profile, mitering the riser cuts at 45 degrees to match the six riser ends. I installed it on the wall, using a short piece of mitered stock to gauge the precise alignment.
After gluing and nailing the first tread at every point of conta…
The first tread. With the skirts secured, I installed the second riser and first tread (leaving the first riser off until the end of the job makes recovering an accidentally dropped tool easier). First, I provided solid 2-by blocking between all the stringers at the first tread to secure the newel post. I then applied PL Premium generously under the tread at every point of contact, positioned the tread equally between skirts, and gun-nailed it to the original stringers with 2 1/2-inch, 15-gauge finish nails, kneeling on the tread while nailing to hold it firmly down. Then I screwed the riser to the rear edge of the tread. The interlocking tongue and groove make this joint appear flawless; on a simpler, butted joint, the screws pull it tightly together. For this reason, I typically nail the risers only along the upper edge.
Newel Post
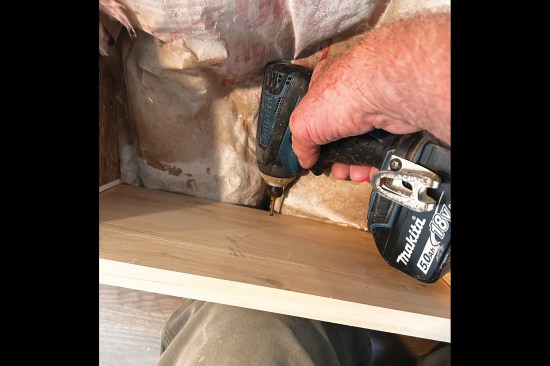
I made the 4×4 oak newel post narrower by 1/8 inch all around from the finished tread line to the subfloor. This created a shoulder on the post to cover the installation hole through the finish tread. Then, using blocking, shims, and glue, I created a tight-fitting pocket in the framing to capture the post, ensuring that it would stand plumb in both directions.
I made a story stick that recorded the pocket’s dimensions and distance from the far skirtboard, then installed the first tread. I left the first finish riser off, allowing access for additional shimming, if needed. Referencing the stick, I drilled a starter hole through the tread within the newel zone, then used a pattern bit in my router to trace the pocket in the framing. I squared the cutout corners with a sharp chisel and dry-fitted the post.
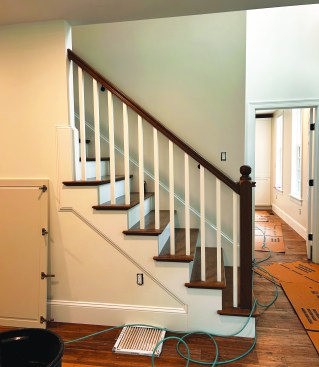
The finished stair with oak bull-nosed treads, newel post, scotia molding (under the tread nosings), handrails, and painted poplar risers, skirtboards, and balusters.
After confirming that the post was plumb all around and met the tread seamlessly, I added a copious amount of PL Premium adhesive to the install cavity and slid the newel home. I drove two, 8-inch-long TimberLok screws through the outside stringer and post and into the stringer beyond. Then I installed the finish riser, adding more glue between it and the solid blocking for good measure. I braced the top of the post to protect it from accidental movement and left the glue to set overnight. The following day, it was immovable.
Finishing up. I then installed the remaining treads and risers, measuring and cutting them one at a time as I worked my way up the stairs. Before turning the stairs over to a professional paint crew to make it all shine, I filled all the nail holes with matching filler. All told, it took five days to complete this stair, including the handrail and balusters, base trim, and dust cap molding.
Photos by Dave Holbrook, Dan Holbrook, and Stephen Najarian; illustration by Tim Healey


