- Q. My company has been asked to enclose a triple-wall metal chimney with a rectangular chase above the roofline. The chimney vents a fireplace, and extends about 4 feet above the roof. The homeowners want to box in the chimney with framing, sheathing, siding, and trim. What type of clearance is necessary between the metal chimney and the box? What is the best way to flash the top of the box?
A.Builder Mike Guertin responds: First, check the chimney manufacturer’s printed specs to determine the minimum clearance between the chimney and the framing. In most cases, the minimum clearance will be 1 or 2 inches; if uncertain, err on the conservative side.
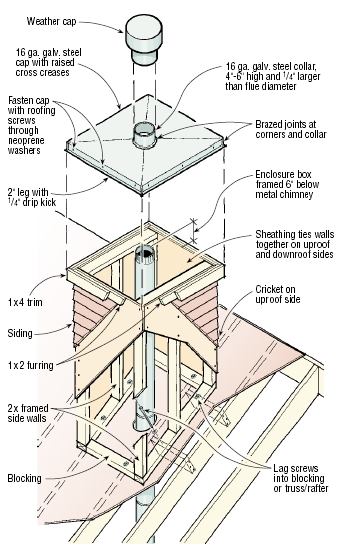
Frame a wooden box to match roof pitch. I usually build two side walls from 2x3s or 2x4s, and just use sheathing to tie the walls together at the uproof and downroof sides. Make the overall height of the box 6 inches short of the pipe termination exclusive of the weather cap. This leaves enough of the pipe exposed to install the weather collar and the cap. Assuming shingle or clapboard siding, install a 1×2 furring strip around the perimeter of the box flush with the top edge.
Fasten the box to the roof framing, preferably with screws or lag bolts. Install blocking between the roof trusses or rafters if necessary, so the screws bite into something. Check to be sure the box is plumb and square at the top. If necessary, frame in a cricket on the uproof side.
Install step flashing and roof shingles as usual. Install the siding, and then cover the 1×2 furring at the top with a 1×3 or 1×4 piece of finish trim all around the box. Measure the top of the trimmed box, taking dimensions carefully. Make a sketch locating the chimney within the perimeter. Note the actual chimney diameter; the chimney hole diameter should be 1/4 inch larger than the pipe.
Make or have made a galvanized sheet metal cap with a separate 4- to 6-inch tall collar that slips over the chimney. I prefer to use 16-gauge material because it’s more rigid than 20 gauge. Diagonally crease the metal cap in both directions before installing the collar. The creases add rigidity to the cap and give a hip effect to shed water. The edges of the cap should fold over the trim about 2 inches, with a 1/4-inch drip kick along the bottom edge.
Snip and bend tabs from either the top or the neck for a secure connection.
Although some builders secure the tabs with pop-rivets and seal the seams with high-temperature silicone, I am doubtful that a caulked joint will be durable. It’s best to braze or solder the joints in the galvanized metal.
Metal Chimney Enclosure
Q&A: Boxing in a Metal Chimney Above the Roofline
2 MIN READ