Low-slope roofs present a particular problem for drainage and waterproofing, especially when they intersect with an upper-story wall. If the roof is not just a roof, but also a walkable deck, the problems can be compounded. And a heavy stone or tile patio that is also the roof over an occupied space may be the trickiest problem of all.
In a previous issue, I discussed a case where we had to diagnose a leaking patio roof (“A Leaking Patio Above Living Space,” Jun/16). But in that example, my company didn’t have to repair or rebuild the patio; instead, the owners opted to cover the whole area with a new enclosed room covered by a conventional roof.
In this story, I’ll look at a couple of other examples, where leaking rooftop patio surfaces had to be completely removed, re-waterproofed, and re-paved. The jobs included removing and replacing the masonry or stucco wall coverings at the bases of the adjacent walls. Along the way, our crews had to rebuild the waterproofing details at the intersections of the patios and the walls, replacing old, leaking systems with a more effective method.
In the example shown under repair, the original patio had flagstones set in a mortar bed on top of an 8-inch reinforced concrete slab, which in turn was supported by basement foundation walls at the ends, and steel I-beam girders in the middle. In the example shown, the slab was supported by a steel structural frame and corrugated steel pan forms—again, topped by a mortar bed and flagstones.
In each case, the slab continued all the way to the home’s framed walls, and the masonry cladding for the house walls rested on top of the slabs; then the mortar bed and flagstones were laid butting up against the masonry wall claddings.
At those complicated intersections, the waterproofing and flashing details require considerable thought, careful planning, and careful execution. The drawing on page 48 and the photo above show our preferred way to handle this condition, and reflect how we repaired each of these wall-to-roof intersections. But that’s not what we originally found when we tore each example apart.
INVESTIGATION
In both cases, the leaks weren’t the only reason for us to be there: The homeowners wanted to replace their stone or concrete-paver patios anyway. But there was evidence of leaking in the rooms below each of the patios (in one case, a ground-level garden room, and in the other case, a garage and occupied room in the home’s walk-out basement level). So we also had to figure out the cause of the leaks, and fix it.
The crew built a low dam using strips of foam caulked to the existing waterproofing and flooded the roof edge.
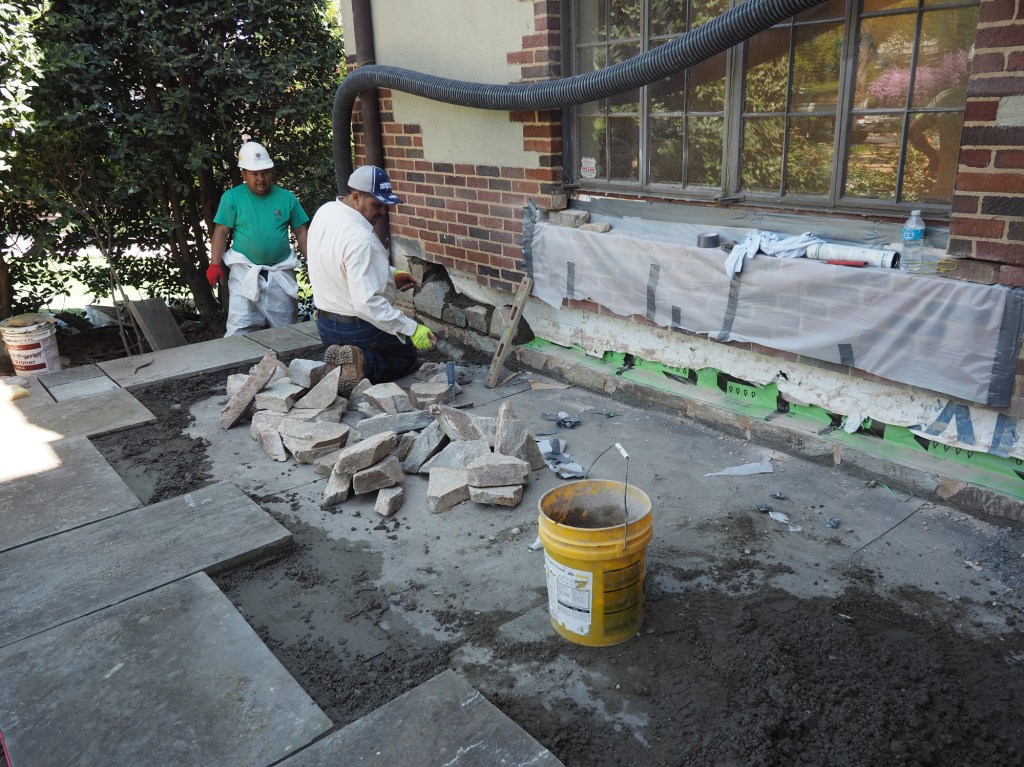
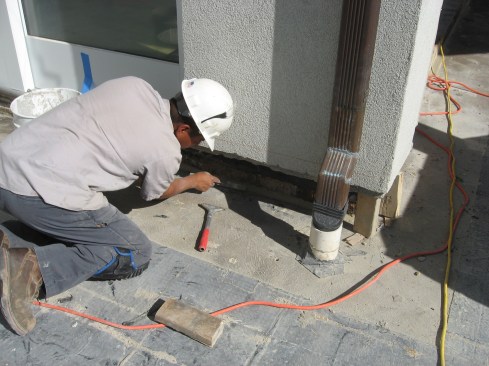
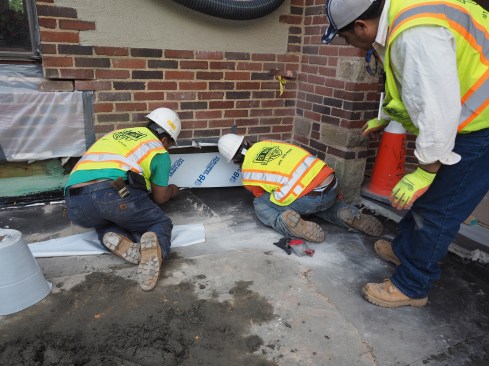
In the case shown on this page, we removed the stone patio, mortar, and dimple-sheet drainage board (which left little circles all over the bitumen-sheet waterproofing). We could not see weeps or flashings in the masonry veneer on the walls, so we tested the intersection of the wall and terrace with water: We built a little dam near the wall, gluing strips of foam insulation to the roof membrane with adhesive caulking. Then we added water with a garden hose to create a shallow pool by the wall, and checked for leaks below the roof. Sure enough, water began to drip from the ceiling in the room below.
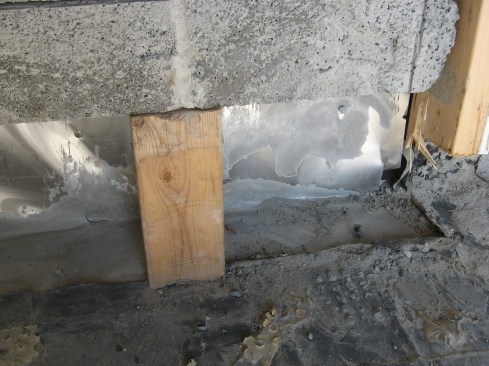
The wall was supported with pieces of 2×4.
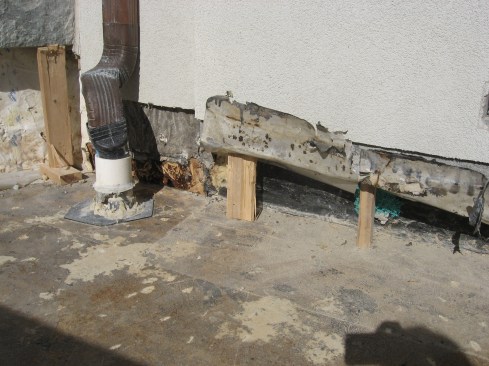
The joint where the rubber roofing met the masonry was seen to be compromised, and aluminum flashing behind the block was corroded and leaky.
Next, masons removed the lowest 12 inches or so of masonry (4-inch block with a stucco veneer) and temporarily supported the block walls with short pieces of 2×4. The previous contractors had applied waterproofing to the flat concrete sub-deck, then a piece of coil stock flashing was placed on top and bent up the wall. Housewrap on the wall was tucked behind this flashing instead of in front as it should have been, but that probably didn’t matter—because water was free to run across the waterproofing and into the wall underneath the aluminum flashing. Also, aluminum flashing will corrode in contact with masonry. That process was well underway in exposed areas.
STARTING OVER
Our next task was to re-waterproof the concrete deck. We removed the old waterproofing and applied a “cant strip” of flexible sealant in the inside corner of the wall for strain relief.
Before applying the coating, workers first made a fillet of flexible caulking at the joint to ease the corner and relieve strain.
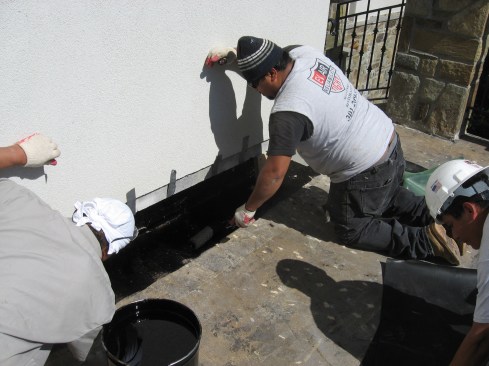
Next, they rolled the hot asphalt onto the wall and the deck edge.
Next, the crew applied Henry’s recommended primer, then two coats of the hot rubber, with a layer of polyester reinforcing fabric laid down between coats. This product makes a thick, heavy coating. A couple of commercial contractors I know think it’s the most reliable waterproofing on the market, and we haven’t had any issues on the few jobs where we’ve used it.
A layer of reinforcing fabric was set over the hot material, then a second layer of coating was applied, embedding the fabric into the rubberized membrane.
Different waterproofing materials have different recommended methods for plane changes, corners, and other details; we always download the instructions and refer to them as we work. But generic details can’t cover every situation that we may find in the field, particularly in a repair situation. So we usually have to make judgment calls on a case-by-case basis, relying on our experience and the expertise of our subs. For the jobs discussed here, a lot of the design and all the repair work was provided by Ev-Air Tight, Shoemaker Inc. (Riverdale, Md.), one of our trusted trade partners.
POST DETAIL
Railing mounts are a typical trouble spot on a masonry patio. For a patio on grade, railing companies often come to the job after pavers are installed and drill holes through the pavers into the concrete, then cement the rail-post bolts into the holes. That’s not a problem if there’s nothing under the patio but ground. But if they do that on a waterproof roof deck, it will make a hole in the waterproofing, and there will be a leak into the space below.
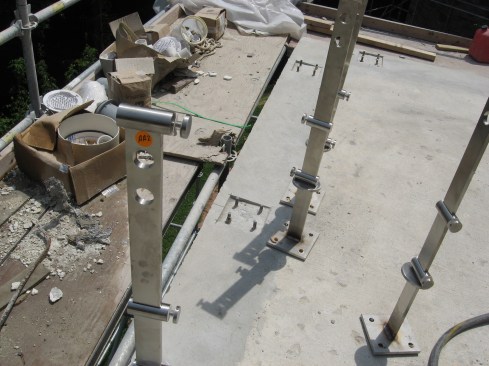
Railing post bases are a common source of leaks in a rooftop patio. The author’s preferred method is to set the bolt in the concrete before waterproofing.
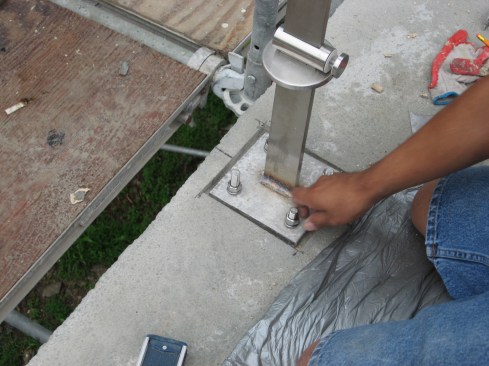
Next, the metal-post base plate is connected to the bolts.
When you need to preserve effective waterproofing, one good approach is to mount the railing posts before doing the waterproofing, or at least set pins for mounting the posts. That’s what we did in this case (see photos, above): The crew set stainless steel bolts into the concrete, then mounted the post bases in place, before applying Henry primer and two coats of rubber to the deck.
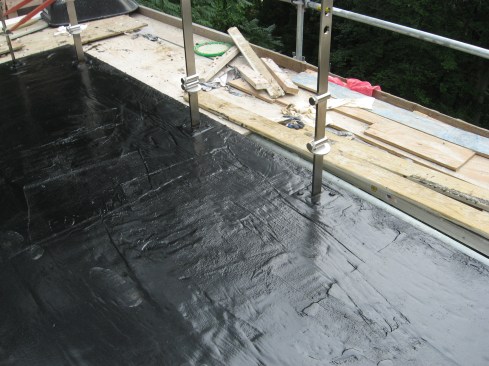
A coat of primer is applied to the metal and the concrete, and finally the reinforced rubberized asphalt is applied over the post base for a robust waterproof seal.
MORTAR BED AND PAVERS
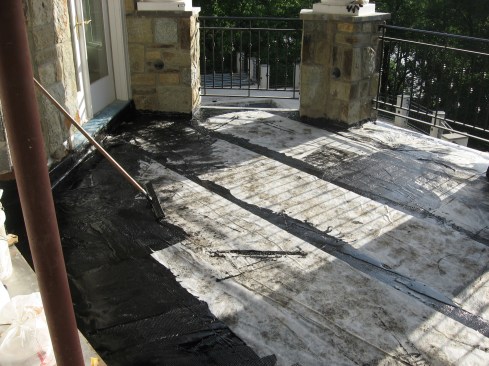
Before setting the new limestone pavers in mortar, the crew rolled out a dimple-sheet drainboard with a filter facing. Many different vendors supply a suitable product for this application; we typically use MiraDrain from Carlisle Coatings and Waterproofing (carlisleccw.com), because it’s easy to find in our area.
The rubberized asphalt membrane is applied hot, and splashes or drips will stick to anything and are a hassle to clean up. At left, the crew has protected the masonry rail posts with poly.
This material creates a drainage space below the stone, giving water free-flowing access to leave the assembly. That reduces the risk of freeze-thaw damage in the stone and mortar, and reduces pressure on the waterproofing. With free drainage, only a tiny amount of water can accumulate on top of the waterproofing, so there is never much head pressure to push water through any flaw.
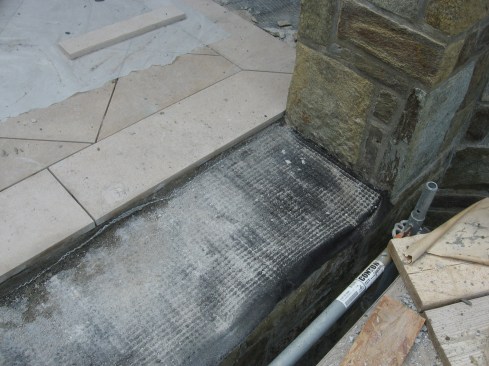
Over the reinforced membrane, the crew layed a dimpled plastic drainage sheet with filter faces, then built up a mortar bed reinforced with galvanized wire mesh.
Next, the masons placed a setting bed of dry-pack mortar, embedding a galvanized wire reinforcing mesh in the center of the mortar bed. Then they mixed a batch of thin, more-fluid mortar, spread that thinly over the dry-pack, and set their pavers in place. Dry-pack forms a strong base, and the more-liquid mortar serves to bond the stone to the dry-pack bed.
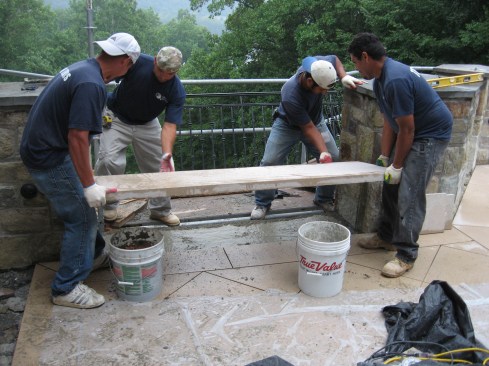
Finally, they set new stone pavers into the wet mortar.
A BEST-PRACTICE DETAIL
Our company has multiple crews working in the field on a wide range of building and remodeling projects. As a large company, one of our challenges is to create a common knowledge base across all of our crews, so that the whole company can benefit from the lessons each crew has learned on the job. Building and sharing that knowledge base is a big part of my job at BOWA.
The drawing below depicts the typical solution that we’ve developed over time for masonry paver decks over living space, based on the recommendations of materials suppliers combined with our own experience on site.
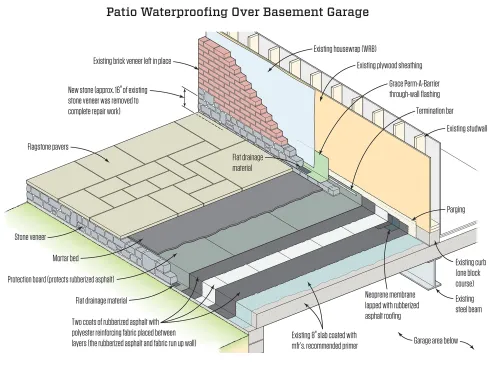
Protection at the transition. In the author’s preferred detail, fiber-reinforced rubberized asphalt membrane extends from the slab up onto the wall sheathing, with neoprene rubber flashing embedded in the hot asphalt at the corner. Protection board on the patio also extends up the wall and is secured with a mechanically fastened termination bar. After the base course of masonry is set, a through-wall flashing and weeps are applied to direct moisture from the wall masonry out to daylight.
The joint between the wall and the concrete slab is the critical point. Ideally, we address that situation with the dual-flashed assembly shown above. The reinforced fluid-applied waterproofing adhered to the concrete slab extends all the way to the pre-primed wall and laps up onto the wall, secured with a termination bar that will hold the material even if adhesion fails. Dimpled drain board or a fiber protection board—or both—improves drainage and protects the waterproofing.
A base course of wall masonry is laid on the waterproofed slab. Next, a through-wall flashing membrane is applied to the top of that base course and lapped up onto the wall. The wall’s weather-resistive barrier (WRB) is lapped down over the flashing. Then more courses of masonry are laid, with weeps provided for drainage above the through-wall flashing.
With this assembly, water in the wall cladding is directed out of the wall onto the surface of the patio. The waterproofing beneath the patio, extending up onto the wall, provides a second line of defense.
PITCH AND PROTECTION
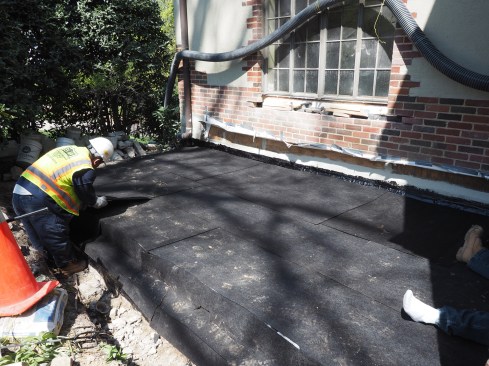
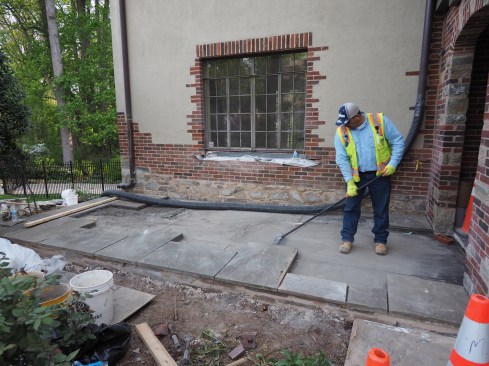
In the example shown below, the patio is located at grade, but it’s not sitting on the ground—it’s over occupied space. The room at the back of the patio is built over a basement-level garage, which extends past the room on both sides, so there is a 10-foot patio over the garage on either side. Like our earlier example, this patio was leaking into the space below because of ineffective waterproofing and flashing at the patio-to-wall juncture.
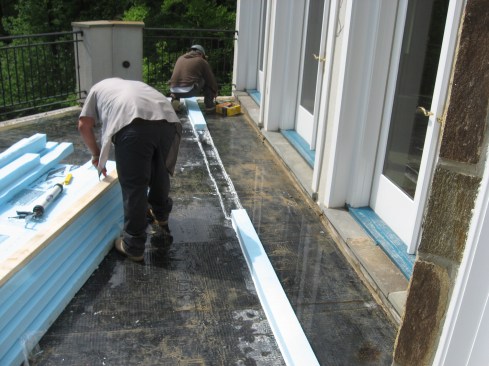
Hot-applied rubberized asphalt is applied to the concrete deck and lapped up onto the primed plywood wall sheathing.
A course of protection board is laid over the waterproofing.
Flashing membrane is applied to the wall as a backing for the new stonework, then a base course of stone is set against the flashed wall. Another through-wall flashing is installed before upper courses of stone are laid (leaving weeps that allow the wall to drain).
Finally, new pavers are set into a fresh mortar bed/
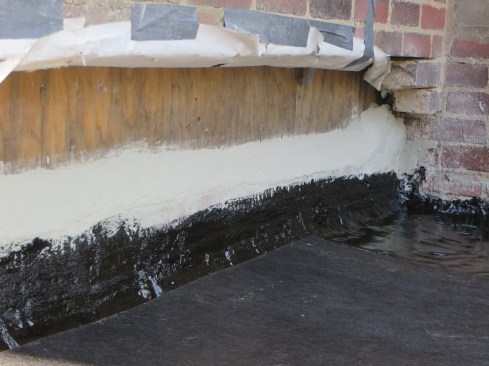
So our replacement of the flagstone patio, again, had to include a reworking of that intersection. In photo 14 above, the crew has taped back the housewrap, primed the plywood wall, and applied rubberized asphalt to the slab and up the wall. Next, they laid down sheets of fibrous protection board, which allowed the masons to rebuild the wall masonry without getting themselves covered in the soft, sticky asphalt, and then to pave the patio without damaging the waterproofing.
The masonry detail at the wall base includes two layers of fully adhered flashing. Before the base course of stone was set, masons applied a peel-and-stick membrane to the wall, lapping it onto the hot-applied asphalt. After setting the base course, they installed a through-flashing membrane over that course, lapping up under the WRB.
This relatively small patio had a good pitch, and so we decided it would be safe to omit the layer of dimpled drainage sheet. So in this case, the masons installed their mortar bed directly on the protection board.


