My company specializes in cedar roofing and siding here on Cape Cod, where cedar has long proven its durability even in severe coastal weather conditions. Correctly installed, a premium cedar roof can easily last 25 years — and typically much longer. In this article, I’ll talk about the specific cedar products and installation procedures we use to ensure a long service life.
Shingle or Shake?
Although the terms “shingle” and “shake” are often used interchangeably, they are in fact two distinct products. Shingles are always sawn on both faces and are thinner, usually with a 7/16-inch butt. Shakes have 5/8- to 3/4-inch-thick butts and are split — rather than sawn — from the log, resulting in a rough, uneven face. (Taper-sawn shakes are unique in the category in that, like shingles, they are sawn on both sides. However, for all intents and purposes, I consider taper-sawns to be nothing more than thick shingles. Generally, the thicker the shingle, the longer it lasts.) Whether split or sawn, roofing application calls for a product with least 90 percent “edge grain,” meaning grain oriented perpendicular to the surface. Edge grain produces better stability and minimizes the cupping and splitting that wood undergoes in the wetting and drying cycle.
Grading. Manufacturing members of the CSSB, the Cedar Shake & Shingle Bureau (604/820-7700, www.cedarbureau.org), rely on a standardized “Certi-label” program, adopted by the major code agencies, to identify various shake and shingle grades. Grading rules are listed on the CSSB Web site. This is important information because building codes stipulate certain minimum standards for wood roofs. Using the wrong shingle could spell big trouble. The IRC (905.7.4) defers to CSSB grading rules for approved shingles, which include grades 1, 2, and 3.
On our roofs, we don’t use anything but premium grade, which is 100 percent clear heartwood and 100 percent edge grain. It’s the best guarantee that the roof will perform without any problems for the longest period of time. The shingles we consider suitable for roofing include 18-inch “perfections” and 24-inch “royals.” Sixteen-inch “fivex” (5-inch exposure) shingles are also available and are allowed by code, but we never use them on the roof.
Finally, while shake roofs are common in the West, I have yet to install one here in New England. (There are a few differences between shingle and shake installation, which I’ll touch upon later.)
Warranties. Although it’s ending this year, the CSSB has historically offered a warranty program on behalf of its manufacturing members, made available through CSSB-approved installers (of which I’m one). In the future, warranties will still be available directly from the individual manufacturing members.
A wood roof is an expensive roof. Two or three years ago, in a red-hot market, I was paying $300 per square for premium red cedar shingles. In today’s flat economy, prices are well under $200 per square, helping to make red cedar a more attractive alternative to 50-year asphalt shingles. That’s not to say the two are competitive, exactly; I generally quote a replacement roof in asphalt at around $375 per square and cedar starting at $600 per square. New-construction costs are slightly lower.
Wind resistance. Wood shingles are rated for wind pressures equal to 173 mph, and shakes to 245 mph — a certain advantage over asphalt shingles in hurricane zones. Insuring a wood-roofed home can still cost more, though, because it’s perceived as having a higher value. Presumably, that perception can also mean a higher asking price when it’s time to sell.
The drier, the better. Steeper roof pitches shed water more rapidly, reducing absorption and making them the best candidates for wood roofing. Cedar shingles are not recommended for roof pitches below 3/12, nor shakes for pitches less than 4/12. On 3- and 4-inch slopes, I reduce the course exposure to about 4 inches. On 3-inch slopes, we always fully cover the deck with self-adhering underlayment. Steeper than that, 30-pound felt is sufficient.
Two Species
In the Northeast, red cedar is far more common than Alaskan yellow cedar, a relative newcomer to our market. Nonetheless, I prefer yellow cedar; it’s slightly denser than red cedar and has better resistance to cracking and splitting. Also, it’s dimensionally stable and has natural oils that make it highly decay-resistant. While red cedar weathers to a dark, sometimes uneven shade of gray, yellow cedar turns a softer silver-gray that closely matches the color of the white cedar shingles commonly used on sidewalls. When it was first introduced, yellow cedar was considerably less expensive than red cedar. However, while prices vary from one region to another, yellow cedar in this neck of the woods now costs about 20 percent more than red cedar.
Pressure-impregnated red-cedar and yellow-cedar shingles are also available, — either preservative-treated (Certi-last) or fire-retardant-treated (Certi-guard), but not both at once. Preservative treatment can really extend service life and offers significantly better material warranties, up to 50 years in some cases. These shingles are recommended for use in high-humidity regions; we recommend their use in particularly shady locations where the shingles are likely to remain wet for extended periods of time. Preservative treatment costs about 7 percent more than nontreated shakes or shingles — a good bargain when weighed against the extended service life.
Fire-retardant treatment comes in Class C and Class B ratings; a Class A rating can be achieved by installing a Class B shake or shingle over a 72-pound mineral-surface fiberglass cap sheet. Design specifics are best obtained from the specific treatment company (Chemco, 360/366-3500, chemco.us; or F.S.R. Treatment, 800/663-8301, firesmartroofing.com).
The CSSB cautions that white cedar shingles are intended for siding use only. White cedar is softer than either red or yellow cedar. The shingles are also predominantly flat-sawn, which practically guarantees that they’ll curl, cup, and split under rooftop exposure.
Width and grain rules. A good roof-grade shingle will split straight along the grain when cut with a utility knife. Generally, if the grain looks too wavy — as if the shingle had been cut close to a knot — I toss it. Wavy grain means the shingle is likely to cup or warp and need replacement. Lower grades permit a certain percentage of flat-sawn grain and knots above the exposure line, both dubious qualities on a roof.
Narrow shingles, or “paint sticks,” don’t make the cut, either. With shingles less than 4 inches wide, there’s simply not enough surface area to cover adjacent keyways and nails. The best range is between 5 and 9 inches wide. Shingles wider than that will move too much during wetting and drying cycles and may end up splitting around the nails.
We cull the 10-inch-wide shingles and resaw them to 5 inches. The very widest ones — those around 12 inches — we put aside to use for one-piece valley shingles, which saves time and materials.
After establishing an accurate pattern, we cut all the valley shingles at once, using an adjustable angle fence on the table saw. On a hip roof, the offcuts can always be used to complete hip courses.
Roof Prep
Because cedar shingles readily absorb moisture, it’s important to provide a means for air to circulate and speed their drying. Otherwise, they’ll cup and support fungal growth and decay.
Many wood roofs today are installed directly over felt underlayment and plywood sheathing, but that’s not the best way to go. Although preservative-treated shingles may hold up well in direct contact, there’s still the possibility that moisture will be trapped against the sheathing. Traditionally, wood shingles were installed over spaced boards, or “skip sheathing,” a practice that allowed air to circulate under the shingles. The problem with skip sheathing is that it’s more labor-intensive to install than plywood sheathing and doesn’t provide the same racking resistance.
A hybrid approach, where spaced boards are placed over solid sheathing, is sometimes used, but the continuous ventilation product Cedar Breather (800/346-7655, benjaminobdyke.com) provides a good, economical alternative without all the fuss. I always recommend it. A 200-square-foot roll of the random-matrix mesh costs about $110 and is easy to staple down with a hammer-tacker. Installed, it adds $80 per square to the roof price. The mesh should run all the way from the edge of the eaves to the top of the ridge. At rakes, we hold it back about an inch so that the shingles can be nailed down hard along the edge to close the roughly 1/8-inch gap. The roll-off is imperceptible. If we’re replacing the roof trim, it’s a simple matter to raise the rake edge enough to cover.
Using Cedar Breather does introduce a thin, springy void under the shingles, bringing with it some concern for cracking the shingles underfoot. We take extra care when walking on them and add staging brackets and planks as needed to minimize direct foot traffic. With thicker, taper-sawn shakes, this is not as much of a concern.
Cracked shingles have to be replaced. The good news is that they’re fairly easy to remove piecemeal, especially if the roof isn’t at the end of its service life. But that’s typically when I find myself making temporary repairs and recommending a new roof. The majority of the wood roofs we replace are about 25 years old, while roofs 40 and 50 years old aren’t unusual.
Installation Basics
Shingles require a three-ply application. Thus, a 51/2-inch exposure calls for 18-inch perfections to ensure triple coverage. A 7 1/2-inch exposure will require 24-inch royals to create a three-ply surface. Unlike shingles, thicker shakes may be installed in two-ply coverage. For example, a maximum exposure of 7 1/2 inches is acceptable for an 18-inch shake, and a maximum of 10 inches for a 24-inch shake. Exposure tables for shingles and shakes on steep and shallow roof slopes are found in IRC 905.7.5 and 905.8.6.
Note that when installing split shakes, there’s an important added step. The irregular, corrugated surfaces of shakes prevent them from lying tightly against each other, which helps with ventilation but makes them susceptible to wind-driven snow and rain entering under the courses. To prevent this, shake courses are interlaid with 18-inch-wide strips of #30 roofing felt. The interlay laps the tips of the shakes no lower than twice the distance of the exposure up from the butt and runs up onto the sheathing, effectively creating a third ply and a baffle against snow and water entry. However, felt interlay should never be used under shingles or taper-sawn shakes, which have no inherent ventilation space between the layers. The felt is absorbent and can hold water, potentially leading to buckled shingles and early roof failure.
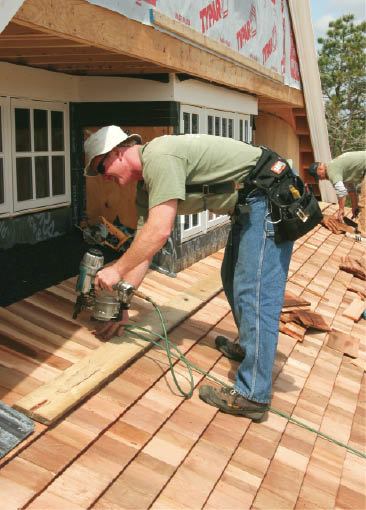
Nails. Although hot-dipped galvanized nails are acceptable, we use only stainless steel ring-shank nails. Considering the overall cost of the installed materials, it’s cheap insurance against failure. In any case, we never use electroplated fasteners of any kind. The CSSB discourages their use, and I have to agree. I’ve seen cedar shingles literally slide off a 7-year-old roof after these nails rusted away. Whether this was due to corrosive salt-laden air or a chemical reaction with the natural oils in the cedar wasn’t clear — but regardless, these nails aren’t worth taking a chance on.
For shingles, we use 13/4-inch nails, while thicker shakes call for 2 1/4-inch nails. Stainless steel staples are allowed, but we don’t use them because I just don’t like the idea of doubling the number of penetrations. Also, staples are more difficult to remove should we need to make spot-repairs or retrofit a skylight. Whichever you use — nails or staples — don’t overdrive them. Doing so risks voiding the manufacturer’s material warranty. We adjust the gun pressure so that the heads are driven just flush with the surface.
Layout
The first course is always a double layer. We nail the first layer a little low, about 5 inches up from the butt, and the second layer an inch above the exposure line. Metal drip edge can be eliminated, but the felt underlayment or self-adhering membrane should always be carried onto the top of the fascia. The shingles should overhang both eaves and rakes by 1 1/2 inches.
To start, we nail shingles at wide intervals along the eaves, overhanging by about 4 inches to catch a chalk line and establish a straight, 1 1/2-inch overhang. We then tack-nail lengths of strapping to the line to guide the first course. The projecting shingles are later sawn flush.
To guide subsequent courses, we rip fence boards to the exposure width — typically 5 1/2 inches — and tack-nail them to the face of the previous course with 1 1/4-inch box nails. These nails don’t fully penetrate the shingles, and the holes self-heal. Every 10 courses or so, we’ll measure back from the ridge at both ends and center to make sure the courses are remaining parallel. If need be, we’ll snap adjusting lines. Don’t use red chalk for this or you could be looking at an accidental line for a long time to come.
Side laps over “keyways” — the joints between shingles — must be at least 1 1/2 inches and thoroughly cover the nails. Nails should be driven about 1 1/2 inches above the exposure line and no more than 3/4 inch in from either edge of the shake or shingle. We’re extremely careful about placing and covering the nails, since this is where shingles are most likely to split. If a split lines up with a keyway, a leak is pretty likely to develop.
For the same reason, it’s also important to make sure that no two joints align vertically within three successive courses. According to CSSB standards, a maximum 10 percent alignment is permissible — but to the experienced eye these stacked keyways tend to stand out like a sore thumb. We don’t allow them at all.
To accommodate expansion, we maintain a 1/4-inch spacing between shingles. (Between shakes, keyways should be about 3/8 inch wide.) However, if the shingles are noticeably wet coming out of the bundle, we tighten the spacing on the assumption that the shingles are as swollen as they’re likely to get. Those keyways will only widen, not buckle.
Valleys. A wood valley can be installed closed, with the two sides cut to fit against each other, but I feel that this makes it more difficult to keep nails far enough away from the center line and prevents the butts from drying promptly. On open valleys, we snap guide lines between 3 and 4 inches off-center, depending on the length of the valley and the expected volume of water. We always line valleys with a 36-inch-wide self-adhering membrane first. I buy preformed W-valley 12-ounce copper flashing in 10-foot lengths from a local sheet-metal fabricator. We overlap all joints by 6 inches and solder them tight.
Hip and ridge caps. While a ridge board is the fastest method for finishing the roof, a woven cap using shingles or shakes really puts the icing on the cake. We save considerable time by buying ready-made hip and ridge units through our roofing supplier. These are made to order to suit specific ridge and hip pitches. Since the joint orientation should alternate from one cap to the next, the caps come in left- and right-hand units. This helps prevent the possibility of a running seam developing over time.
Before installing the caps, we cover the hips and ridges with a 6-inch-wide piece of self-adhering membrane.
Maintenance. Ensuring that the roof will stay as dry as possible is critical to long service life. Wood fungus leads to rot and forms most aggressively in areas where the roof stays wet for long stretches of time. Valleys, gutters, and downspouts should always be kept clear of debris. Overhanging branches should be trimmed back and shade trees minimized. A simple way to help prevent moss from gaining a toehold is to install a narrow strip of lead or copper under the ridge board or cap, leaving about an inch of metal exposed. Then, when it rains, trace amounts of the metal will leach and wash over the roof, killing mold spores before they become established.
Chris Yerkes owns Cedarworks in South Dennis, Mass.


