With our reputation as a quality-focused contractor, we are regularly asked to take on “rescue” projects when another builder has failed to the point of being removed from the job. On a recent project, a brand-new TPO low-slope roof had been installed by a previous builder and we were asked to evaluate it as part of our work to take the partially finished project to completion and help the clients close their contract with the first builder.
Low-slope roofs are always challenging. With most types, there is no redundancy, so a single flaw can cause large problems. Over the years, we’ve found that some parts are more likely than others to fail, so we checked those areas carefully.
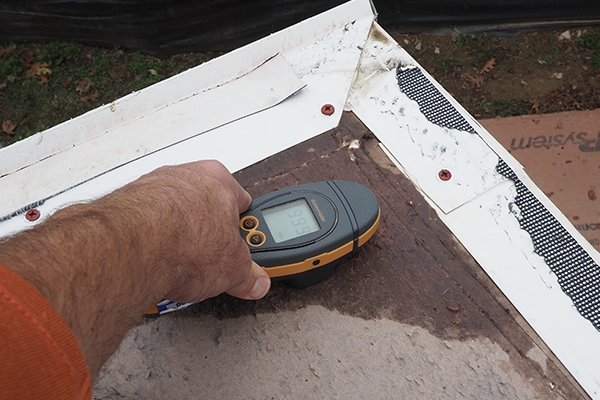
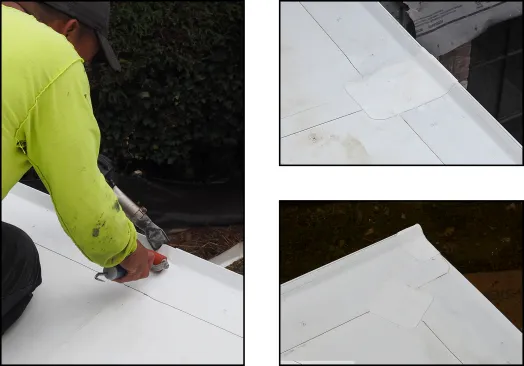
Signs of poor construction. Evaluating the 16-by-29-foot roof, we first checked the TPO seams using a seam probe. Running the awl-like tool along the edge of the seams, we quickly found multiple voids. In addition, heat-welded patches were missing at numerous seam intersections, so it didn’t take us long to determine that the roof’s seam and patch work would have to be carefully checked and heat welded as needed. We also noticed that seam sealant hadn’t been applied to the field-cut edges of the TPO membrane and patches. Some brands have factory edges on all sides, but once cut, the membrane’s fabric reinforcing layer becomes exposed and vulnerable to weather damage.
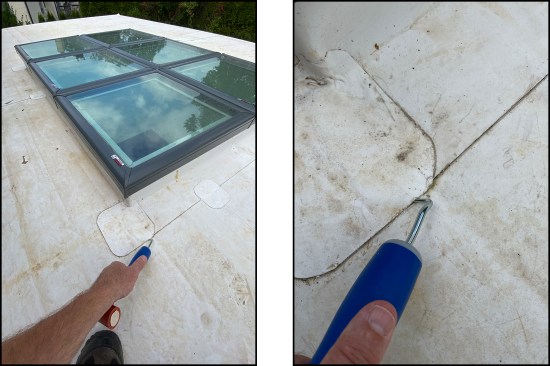
The recently installed 16-by-29-foot kitchen addition roof featured a ganged skylight unit (left). Using a seam probe, the author found multiple voids along the TPO's welded seams and patches (right). Required sealant along cut edges of TPO had been omitted.
Edge metal installed first. The most common failure point we come across on low-slope roofs is the edge. In the area where we work, the drip edge and gravel stop edge metal are often installed first, with the TPO membrane run on top of the edge metal. Edges built this way often leak, and the usual culprit is a failure to apply heat-welded flashing tape and extra layers of TPO flashing at vulnerable locations—any joints in the edge metal or the TPO membrane—per the manufacturer’s specifications. In my opinion, installing the TPO membrane first, then attaching the metal on top of the membrane later is a much better flashing detail (see “Low-Slope Roofing Details That Work,” Nov/19, for information about drip-edge detailing).
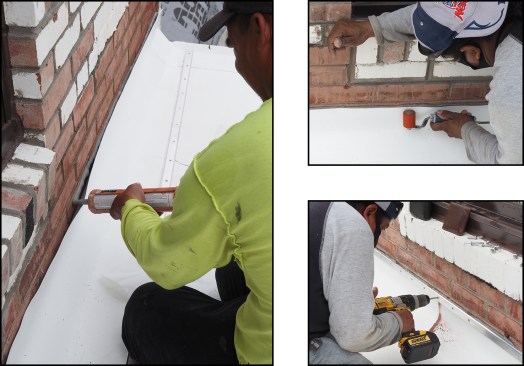
On visual inspection, we found areas where the membrane was not attached to the metal at all. Special coated metal per the manufacturer’s specifications is to be used and the membrane heat welded to it, but on this roof, the membrane was glued to the edge metal—and poorly at that. There were lots of voids in the adhesive, and dirt from rain had collected between the metal and the roofing within a short period of time.
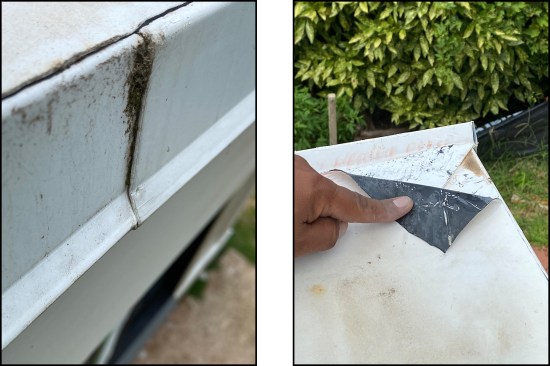
Dirt and moss built up at drip-edge seams, indicating water intrusion (left). The TPO membrane had been glued to the edge metal rather than heat-welded, as shown here at the juncture between the gravel stop (“rake”) edge and drainage edge metal (right).
When we cut back the membrane along the edges, we found that five of the six edge-metal joints had leaked. The leaks were mainly from water getting between the two overlapped pieces of metal; the manufacturer calls for the edge metal flashing to be “butted” end to end with a 1/4-inch gap to account for expansion and contraction. It also calls for multiple layers of heat-welded TPO flashing to seal the joint, but these were not installed. Instead, copious amounts of sealant were “smooshed” between the overlapped metal pieces in hopes of keeping water out.
When the TPO was cut back from the edges …
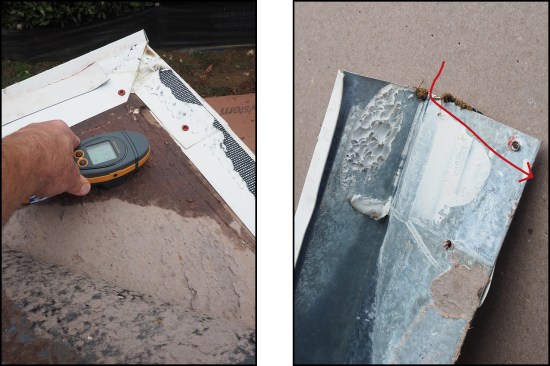
… it was discovered that the drip edge and gravel stop edge metal had been installed on top of the protection board. The manufacturer’s rigorous flashing detailing had not been followed, resulting in leaks where metal flashing overlapped (left). A “leak path” (red) had occurred from the outside corner back to the substrate; water had bypassed sealant at overlapped pieces of drip edge (right).
Other trouble spots included unfinished roof-to-wall flashing (the termination bar and counterflashing hadn’t been installed) and the skylight TPO flashing (the curbs had been flashed and heat welded in a hodgepodge manner). Because the edges needed to be redone and the difference in cost for a total reroof was not huge, the clients decided to replace the months-old TPO roof completely.
Installing a New Self-Adhering TPO Roof
Our roofing sub’s crew started the tear-off at the edges, and we immediately found leaks all along the perimeter, not just at the seams. The crew pulled the adhered TPO membrane off the protection board’s facing, then unscrewed the plate fasteners and removed the foam board from the roof deck. The Zip System sheathed deck was blown dry with leaf blowers, then holes in the deck from the removed plate fasteners were hit with sealant. The roof’s perimeter fascia trim was rebuilt and Zip tape was added along the deck’s edge as needed to seal seams and nail holes.

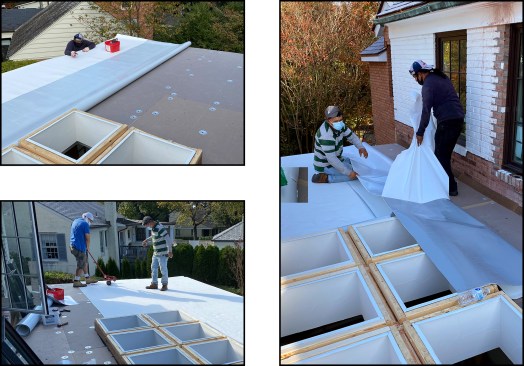
In addition to the leaky edges, application of the roof-to-wall (left) and skylight curb flashing had been subpar (top right). It was deemed preferable to remove the roof down to the decking rather than repair its many deficiencies; here, a leaf blower is used to help dry the roof deck (bottom right).
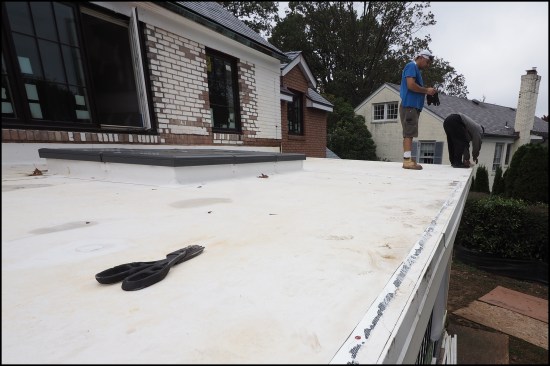
New 1-inch-thick polyiso protection board was mechanically fastened to the deck, then the new self-adhering TPO roof was laid out. The Firestone UltraPly TPO SA 60-mil membrane was installed in two pieces, with the first, roughly 10-by-29-foot sheet trimmed and dry fit around the skylight. The membrane was overcut so it could be turned down at the edge and its vertical leg nailed off at the fascia. Crew members removed the release paper from the back of the membrane and pressed the TPO onto the protection board by hand, then rolled it with a heavy roller to set the adhesive. The second, roughly 8-by-29-foot sheet was installed similarly, with 8 inches run vertically up the adjacent masonry wall.
Factory overlaps do not have adhesive on them, so they’re ready for heat welding. On field-cut edges, the adhesive has to be removed to make a clean area for heat welding. The crew carefully cut off the release paper and rubbed the adhesive off by hand, which bunched up and peeled off readily. Seams were heat welded and patches applied where two seams intersected, per the manufacturer’s specifications.
After the new protection board was installed, the TPO membrane was dry fit to the roof (top left), then rolled with a heavy roller to set the membrane’s adhesive to the mechanically-fastened protection board (bottom left). The Firestone UltraPly TPO membrane comes with an adhesive backing; here, the release paper was removed from the TPO sheet in preparation for adhering it to the roof (right).
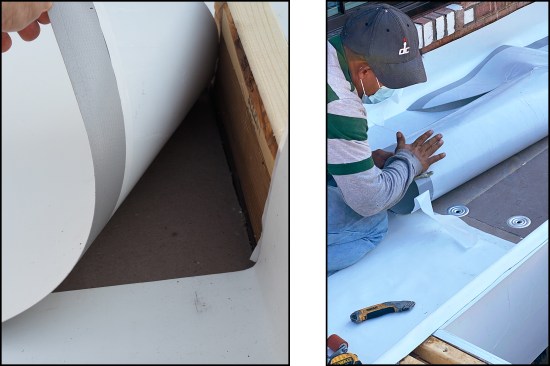
Factory overlaps come without adhesive, ready for heat welding (left). At cut edges, the adhesive was removed by hand to make a clean area for heat welding (right).
Edge metal installed on top. Our roofing sub installs an aftermarket drip edge and gravel stop made with Firestone’s coated metal and UltraPly TPO membrane. The “TPO metal” comes assembled with a strip of TPO already heat welded to it. The TPO flashing flips up to allow fastening of the edge metal, then it is heat welded down onto the membrane. At seams, the TPO metal is butted end to end and a 6-inch-wide TPO patch is applied over the joint and run down the vertical leg of the TPO metal profile an inch or so. This is faster than hand-assembling on site, and the result is superior, with an inherently less risky detail at joints in the metal.
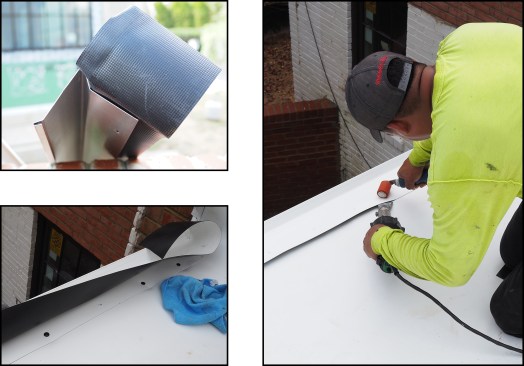
The author’s roofing sub uses edge metal that comes with a strip of TPO heat welded to it (top left). The TPO is flipped up to allow fastening of the edge metal (bottom left), then it’s heat welded down onto the membrane (right).
Along the gravel stop edge, the upslope strip of TPO is lapped 2 to 3 inches over the downslope strip (left). The seam between lengths of “TPO metal” edge is patched with TPO membrane (right, top and bottom), and the cut edges are later sealed with sealant.
Finishing up. At the roof-to-wall intersection, a bead of waterblock sealant was installed at the vertical leg of the membrane, then the termination bar and copper counterflashing were installed. At the ganged skylights, the TPO membrane was run up and over the existing curbs, the seams were flashed with TPO patches per the manufacturer’s detailing, and cut edges were sealed with approved sealant.
Had the edge flashing not been so poorly installed, this probably would have been a “TPO roof rescue”—instead, we were left with having to reroof it.
At the roof-to-wall juncture, the TPO membrane was run up the wall 8 inches. Waterblock sealant was applied (left) and rolled for adhesion (top right). A termination bar was then installed and secured with drive pin anchors set in drilled-out holes in the existing brick wall (bottom right). Copper counterflashing saw-cut into the solid masonry wall was later installed.
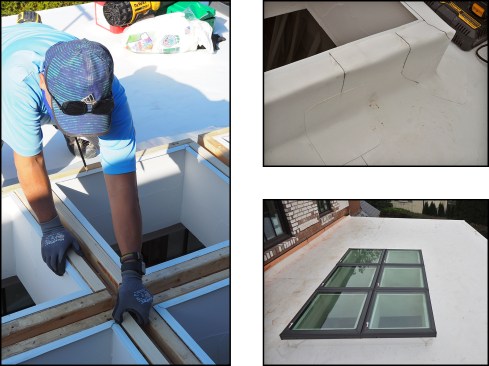
The existing skylight curbs were shimmed as needed for proper sealing (left). The ganged units were installed too close to each other, which made refastening to the existing curbs difficult. The TPO membrane was run up and over the existing curbs, the seams were flashed with TPO patches per the manufacturer’s detailing, and the cut edges were sealed with an approved sealant (top right). The finished reroof (bottom right).
Photos by Doug Horgan
Keep the conversation going—sign up to our newsletter for exclusive content and updates. Sign up for free.


