My company does a lot of high-end cabinetry and finish carpentry work, including coffered ceilings. Building coffers requires dozens of coped joints, and we’ve found that we can save a lot of time in the field and produce a better finished product by precutting all of the pieces in our well-equipped shop.
We worked out our precutting process a couple of years ago when we got the contract for a huge coffered ceiling in a new golf club. My crew and I decided that we needed a better system, because even our most skilled finish carpenters would spend several minutes on each coped joint. At that rate, the huge job would have taken weeks.
I turned to a couple of our talented shop workers to produce the coped pieces faster. Their solution was a portable band saw (the hand-held type favored by plumbers and steam fitters) equipped with a custom-made tilting table. It worked great, and we got the time for each joint down to about a minute. The pieces fit perfectly, and installing the ceiling took only a few days. I thought we had come up with the perfect system until I saw the Copemaster (800/630-1104, www.copemaster.com) demonstrated at a trade show. I immediately decided that we should try one, even though it had a jaw-dropping $2,300 price tag.
What Is It?
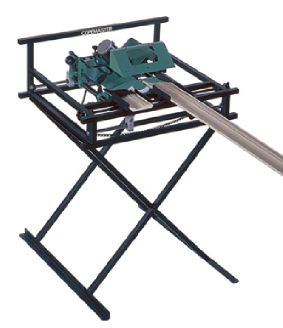
The Copemaster is basically a circular saw mounted in a sliding carriage that moves on an X and Y axis. The operator produces perfectly coped pieces by following a template. It works similarly to a key-cutting machine or lathe duplicator. The 60-pound tool is built on a folding steel stand, making it reasonably portable.
The Copemaster works like a key-duplicating machine. A stylus rides along a template and transfers the profile to another piece of stock with a 10-inch, carbide-tipped saw blade. The result: perfect copes that take seconds to produce.
Making Templates
Using the tool is easy, but making a template takes some practice. You start by putting a 45 on the end of the stock, and then you use the machine freehand to “carve” away the stock. Carpenters without a significant caffeine habit usually get the hang of it after a few tries. The hardest part is removing the tiny amount of stock near the end of the process. One wrong move, and you destroy the template and have to start over. Instead of making the final pass with the spinning blade, stop a little short and finish the template with self-adhesive sandpaper stuck on a scrap with the same profile. We sand the template until the two pieces mate perfectly.
The Copemaster blade rides at an acute angle, allowing it to cope moldings in much the same way cove moldings are made on a table saw. The template, shown here, is cut freehand — the painstaking part of the process.
To make the process a little easier, the manufacturer recently started including jeweler’s glasses to magnify the cut line. The glasses have a 2x magnification, and once you get used to them, they help quite a bit. Once you’ve made a template, you can use it over and over. Just make sure that you always compare it carefully to the stock you plan to use. Even on standard moldings, the thickness and profile can vary enough that you’ll need a new template for a tight joint.
Quick Copes
Once you have a template, running the machine is easy enough to put your least skilled crew member on it — something you could never do coping by hand. Changing from a left-hand cope to a right requires a new template and resetting the motor position, a process that can take about half an hour. To save time, the manufacturer suggests making all of the right or left copes and then switching directions. Instead of resetting the motor and making a new template, we make all of our copes the same direction. Although some carpenters are skeptical, we haven’t found a situation where both directions are necessary.
Putting a 45-degree bevel on the stock produces a cleaner cut and prolongs the life of the $125 blade (top). The stylus is first locked in the deepest part of the template and the stock is slid into the spinning blade to the cut line (above left). The operator then unlocks the stylus and follows the template, using the ball-shaped handle (above right). A cope on small moldings takes about 10 seconds.
For situations like the coffers, where you usually cope both ends of the last piece, we use another method. We use a scrap to position the first piece and start nailing about a foot or more from the joint. Positioning the first piece with a scrap and holding back the nails allows us to slip in the last piece with one coped end instead of two. It works great, and you don’t have to change the setup on the machine.
The Verdict
This is a well-made tool with industrial-quality components. Its powerful DC motor and smooth-rolling saw carriage should stand up to heavy use. It also has a built-in work light that helps with visibility and powerful magnets that hold the saw carriage in a neutral position when you’re changing stock or making adjustments.
It’s important to keep in mind that this is a production tool, and you’ll probably have to change your methods to take full advantage of the potential time savings. In my case, the tool has almost paid for itself in the six months we’ve had it, so if you’re making a lot of coped joints, I think it’s a very good investment. It has been as revolutionary to my business as biscuit joiners and pocket screws.
Tom Moore is a custom home builder and cabinetmaker in Underhill, Vt.


