Most of the houses I work on here in Southern California have few if any accessible design features. For a homeowner who uses a wheelchair, even a single step at the entry is a serious impediment. Over the last several years, I’ve put my welding skills to good use building access ramps out of readily available steel parts. The ramps are strong and secure but can be made smaller and less noticeable than a wood ramp and are easy to dismantle if needed.
I learned to weld while working as a farrier years ago, plus I had some vocational training. If you’ve never welded, consider taking a course; with hands-on training, you can pick up the basics in as little as six months.
As for equipment, you probably already own a hammer drill and the assorted hand tools you’ll need. You’ll also need a welder, a cutoff saw with an abrasive wheel designed for cutting steel, and a hand-held grinder. For welding, I use a Weld-Pak from Lincoln Electric that runs about $500 new; it uses a “flux core” welding electrode that eliminates the need for a shielding gas. (Translation: It’s an easy-to-use, very portable machine.)
For public buildings, ramps have to meet ADA regulations; residential ramp design can be a little more flexible, but I try to follow the basics. In particular, I resist building ramps with slopes greater than 1/12, even though the ramp usually extends farther than the client anticipated. While a ramp used exclusively for walking can be a bit steeper, try maneuvering up or down in a wheelchair without using your legs, and you’ll see the wisdom of the nearly flat slope. I also incorporate a minimum 2-inch lip around the perimeter of the ramp and any attached landings or decks to prevent a wheelchair from rolling off the edge. And handrails are obviously a good idea.
It’s vital to involve clients during layout, to help them visualize the finished project. With my tape, I’ll measure the high point of the ramp, then explain the slope needed — for example, that an 18-inch height requires an 18-foot-long ramp. I then ask the client to hold the tape at the high point while I stretch it out to 18 feet, approximating the position and incline of the ramp. At this point, the client may try to get me to shorten the ramp. Clients have argued that helpers will be pushing the chair, or that they have excellent upper-body strength, or that they have a powered wheelchair. Whatever the rationale, I try not to give in — but if I do cave, I add a disclaimer to the proposal holding them responsible for the changes.
I do the same thing with any feature the client chooses to eliminate, like the lip around the ramp or even the handrails. When clients discover that leaving out these elements was a bad idea, I don’t want to be held responsible for their poor decision.
I always take a look at the condition of the existing concrete around the entry; if it’s in bad shape, it will have to be repaired by a concrete contractor.
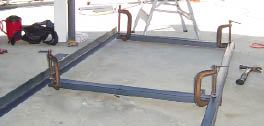
I start the building process by precutting as many of the parts as possible, which both speeds the job and makes for a more consistent layout. My ramps may be slightly overbuilt, but the point is to eliminate any bounce or deflection so the client feels secure.
Both ends and crosspieces are cut 3 feet long, then clamped in place, ensuring a consistent ramp width. I typically build my ramps in 8-foot modules, with the end pieces flush and intermediate crosspieces set at 24 inches on-center. After clamping, I check each piece for square, tack weld, and check it again. Once I’m satisfied the entire frame is square, I complete the welds.
Alternating the welds from side to side and top to bottom helps prevent heat distortion. Note the crosspiece in the foreground: That’s the bottom edge of the ramp, made from 1/8-inch-by-2-inch flat bar. It will later be attached to the concrete deck.
I prefabricate legs from angle iron and 3×3 post bases that I get from my steel supplier; they come with 3/8-inch holes in the corners. I set the ramp in place — allowing an offset for the plywood deck to be added later — and clamp the legs in position. Each leg is then marked, cut, and welded. Note the 1/8-inch flat bar at the lower end of the ramp, with its two bases also positioned for welding.
Since not all parts of the ramp will be accessible after installation, I prime and paint it first. After degreasing and prepping (I use ammonia and Jasco Metal Prep for this process), it’s quick work to set the ramp on sawhorses and shoot it with a coat of primer. After lunch, the paint is dry and the ramp ready to install.
I use 3/8-inch-diameter Redhead sleeve anchors for securing the ramp, drilling holes directly into the concrete through the leg bases, typically two per base. After cutting and attaching the 3/4-inch plywood surface with flush-head sheet-metal screws, I mask any surrounding areas as needed and finish the painting. The plywood can later be covered with a seamless length of rubber matting or coated with nonskid paint.
I always recommend a handrail on at least one side, as shown on a similar ramp for another client. To fabricate the rail, I just extend two legs 36 inches above the finished deck height and weld a 1 1/2-inch-diameter capped pipe on top. (My steel distributor sells half-sphere rail caps ideal for this purpose.) For some reason, clients will occasionally demand a ramp without a handrail. In those cases, I insist on a waiver of liability.
Leland Stone provides handyman services in La Mirada, Calif.


