Download PDF version (757.9k) Log In or Register to view the full article as a PDF document.

Image

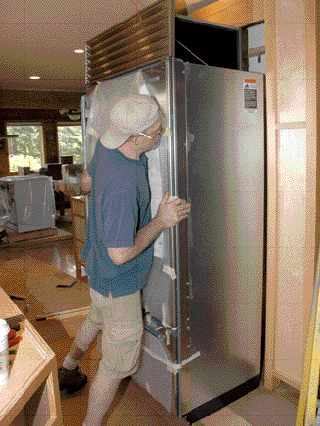
Early in my career, I worked exclusively as a custom cabinetmaker; I didn't concern myself with appliances other than to make sure that the openings for them were the right size. It wasn't until I became a remodeler and found myself responsible for the entire project that I learned how to plan properly for appliances. Not only do the units themselves have to fit, but the mechanicals have to be located so that connections can be made without reworking rough-ins or butchering cabinets.

Specifications

The importance of appliance specifications cannot be overemphasized. Our company policy requires that all appliance decisions be made before the cabinetry is designed and the actual work is begun. Even small differences between models can cause problems if you don't pay attention.

Simply knowing the size of the openings and what utilities to bring in isn't enough, either: You must read and become familiar with all of the installation requirements. If you don't follow the instructions, the manufacturer will not honor the warranty.

Also, don't assume the instructions are complete or accurate. Several years back, the motherboard on an oven I'd installed burned out because the instructions failed to mention venting the cabinet. At first, the manufacturer blamed me and said I'd have to pay for the replacement. But I'd saved the instructions and was able to show that they didn't mention venting. In the end, the company admitted its mistake, replaced the oven, and paid for me to modify the cabinet according to the new specifications.

Now when something in the instructions seems off-kilter, I call the manufacturer's technical-support number and check.

Ranges

There are two main types of slide-in ranges: freestanding and built-in. Both sit on the floor. Freestanding units project slightly above (1/8 to 1/4 inch) the countertop and have a raised back that butts to a wall; since countertop edges are partially visible, they need to be finished. Built-in ranges, by contrast, have trim pieces that seal the gaps between the countertop and appliance. They come with or without raised backs, making them suitable for island applications.

Size of opening. Face frames usually hang 1/8 inch or more beyond the sides of the cabinet boxes (see Figure 1), so if the specifications call for a 30-inch opening I install face-frame cabinets 30 inches apart edge-of-frame to edge-of-frame. With a 1/8-inch overhang, the sides of the boxes will be 30 1/4 inches apart; the extra space makes installing the appliance easier and keeps it off the sides of the boxes.

Image
Image

Figure 1. When installing face-frame cabinets on both sides of an appliance bay, the author measures from scribe to scribe to create the specified opening; the extra quarter inch leaves more room for the appliance itself to fit (left). Frameless cabinets (right), with their tight reveals, are less forgiving.

Frameless cabinets have no overhang, so when I install them I hold each side about 1/16 inch back from the opening; this gives me a 30 1/8-inch space between boxes. I make sure the person fabricating the counters knows to run them 1/16 inch beyond the sides of the boxes so that the counter opening is 30 inches wide.

Image

Figure 2. The rough-in for a dual-fuel range includes a 220-volt outlet, a gas connection with shutoff, and — farther up the wall — a clip to prevent tipping.

Some ranges are required to be a specific distance from adjacent drawer fronts and doors so that heat doesn't char or melt the cabinet fronts. Accommodating these clearances is easy if you know about them in advance, but if you don't, you may have to shift the cabinet layout in the field and install filler pieces.

Gas and electric hookups. Ranges can be all-electric, all-gas, or dual-fuel (gas burners with an electric oven). Electric and dual-fuel models usually require a dedicated 220-volt circuit (40 or 50 amps) in the wall near the floor (Figure 2). Don't assume you can reuse the existing three-wire circuit; many jurisdictions don't allow you to ground through the neutral, so you will have to run a new four-wire circuit.

All-gas units require 110-volt electrical service for the electronics and ignition. The gas shutoff valve is typically located next to the wall just above the floor. The exact position varies according to the manufacturer's requirements and the location of joists.

Most houses have a 1-inch gas-supply line, and that's usually enough. But multiple appliances and long runs may strain gas flow, so when remodeling a house with many gas appliances I always ask the mechanical contractor to inspect the system and verify that there will be adequate flow.

Cooktops

There are two types of cooktops: drop-ins and range tops. With a drop-in, the counter is continuous and there's no break in the face of the cabinets. A range top slides into an opening that interrupts the edge of the counter and the cabinetry face. Since range tops vary in height, custom cabinets may be required (Figure 3).

Image

Figure 3. In the best-looking installations, a range top — which gets mounted on a custom-height cabinet — is flanked by drawers that match its height.

The gas shutoff and electrical connections are usually in the cabinet below the unit. The one exception is when a gas cooktop is installed over an undercounter oven, in which case the gas shutoff must be in an adjacent cabinet; if there's room, the electrical connection can be behind the oven. Don't assume that any cooktop can be installed over any oven: Some appliances are not compatible, generally because the necessary clearances can't be maintained.

The instructions for a drop-in cooktop specify the size of the opening in the counter and the clearance (or air space) needed for cooling. Most drop-ins overlay the edges of the opening and screw or clamp to the underside of the counter.

One issue often overlooked in cabinet layout is how the space below the cooktop will be used. To maximize storage, I always try to position the mechanicals along the far back wall of the cabinet. The current trend is to put a lot of drawers in base cabinets, which works fine under cooktops and range-top units as long as allowances are made for utilities and the required clearance from combustibles. Ideally there should be a 4-inch space for utilities behind the drawers in cabinets that contain cooktops (Figure 4).

Image
Image

Image

Figure 4. To allow room for the electrical connection, the drawer in this cooktop cabinet (above left) stops short of the back. An electrician removes it and installs the cooktop (above right), then makes the connection with armored cable (bottom).

Putting the gas shutoff behind drawers is also acceptable. The requirement is that the shutoff be accessible; since drawers are removable, the area behind them qualifies. Service people can follow the supply line to find the valve.

Built-in Ovens

Wall ovens can be difficult to install because they're heavy and have to be maneuvered into tight openings. The tolerances are exacting — even more so than for other appliances. If the opening is just a little too small or slightly out of square, the oven won't fit. And if it's too big, the trim won't cover the gap.

Like all appliances, ovens require dedicated circuits. The electrician roughs in a wire that is later routed into the cabinet (Figure 5). The oven comes with a flex conduit with conductors ready to be hard-wired to a junction box in the back of the cabinet just before installation.

Image
Image

Figure 5. An electrician makes the 220-volt connection to a built-in convection-microwave oven (left). The electrical box will be mounted in the back of the cabinet, which will also contain a conventional built-in oven, shown here (right) being lifted into place.

Undercounter ovens are installed the same way as wall ovens; the only difference is that they go under a counter. A gas oven should be connected to a dedicated 110-volt circuit and to a gas valve in an adjacent cabinet.

Microwaves

There are two kinds of built-in microwaves: models that can be installed only in cabinets, and models that can sit on the counter or be field modified for installation in a cabinet. Field modifying a microwave means installing an optional vent that redirects the exhaust from the back (where it's typically located on countertop units) to the front, and adding trim to cover the gap between the appliance and the cabinet.

For either kind of microwave, you have to provide a specific-sized opening and electrical power in a specific location. Typically, the opening is much larger than the appliance, so there's room to attach venting. The hardest part of this installation is lifting the unit into place (Figure 6).

Image
Image

Figure 6. The author lifts a microwave into a cabinet (left), which for venting purposes will remain open from below. The microwave is held in place from above and will be plugged into a 110-volt outlet (right).

Microwaves draw a lot of amperage and — like any appliance — require dedicated 110-volt circuits. A large built-in unit must be hard-wired; a small one has a power cord that plugs into an outlet you provide.

The most common wall-mounted application is an over-the-range microwave/ventilation unit. These appliances hang from brackets screwed to studs in the wall. Once in place, the ventilation fan should be connected to a metal duct that runs to the exterior. It's important to use the correct-size duct and not to exceed the maximum run or number of fittings allowed by the manufacturer.

Ventilation

Updraft ventilation systems are typically mounted on the wall or — for island installations — hung from the ceiling. Wall-mounted updrafts are the simplest to install: They're secured to the wall or to adjacent cabinets and then connected to the duct and a dedicated 110-volt circuit.

Island units are a little more complex. The duct must come out of the ceiling exactly where the hood will be; blocking must be installed in advance so there's something to hang it from. Most units are designed to fit standard flat ceilings, so if a ceiling is sloped or especially high, a duct cover may have to be custom fabricated (Figure 7).

Image
Image

Figure 7. Since this vent hood wasn't tall enough to reach the ceiling, the author extended it with metal angles and a vertical run of duct (left) that will be hidden behind a custom-fabricated cover. The hood plugs into an outlet in the ceiling above (right).

The motor can be attached to the unit itself (the most common and least expensive approach) or installed remotely on the roof or sidewall. One advantage of a remote installation is that it keeps the motor noise out of the kitchen.

Downdraft models. Although not quite as popular as it was once, downdraft ventilation is still a good choice for island-mounted cooktops when the presence of an overhead hood would be objectionable (Figure 8).

Image
Image

Figure 8. This downdraft vent (left) ducts through the bottom of the cabinet and connects to a remote fan and motor on the outside wall (right).

Some ranges come with the downdraft unit built into the chassis. Cooktops, however, require a separate downdraft element. Components must be compatible; I've found it's best to work with an appliance dealer who can specify what will work.

Among the details you need to know to plan the installation are the size of the opening in the counter, the size of the cabinet, and the path the duct will take. The cooktop and ventilating unit have to share the same opening, so it must be sized accordingly. Most downdraft/cooktop combinations are designed to fit inside a standard 24-inch cabinet. If possible, I specify a slightly larger cabinet, to provide more room for the appliance and ductwork. The downdraft unit will be smaller, lighter, and easier to install if the motor is mounted remotely.

Ductwork. Running the ductwork is usually the hardest part of the installation. Because the pipe run is a straight shot up from the hood, it's easiest to vent through the roof. If the space above is finished, though, you have to go through the sidewall. Every manufacturer specifies the duct size, maximum duct run, and number of elbows allowed. Exhaust fans are designed to work with rigid metal pipe, so don't use flexible duct. It's critical to do accurate layout at the rough-in stage; once installed, metal pipe is hard to move.

Ideally you will be able to avoid floor and ceiling joists. If not, consult a structural engineer about making changes to the frame. On one recent remodel we had to cut ceiling joists and make other modifications to help the 10-inch duct avoid existing plumbing (Figure 9).

Image
Image

Figure 9. It's easiest to run an exhaust duct through unfinished attic space (left). Ceiling runs are harder (right); to avoid lights and plumbing, this 10-inch duct had to jog between bays and through a joist — necessitating an engineered design that involved doubled 3/4-inch subflooring above, and several sistered members.

If the duct passes through unheated space, such as an attic or crawlspace, it should be insulated to prevent condensation. Most ventilation systems come with built-in dampers; to prevent critters from getting in, a damper should also be installed where the duct exits the building.

Dishwashers

With dishwashers, the important distinction is whether they are of American or European design. American-made units require 24-inch openings; European models require 23 5/8 inches. If you plan for an American model but install a European one, you'll end up with an ugly 3/8-inch gap. I once had to move a cabinet after the granite countertop had been installed just to rectify the 3/8-inch discrepancy.

Double-drawer units stand on the floor, same as traditional dishwashers. Single-drawer models sit on top of short cabinets, much as range tops do.

Dishwashers require a dedicated 110-volt electrical circuit, plus a hot-water supply and waste line. If the unit is hardwired, a wire is run into the opening at rough-in and the connection is made from the front at floor level after the unit is installed. Many dishwashers now come with an attached plug, so they can be plugged into standard outlets. It's best to wire the outlet into an adjacent cabinet; that way, the appliance can be easily disconnected for future service.

I've installed only a couple of dishwashers that weren't located next to the sink cabinet. In both situations, we still used the plumbing at the sink location. Plumbing rough-in is fairly basic: Fresh water is supplied via an extra hot-water stub-out. An angle stop is installed on trim with a flexible water line running to the dishwasher through a hole in the side of the cabinet. A flexible waste line runs through the same hole and ties into the sink's P-trap or a dedicated waste line.

Air-gap device. In our area the code requires that dishwashers have an air gap in the waste line to prevent wastewater from being siphoned inside. The standard way to achieve this is by installing an air-gap device in the counter. However, many of my clients absolutely despise having an extra hole in the counter, so in their kitchens we install an air-gap fitting called a Johnson Tee (Johnson Industries, 800/548-6895) during rough-in. The product includes a 1/2-inch copper pipe that runs from the sink cabinet location and connects to its own waste pipe in the exterior wall (Figure 10). When the dishwasher is installed, the drain hose is connected to this copper pipe.

Image
Image

Figure 10. When customers don't want a dishwasher air-gap device on top of the sink counter, the author installs a Johnson Tee, an air-gap fitting approved by the Uniform Plumbing Code that allows a 1/2-inch copper drain line to connect directly to the ABS standpipe (left). The dishwasher drain connects to the copper drain line (below).

I consider the Johnson Tee a great alternative to a counter-mounted air gap, but some plumbers refuse to install it because they claim the waste line is easily clogged. My experience has been that if homeowners scrape their plates before loading the dishwasher, clogging will not be a problem.

Refrigerators

Standard refrigerators require nothing more than a dedicated electrical circuit, a space against a wall, and perhaps a water line for an icemaker. The placement of the electrical outlet is not critical; I usually put it about 4 feet off the floor.

There are two main ways to run the line for an icemaker. The first is to use an in-wall shutoff valve that the water line connects to. The second is to run soft copper pipe from the sink cabinet to the refrigerator location — a method I prefer because the water can be shut off without moving the appliance. I also recommend putting a water filter in the line that runs to the icemaker.

Built-in refrigerators have become very popular in high-end kitchens. Their low profile allows them to be integrated into standard 24-inch-deep cabinetry; the maker provides a specific size opening and specific locations for the utilities.

With a Sub-Zero — one of the most common built-in refrigerators we install — the water connection is made in the center of the opening near the front of the unit. I strongly recommend putting a water shutoff in the sink cabinet so the appliance doesn't have to be moved if there's a leak (a standard 36-inch-wide Sub-Zero weighs about 600 pounds). The compressor is at the top of the unit, so the 110-volt outlet needs to be at a spot high on the wall. Anti-tip blocking may be required at the top of the opening (Figure 11).

Image
Image

Figure 11. The author installs an anti-tip bracket for a Sub-Zero refrigerator (left). A soft copper water line (right) is run to the front of the opening, where it will connect to the icemaker.

Built-in refrigerators are installed after all the adjacent cabinetry is in place. First, the flexible water line is bent down and slid underneath the appliance. Next the unit is rolled into the opening (finished floors should be protected). Once the refrigerator is pushed all the way back, it must be leveled. With the upper grille removed, the power cord can be plugged in; then the appliance can be powered up and the upper grille replaced. Finally, the water supply is attached from the front of the appliance and the toekick cover is installed.

Miscellaneous Appliances

There are plenty of other appliances you might be asked to install, including trash compactors, warming drawers, wine coolers, and espresso machines. In most respects these appliances are similar to the more common ones described above: All require electricity, and some also require water. The bottom line is that you need to know in advance which models will be used, and then do your rough-ins and cabinetry installations in accordance with the appliance manufacturers' specs.

David Getts owns David Getts Designer Builder, a remodeling company in Seattle.