As a design-build contractor in an area with no shortage of upscale home buyers, I have quite a few clients who care more about getting a good product than they do about watching every dime. As a result, I often have a chance to try out new products and ideas. One thing I do with that freedom is try to steer my designs in the energy-efficient and “green” direction, while meeting the client’s other objectives.
On a recent project, I used the Polysteel insulated concrete form (ICF) system to build the foundations for three connected buildings. I’m glad I gave this system a chance: The results were everything I had hoped for, and the few minor glitches we encountered will be easy to avoid next time around.
Why ICFs?
The high insulation value of an ICF wall wasn’t my primary reason for using the system. The main thing, frankly, was convenience: ICFs gave me more control over schedule and quality, and they gave me design flexibility.
In our area, you can wait a long time for a foundation contractor to fit you into his busy life. With an ICF system, my crew and I could form the footings and walls ourselves instead of having to work around a subcontractor’s schedule.
Also, with the time pressure they face, poured-wall contractors don’t always produce accurate work, and anyone who builds houses knows how much trouble it can be to adapt your wooden structures to a concrete foundation that is not quite true or level. By setting our own forms, my carpenters and I knew that if the basement didn’t end up the way we wanted it, we’d have only ourselves to blame. It wouldn’t take us any longer to place our own forms accurately than it would to level and square the deck on somebody else’s concrete work.
Finally, ICFs made it easy to accomplish my stepped foundation design. I wanted to preserve a lot of the natural landscape on the site, and I wanted the building to conform to the contours of the existing terrain. The excavator I work with is willing to do things carefully, so instead of just hogging out a giant pit for the basement and worrying about the landscaping later, I planned to shape the foundation to the hillside. I ended up with a section of full 8-foot basement, a section of 4-foot crawlspace, and a section of 6-foot partial basement. Stacking 4-foot by 16-inch ICF blocks let us easily match the walls with the stepped footings as we went up the grade.
Energy advantage. Although construction efficiency was my first consideration on this job, I don’t mean to make light of the energy efficiency of ICFs. Above grade, ICF walls rate an R-20 or better, and they’re impressively airtight as well. R-20 is heavy insulation for a basement, and the wall’s performance when buffered by earth is probably quite a bit better than even that rating would indicate. I’m not sure how much the basement affected the whole building’s heat-loss calculations, but I would say that this basement feels much more snug, warm, and dry than most basements I have built.
I would have gone to some trouble to insulate this foundation even if it had been a conventional basement. But when you stud out a basement and insulate the cavities, you’re stealing living space; and you sometimes encounter moisture problems, too. If you put foam on the outside of a conventional concrete basement, you can have termite and ant problems, and aligning the siding becomes a concern (typically, you have to cantilever the sill out over the foam). Either way, there’s labor involved. With ICFs, on the other hand, you’re insulating at the same time you set up your forms.
Cost wasn’t really an issue for my clients on this custom job, so I was expecting changes during construction. And I was right: We ended up moving some windows on the first and second floors. Needless to say, I was glad those above-grade walls were not cast in concrete.
For a fixed design, however, such as a row house, I can certainly see some advantages to using ICFs for the whole house. The day may come when I take a chance on building a whole-ICF home.
Choosing a Manufacturer
This was my first ICF project, and I don’t know enough about the different ICF systems to recommend one over another. Quite honestly, I picked Polysteel (American Polysteel, Inc., 800/977-3676, www.polysteel.com) because they had a distributor not too far away, and because they were the quickest to supply us with useful information. Their instruction booklet is clear and comprehensive enough that I didn’t need to call the company for any help or advice during the project. They also sent us their video, which the crew and I watched together; that convinced us all that we’d be able to handle the job without any trouble.
Polysteel also has the advantage of being treated with borates to resist ant and termite infestation. That saved us from having to install termite shields between the foundation and the house frame, and it let us bury the foam and stucco over the above-grade portion, without any concern that bugs would cause hidden damage. If you chose a brand with no borate treatment in the foam, you’d need to think about the insect protection issues.
I was very happy with the way the Polysteel forms worked. They were easy to assemble, and the steel fins on the outside face accepted screws readily, so it was easy to fasten bracing to the forms and to make splices when we needed to cut a form to length. Other forms might have other advantages, but all in all, I was satisfied with my choice.
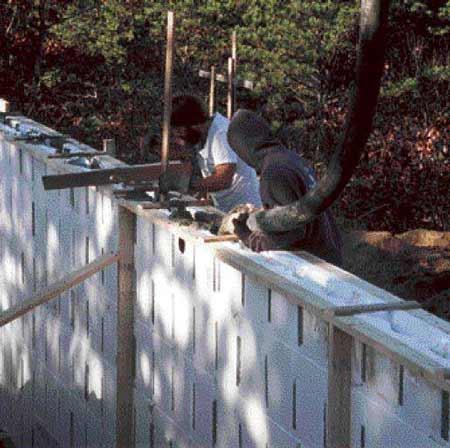
Stacking the Forms
Polysteel forms are 4 feet long, and they come in 1-foot, 2-foot, and 16-inch heights. The top, bottom, and ends have a tongue-and-groove profile, so they stack precisely and the forms lock together to a certain extent. Setting up the forms is simple. You pour your footing using conventional methods, and snap lines for your foundation footprint the same way you would for conventional forms. The first course of forms is adhered to the footing with a thin, continuous bead of polyurethane foam. From there on up, setting the forms is something like building with toy Lego blocks: You just stack them up, using a little dab of foam at all abutting edges to “tack” things together. (We cemented all the blocks together with a continuous bead of foam because we had plenty on hand, and that worked fine — just don’t use so much foam that it pushes things out of alignment as it expands.) When you come to a corner, you use a right-hand or left-hand corner form.
Layout. The footprints of my three connected buildings had a few jigs and jogs in them, but they weren’t especially complicated, and there were only right angles — no odd bends or curves. So I didn’t have to learn any of Polysteel’s methods for making mitered corners (although their handbook provided detailed instructions for that, and it doesn’t look too tough). For the sake of efficiency, I based my plans as much as possible around the 4-foot and 2-foot modules. A few odd wall lengths required us to trim forms, and this was not a big problem, even though we had a minor incident during the pour when a splice started to give way. For the sake of simplicity, it’s nice to avoid the odd dimensions if you can.
A more critical layout concern has to do with how you place your rebar. Every wall gets some amount of reinforcing steel, and the vertical bars within the wall are tied into short stubs that are wet-set into the footings. The rebar has to sit in the middle of the 1-foot-on-center core voids in the waffle forms, starting with a bar rising up the center of the corner cavity (see Figure 1). So it’s important to know how your foam forms will lay out, and to mark the footing forms for the proper rebar locations (or else be ready to measure carefully as you place your rebar stubs into the footing).
Figure 1.Rebar stubs must be accurately set into the footings to ensure that the vertical bars are centered within the core voids. The exterior of the completed wall has flat, parallel faces, but the waffle-shaped interior reduces the amount of concrete needed while still providing a high-strength product.
Placing forms. You stack the blocks up one course at a time, always beginning in a corner (Figure 2). If your foundation is the right size, you can go all the way around the footprint without cutting any forms until you get back to where you started. But you’ll usually have to cut at least one form at the end of the circuit, and you may need to cut one in every length of wall as you approach the corner. In any case, you alternate left and right corner forms as you go up the wall, and stagger the end joints of the form blocks so they don’t fall out above one another.
Figure 2.Walls are stacked one course at a time; corners are laid up using alternating left-hand and right-hand corner blocks. Polyurethane foam is used as “glue” between trimmed forms that lack the usual tongue-and-groove connection, but added exterior reinforcement is also needed in those areas.
Cutting and splicing. Whenever you cut a form, you’re trimming off the tongue-and-groove connection, and you need to replace it with a strong splice. Running a bead of polyurethane foam between the cut forms helps keep them in alignment, but the easiest way to provide the needed structural strength is to place a small piece of plywood to span over the joint and screw it to the nearest steel furring strips on the forms. In our experience, it’s worth taking time with splices, and even providing each splice with its own brace back against the soil. The only time we had trouble during our pour was when a splice started to give way.


