As a builder in the Energy-Crafted Homes (ECH) program in Massachusetts, I’ve been putting together energy-efficient houses for years. Homes in the program have to meet stringent standards for total air leakage and total heating load. In typical houses, roofs are a big source of heat loss and air leakage. So we put a lot of effort into building airtight roofs with plenty of insulation. Cathedral ceilings are a particular challenge: When you have only the depth of the rafter to work with, achieving a high R-value, a good air and vapor barrier, and code-compliant venting takes a bit of thought.
If I’m building a big house but only a small section has a cathedral ceiling, I don’t go overboard. It’s the whole house, not each little part, that has to meet the standard, so putting a lot of work into improving the insulation of that little piece doesn’t pay off. I’ll usually settle for R-40 or so in a small section of ceiling.
On big expanses of cathedral, however, I want close to R-50, and a near-perfect air and vapor barrier. I try to be well within the ECH standards, not barely inside the line.
I’ve tried a lot of different techniques over the years, and I’m still experimenting. In this article, I’ll discuss several ways to get a high-performance cathedral roof and give you a close look at our latest method.
Deep I-Joists
This method seemed like a simple idea when I tried it. On a cathedral roof that needed only a 10-inch-deep I-joist for structural reasons, we went with a 16-inch I-joist, installed vent channel under the sheathing, stapled a reinforced plastic vapor barrier to the rafter faces, strapped over the plastic with 3/4-inch strapping, and blew the cavities full of dense cellulose (see illustration, below).
Subtracting 3/4 inches for the vent channel, we had a 15 1/4-inch space filled with R-3.6 cellulose, for a total R-value of at least R-55 (more if you count the air space created by the strapping).
I-joists have the advantage of being straight and true, so this technique gives you a nice flat ceiling. Even so, I would not do a ceiling this way again. For one thing, I-joists are just too expensive. But more important is the labor cost of working with them. Attaching the joists at the plate and ridge is complicated (especially if there’s a hip or valley in the plan), but the worst thing is the eaves and rake details. Attaching soffit and fascia to I-joists requires all kinds of packing out; compared with trimming out sawn rafter tails, it’s way too time-consuming.
Building Down With Gussets
This technique has worked well for me, and I still like it for some situations. We increase the rafter depth downward after the roof is framed, using plywood gussets to hang the rafter build-down from the main rafter (see illustration, below).
As usual, we staple vent channel to the underside of the sheathing. After installing a reinforced poly vapor barrier and strapping across the ceiling, we fill the cavity with dense-blown cellulose. On a big section of roof, the build-down goes quickly. Getting the ceiling plane flat is a problem, though. Using string lines often isn’t practical — for example, when the roofline is cut up by valleys or hips. And when efficiency is a factor, the last thing you want is for your framers to start messing around with strings.
The fastest way for setting the build-downs is to cut the gussets a uniform length equal to the insulation depth we’re after, and nail the gussets onto the build-down pieces first, making all the pieces identical. Then the framers can just hold the pieces up so the gusset ends butt against the underside of the sheathing, and nail the gussets into the sides of the main rafters. Since the gussets are all uniform, they transmit the roof sheathing plane through to the ceiling framing. We try to use reasonably straight 2x3s for the build-down, and we compensate by eye for any excessive rafter crown. Most of the time this gives us a good result quickly. We use a light nail gun for fastening the gussets to the rafters, so the work’s not too hard.
The big advantage of this system is that you can get any depth of insulation you want — it’s limited only by the size of the gusset. And it also saves on lumber: If you only need a 2×8 rafter for strength, you use a 2×8 rafter. But you can still get a foot or more of insulation into the build-down space.
This technique also creates a thermal break between the ceiling and the main rafter, which cuts thermal bridging. That makes a difference to system performance: A foot of insulation with a 3-inch thermal break performs a good bit better than the same amount of insulation with thermal bridging at every rafter.
When you’re blowing dense cellulose, you need to be aware of the force that it exerts. The material goes in under extreme pressure — it will belly out poly vapor barriers and can crush some types of vent channel. When blowing cellulose into ceilings, my insulation contractor uses Sturdy Vent (Edwill Manufacturing, (10223 Timber Ridge Dr., Ashland, VA 23005; 800/476-4295), a strong extruded polyurethane vent channel with a center rib that resists crushing. For the vapor barrier, we use a cross-woven three-ply reinforced polyethylene, and we always strap over the poly at 16 inches on-center before blowing in the insulation.
Foam-Faced Ceiling
Sometimes, I don’t have room for a big build-down because the area below the ceiling is taken up by high windows, light sconces, or something like that. And sometimes I’m dealing with a small area of ceiling and I want to get it done quickly. In such cases, I occasionally use the simple method of stuffing the rafter cavities with fiberglass batts, and installing foil-faced sheets of rigid foam over the rafter faces, taping the seams to create the air and vapor barrier (see illustration, below).
Foil-Faced Foam
I strap across the foam to provide a good screw base for the drywall (the dead air space also adds a little R-value). With R-30 high-density fiberglass batts and R-10 (11/2-inch-thick) sheets of foam, you can pack a touch over R-40 (including the air space) into 103/4 inches. The work is simple and quick. However, you don’t get a lot of bang for the buck with this method. The high-density batts go for 70¢ per square foot installed, and the R-10 foam is 77¢ per foot — a total of $1.47 per square foot for the R-40. When we use the build-down method, my insulator charges me $1.12 per square foot for a 12-inch depth of dense cellulose in the ceiling, good for an R-43 or more — and the unit price goes down as the depth increases. Even including labor and materials for the build-down, I come out ahead by building down and blowing in cellulose. I also prefer cellulose to batts for other reasons, like the fact that it’s recycled and offers more resistance to air movement. And when you install batts, you often get voids that cut their effective R-value. On the other hand, batts perform reasonably well in this application, particularly with the added protection of the foam below. And in some cases, cellulose has its own limitations. For instance, in a roof that had metal roofing over strapping (with no plywood sheathing), I used high-density fiberglass batts because I figured that blown cellulose might find its way behind the strapping into the vent channel and clog it up.
The Latest Twist: Crisscross Build-Down
On a recent house, we tried a new build-down method that doesn’t require gussets. Under 2×12 rafters, we simply used 3 1/2-inch pneumatic nails to spike 2x3s on edge perpendicular to the rafters (see photos, below).
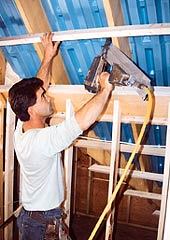
The author’s newest method is to spike 2x3s on edge crosswise to the rafters …
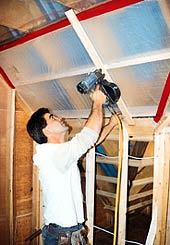
… install a reinforced vapor barrier and strapping …
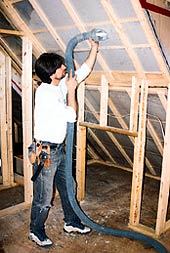
… then blow the cavities with cellulose.
Again we installed a reinforced poly vapor barrier and strapping (this time, the strapping went parallel to the rafters), and blew the cavity full of dense cellulose. Subtracting 3/4 inch for the vent channel, this gave us a 13-inch thickness of cellulose, including a 21/2-inch thermal break below the main rafters — a good R-49. This particular roof was more a cape than a cathedral: There was a small, flat ceiling at the top, and a kneewall halfway down the roof plane from that. But as in a straight cathedral roof, we insulated the rafter cavities all the way from the upper attic section to the eaves — the space behind the kneewall stayed within the insulated space. This technique was simple and effective, and I plan to use it again. However, next time it involves a kneewall, I’ll do that part differently. Last time, we framed the kneewall before building down the rafters, which created complications with the vapor barrier (see photo and illustration, below).

In the case shown, a kneewall complicated the vapor barrier installation (photo). To prevent that, the author recommends first insulating the entire roof plane down to the eaves, then building the kneewall.
Crisscross Build-Down
In the future, we’ll build down the rafters first, install a 3/4-inch plywood plate spanning two builddown pieces, then frame the kneewall to that plate.
Of all these methods, the only one I wouldn’t use again is the first — to my mind, I-joists for rafters aren’t worth the hassle. Of the other three methods, I’d use whichever one best suits the particular case. Building down with gussets is great for a large expanse of ceiling, where the work goes quickly — and you can get an almost unlimited thickness of insulation. Our new crisscross builddown method is also quick and simple, as long as you plan ahead for vapor barrier and strapping details. And although the foam-face and batt method isn’t the best or the cheapest technique, it gives decent results quickly on a small ceiling.
But like I say, I’m still experimenting. If anyone’s got a better idea, I’d love to hear it!


