Shotcrete, or pneumatically applied concrete, is commonplace on commercial jobs and civil engineering projects. But as a specialty concrete contractor, I’ve found that it can also save a lot of time and effort on residential jobs. My company started using shotcrete several years ago to build and repair foundations under existing houses, and it didn’t take us long to realize that it has an almost unlimited range of other uses.
Our first nonbasement shotcrete job came up several years ago, as we were preparing to build a conventionally poured retaining wall for a new home on a bluff overlooking the Pacific Ocean. It was late in the year, and building the forms for the 18-foot-high, 150-foot-long, 18-inch-thick wall threatened to drag on into an extended spell of bad weather. We were about halfway done with forming the back face of the wall with plywood, snap ties, and walers when we realized that we could save at least a week by switching to shotcrete. With the approval of the project engineer and local building officials, we made the necessary changes and brought the project in ahead of schedule.
Since that time, I’ve used shotcrete for many applications that I would once have used poured concrete for. The process is so regulated and carefully controlled that the average contractor can use it with confidence for all sorts of difficult and unusual projects. The purpose of this article is to demystify the process for contractors, engineers, and building officials who don’t yet have any firsthand experience with it.
Why Shotcrete?
From my perspective, there are three major benefits to working with shotcrete rather than standard cast-in-place concrete. First, it’s less demanding in terms of formwork. The mortar-tight forms used with poured concrete have to withstand serious lumber-cracking pressures of up to 900 pounds per square foot. Shotcrete forms, on the other hand, only have to withstand pressures of about 150 psf, which is basically the pressure of the shotcrete as it emerges from the nozzle. Because shotcrete is sprayed against a single-sided form rather than confined between the walls of a closed form, the pressure at the bottom of the form is no greater than the pressure at the top, regardless of the height of the wall. We find that forming a shotcrete job generally takes between 20% and 25% as long as it would to form the same job for poured concrete.
Second, shotcrete lets you place concrete in locations that are difficult or impossible to form otherwise, such as against vertical soil cuts, or even against overhead surfaces. Finally, the quality of the finished concrete is often exceptionally high. It can be difficult to push low-slump poured concrete around in closed forms, but because shotcrete is sprayed exactly where it’s needed, there’s no temptation to weaken the mix by adding extra water. The shotcrete on our jobs typically has a 2 1/2- to 3-inch slump and yields a finished strength of 5,000 to 6,000 psi. We’ve had some material test out as high as 7,500 psi.
Dry mix vs. wet mix. There are two kinds of spray-applied concrete — wet mix and dry mix. In the dry-mix process, dry aggregate and cement are driven through the hose to the nozzle, where the water is injected into the mix just before it emerges. This is generally known as the gunite process, and it’s popular for building swimming pools and things like low retaining walls.
With gunite (originally a trade name), the amount of water used is controlled by the operator, which makes it difficult to accurately control the quality of the finished product. The equipment can’t handle coarse aggregate, so the mix consists of just sand, cement, and water, which further limits its strength. Finally, gunite isn’t air entraining. That leaves it vulnerable to damage from freezing and thawing in areas where that’s a concern.
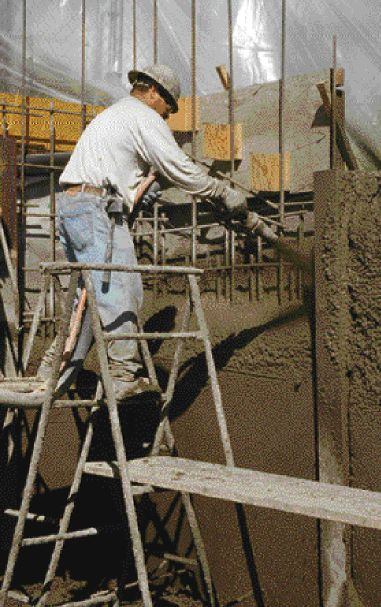
Wet mix, which is what we use, is better for engineered applications requiring high strength. (To avoid confusion, we call wet mix “shotcrete” and dry mix “gunite,” although some people refer to both as shotcrete.) In the wet-mix process, the concrete itself is mixed at a batch plant and delivered to the site like standard ready-mix. At the site, it’s dumped into the hopper of a powerful pump that forces it through a hose to where it’s needed. A supply of compressed air, delivered through a separate hose, is mixed with the concrete at the nozzle to spray the concrete against the receiving surface.
Comparing costs. On a yard-for-yard basis, shotcrete definitely costs more than poured-in-place concrete placed with a pumper truck. This is partly a function of labor: A shotcrete crew consists of seven to ten workers and a mechanic-operator to run the machinery, while a poured-in-place crew requires only five or six people.
It also takes more time to spray shotcrete against an open form than it does to dump ordinary concrete into a closed form or slab. Under most conditions, a shotcrete crew can place about 7 or 8 yards an hour, although we’ve placed up to 150 yards in a day by working with two crews. But these higher labor and equipment costs are nearly offset by the time and effort saved in building forms. In most cases, we find that overall costs for shotcrete and poured-in-place are fairly comparable.
Formwork
We do all of our own forming because we want to remain in complete control of the process. One of the most frustrating aspects of contracting for me is when a subcontractor with whom I am locked in on a price runs into a problem during the course of the job and says, “It can’t be done” or “We didn’t figure on that.” As innovators in our medium, we pride ourselves on our ability to build anything.
Formless application. Some shotcrete jobs require little or no formwork. When we build below-grade basement walls or earth-retaining walls, we can often use the excavated bank as a form. For a basement wall, we usually pin a drain mat directly against the soil and apply a waterproofing membrane over the drain mat before tying in the rebar and shooting the wall (see “Retrofitting Basements,” 8/02).
The same general technique is used to build retaining walls. High retaining walls are often reinforced with soil nails, which are created by boring regularly spaced 6-inch-diameter holes horizontally into the face of the excavation. The depth of the boreholes is determined by the soil engineer, but they typically extend anywhere from 20 to 40 feet into undisturbed soil. Heavy strands of rebar are inserted into the holes and tied into the rebar grid in the face of the wall. The concrete crew then pumps concrete into the holes and shoots the face of the wall.
One advantage to this approach is that it eliminates the need for a huge footing because the wall is supported by the soil nails — something like a slab on friction piles that’s been stood on edge. In cases where the earth cut for the wall would exceed a safe working height, this method also makes it possible to build properly engineered high walls from the top down, often in a series of 6-foot cuts.
Single-sided forms. The first step in setting up a single-sided form is determining which side of the resulting wall is to be formed and which side is to be sprayed and troweled. If we need a perfectly true inner surface in a basement, such as a wall that will be faced with thinset tile, we may set the form on the inside and shoot against it from the outside. The problem with that is that it requires a much wider excavation to provide the shotcrete crew with room to work. For above-grade applications, that’s not an issue.
Compared to the forms used for poured concrete, single-sided shotcrete forms can seem pretty flimsy. One shotcrete foreman told me that a form is heavy enough if it doesn’t move when shaken by hand. We use 3/4 plywood for the straight runs and gentle curves and 3/8 plywood doubled for tighter radii. The plywood is typically set up with a snap tie cut in half, and single waler brackets holding either vertical or horizontal 2×4 walers. In some cases, we’ll make “lost forms,” which are not stripped but simply buried in the ground and left there. These can be made from ordinary U-channel steel studs faced with drywall or an expanded metal lath with stiffening rib called SureForm.
Placing rebar. In California, just about everything we build is engineered as if it was going to support a skyscraper, so all of our projects contain engineering specs for the reinforcing steel. These specs will be all over the board with what they contain. One project will specify a single mat of #5 rebar at 12 inches on-center, while a similar installation in similar geology, across the street, by a different engineer, will call out a double mat of #7 rebar at 4 to 6 inches on-center.
No matter what the specs call for, though, the reinforcing steel must be very rigid (see Figure 1). This is an important difference from cast-in-place concrete, where the rebar can be allowed to rattle around inside the form. If the rebar moves at all when the shotcrete is gunned against it, the concrete can slump or fall away from the rebar, leaving voids.
Figure 1.In this basement application, the lower part of the wall will be shot against the bank, which has been covered with a waterproofing membrane. The above-grade section is backed by a single-sided plywood form. To prevent the completed rebar grid from vibrating when struck by the high-pressure stream of shotcrete, the top will be wired to the plywood form and the bottom to rebar projecting from the floor slab. Number 2 wire chairs, not shown, will be wedged between the grid and the bank or form to maintain the proper spacing.
Guide wires. Once we’ve tied and braced the rebar, an employee of the shotcrete sub called the wireman shows up with a portable laser, several 300-foot rolls of high-tension piano wire, and an assortment of pliers and wire cutters (Figure 2).
Figure 2.Highly tensioned guide wires are strung across the faces of the forms to control depth and permit accurate screeding. The steel soldier beam supports temporary shoring during construction (top). The vertical guide wire in this partially completed basement allows the finishers to create a sharply defined outside corner (botom).
The wireman’s job is to string the wire along all flat surfaces and corners on about 2-foot centers as a guide to permit accurate placement and screeding of the shotcrete. Notched lengths of threaded rod are used to hold the guide wires in the desired plane of the finished wall (Figure 3). Once they’re in place, the guide wires are tensioned with something like a trucker’s knot until they’re tight enough to give off a C-note when plucked. A good wireman can string the forms so that the finished surface will never be in or out by more than 1/4 inch.
Figure 3.A length of threaded rod, driven through the bentonite-coated polyethylene waterproofing membrane and into the soil beyond, serves both to anchor the rebar grid and to position a horizontal guide wire that will help define the face of the finished shotcrete. The rod has been notched with bolt cutters so it can be snapped off after the wall has been sprayed and finished. To prevent leakage, the membrane penetration will be sealed with a proprietary mastic before the shotcrete is applied.


