A top-quality prebuilt staircase takes just an hour or two for two men to install, and it costs the contractor little more than he would pay for materials alone. |
I’m a design-builder in the high-end custom market in coastal New England. For every house or remodel I take on, I create a unique design, which includes the staircases. Like a lot of builders, I used to have my own carpenters build our custom stairs. Then one day, my neighbor Dave Cooper invited me to check out his stair-building shop, Cooper Stairs (which now has been bought out by Horner Millwork in Somerset, Mass.). With a full-time staff of employees, Dave’s company does nothing but build stairs. When I saw the details Dave was using — precision-routed stringers, fully housed risers and treads, glued tongue-and-groove joinery, and so on — I said to myself, “I’m not giving my customers this level of quality.” Though I prided myself on my company’s first-class work, I was actually doing my customers a disservice by custom-building stairs instead of installing the shop-built product. Then I saw what the shop was charging for a stair package, and I realized that I couldn’t beat the price either — certainly not for stairs of this quality. I employ excellent finish carpenters, but I can’t expect guys who are building a handful of staircases a year to be as efficient or as accurate as professionals who build stairs every day. In the shop, the materials are always on hand and the machines and tools are set up for full-time stair building. And a big shop has the volume buyer’s advantage: In the real world, I pay almost as much for the materials to build a stair as the shop charges me for the finished item — and that’s before I even look at my labor cost. Bear in mind that there are lots of stair manufacturers around the country. They sell stairs for every kind of house from multifamily tracts to million-dollar palaces. I don’t suppose my supplier is unique, but I haven’t shopped around much — you should check out your local supplier’s operation if you’re seriously considering manufactured stairs.
Cost
In my market, prices look something like this (including stairs and railings): For a straight box stair, to be placed between two framed walls with railings attached to the walls, I expect to pay around $900 to $1,000. That’s with southern yellow pine risers and oak treads; for basement-grade wood, you could cut that almost in half, but to go up to poplar risers or all oak would add a few hundred to the base price. For a slightly nicer stair, partially open on one side, the base price is a little more, say $1,400. Little extras like a bullnose bottom step and railing volute would add about $300. If you upgrade a little more and choose stairs that are partially open on both sides, or completely open on one side, then you’re up to around $2,000 (it’s the railings that make most of the difference). For this type of stair, poplar risers would add almost $200, oak risers more like $400, and common upgrade options like bullnose steps or volutes bump it up another $400. At this level you’ll get a very nice stair for a good-quality upper-middle-market home. Let’s get a little fancier and talk about an L-shaped stair with a landing, open on one side. Now you’re looking at $2,700 for the basic stair and railings, and the various upgrades could add another $1,300 to $1,400. In a more upscale market, for a 90 degree curved stair, you’re in another ballpark — $10,000 and up. You’re also looking at extra money if you want touches like over-the-post railing transitions. On the other hand, the upgrade to all oak is still probably under $500. Curved stairs. We’re not going to get deeply into curved stairs in this article, but it’s worth a quick look. When Cooper’s shop builds curved stairs, they output a full-scale print of the floor plates for the curved wall from a CAD program, and use that as a template to cut wall plates from plywood. They send an exact duplicate of the wall plate to the site for the framers to use, and then rig up a full-scale replica of the wall itself in their shop (Figure 1). They build the stairs right onto the mocked-up wall, so when the finished item arrives on site, it drops right in place.
Figure 1. Curved stairs are built on a wall mockup that is framed using plates cut from a full-scale CAD pattern. Identical plates are sent to the site so the actual wall will match the shop jig. Railings are test-fitted in the shop before the stair is shipped. |
Scheduling
Besides cost, another big advantage of manufactured stairs involves scheduling. When I started out as a builder, I thought of the schedule in linear terms: First the foundation guys come, then the framers come, then the plumber comes, then the hvac guy comes, and so forth. But after years in business, I’ve come to think in terms of layering: “Who can work on top of whom?” That’s because, as a rule of thumb, the longer a job takes, the less money I make. In the case of stairs, a prebuilt installation takes a few hours, while building the stairs on site could tie up my best carpenter for a week or more. By using a shop-built component, I avoid uncertainty in both schedules and costs. If my carpenter on site runs into a snag on a site-built stair, the whole project stops until he’s back on track. A week can easily turn into ten days. This doesn’t just blow my cost estimate for the stair itself: By interrupting the schedule, it also creates other costs that you can’t even account for. But when I order prebuilt stairs, it’s the supplier’s responsibility to deliver them on time and on budget. The stair package is a fixed cost that I can predict on the first day of the job.
Ordering Stairs
Here’s how stairs fit into my usual time line: As soon as I have a firm set of plans, I fax a copy to the stair shop with a description of the stairs. They send me back a price for the complete package, including railings, and let me know when they can deliver. They also quote me a price to install the stairs, but it’s usually cheaper to use my own crew. I pay for an outside installer only when my own people are tied up on another site. When you do have a manpower problem, though, it’s nice to know your supplier can come in and do the job right. The supplier won’t build stairs from plans. After the house is framed, they send a rep to the site to measure the actual dimensions of the opening (Figure 2). It’s the rep’s responsibility to make sure the stairs are built to fit.
Figure 2. Stairbuilders will quote jobs from plans, but they generally send a field rep to the site to verify measurements before starting work. |
The time for installing the stairs is flexible. We always build rough stairs when we frame the house so the crew and subs don’t have to use ladders to get from floor to floor. We tear these out when the manufactured stairs arrive, which can be any time after the roof is on, either before or after drywall. Damage is an obvious concern. The manufactured stairs come wrapped in protective plastic, with tread protectors tacked on. It’s pretty safe to install them early on, but I still like to wait until most of the subs are gone — no point in tempting fate. On the installation shown in this article, it worked best to install the stairs after framing and before drywall; railings didn’t go on for another month and will be covered in a future article.
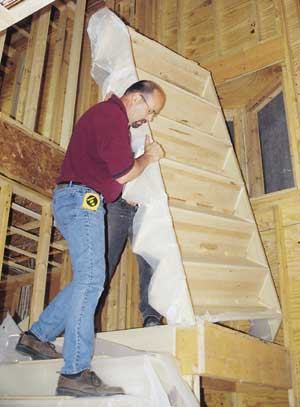
How the Stairs Are Built
When I saw the way the stairs were put together in the shop, I was impressed with the efficiency as well as the quality of the process. With every tool set up for its specific purpose and all the materials on hand, the production process moves right along. The most skilled workers handle the complicated curved stairs, there’s one man trained to run the computer-controlled machinery that cuts and routs the stringers, and one highly experienced woodworker hand-carves most of the custom railing transitions. Dedicated tools make first-rate joinery possible. For example, tread returns fit very tightly because the matching pieces are milled on the same router using different jigs. And although the work goes faster than it ever could on site, the shop uses connection details that few builders employ. Tongue-and-groove tread-riser joints are glued as well as nailed (Figure 3).
Figure 3. Perfect-fitting tread returns are glued and air-nailed to the treads (left). A tongue on the back of each tread (center) matches a groove routed into the face of each riser. Gluing and nailing these joints, the stair builder makes up a complete set of tread-riser pairs in about 20 minutes (right). | ||
Tread and riser ends are fully housed in dadoes in the stringer, and are held snugly in place with wedges, glue, and screws (Figure 4).
Figure 4. Stringers are precision-routed on a computer-controlled machine. The treads are securely wedged (left), glued (center), and screwed (right) in place. | ||


