We’ve developed a set of simple, effective, and repeatable methods that produce predictable results. In this article, I’ll describe what they are, and how we deal with various obstacles that may crop up along the way.
In general, our installations have four phases. The first is the builder’s job: Waterproof the foundation and install good foundation drains. Next, we come in and apply poly and rigid foam insulation to the foundation walls. As soon as there’s a roof on so that rain won’t get into the crawlspace, we come back a second time and put down a sacrificial layer of poly to keep the ground vapor out for as long as it takes to finish the house. Then, in the final two weeks of the job, we come back to take out this temporary “construction poly” and install a permanent version, carefully sealed at all seams and secured to the ground. At the same time, we also install a quiet ventilation fan that runs continuously to provide the newly sealed space with a steady supply of conditioned air.
Managing Bulk Water
My vapor barriers are sealed with mastic, and they’re both watertight and airtight as well as vapor-tight. But I don’t intend them to cope with pressure from groundwater. Since I work as a sub on the job, I hold the builder totally responsible for managing bulk water. I tell him that if he lets groundwater come up under my poly, presenting the risk of flooding the crawlspace, then I won’t guarantee the results. Our mastic joints are very tough, but they can fail under pressure. One good rip in the poly, and bulk water intrusion could completely bypass our vapor barrier.
So I need to see waterproofing, or at least dampproofing, on the foundation walls starting at the finish grade and extending down to the footing. I want a perimeter drain at the level of the footing, sloped to one corner of the building (see Figure 1). An exterior footing drain is the minimum; even better is to have drains on both sides of the footing, connected across the footing at the low corner.
Figure 1.Perimeter drains around the foundation footing are necessary to prevent bulk water from threatening the crawlspace’s poly vapor barrier or its mastic-sealed seams.
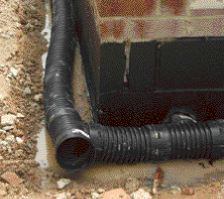
The crawlspace floor is also sloped to that low corner, so that if a pipe breaks and floods the space, water will drain that way on our poly. To provide the water with an escape route, we install a backwater valve in that low corner (Figure 2).
Figure 2.Managing bulk water is essential for success in a sealed crawlspace. The author ties a backwater valve into the foundation drain system at the low spot in the crawlspace, so that any water from a plumbing leak will be able to drain out through the perimeter drain.
The valve is connected to the perimeter drains; when we later install the final poly, we cover the inlet with a grate that’s sealed to the poly with mastic. When the crawlspace is dry, the valve stays closed and keeps the groundwater out. But if water collects in the corner of the crawlspace, the valve flapper opens and allows the water to drain out through the footing drain. You can get these from your local plumbing supply or from D.A. Fehr, a distributor of plumbing supplies (800/325-8999, www.dafehr.com/Canplas/cisbwvalve feat.htm).
The crawlspace floor isn’t usually graded perfectly smooth. In the event of a flood caused by a plumbing leak, little dips and hollows might collect puddles, but that much water can evaporate out without wrecking our crawlspace. What we’re trying to avoid is 10 inches of standing water, and this setup does it.
Complete dampproofing. The North Carolina code calls for dampproofing only where the exterior grade is higher than the interior crawlspace floor. This means that if I have a 4-foot block wall with 2 feet of earth inside it and 3 feet backfilled against the outside, dampproofing is required only on the 1-foot portion where the exterior soil is higher than the interior soil, not all the way to the footing. This seems to assume that water won’t come through a block wall if there is soil on the other side. I don’t see anything to prevent it, so I say use the belt and the suspenders: Coat the foundation all the way to the footing, and install drains inside and out.
Wall Poly and Insulation
Once the builder has the foundation wall built and the drainage installed, I install the poly and foam on the inside face of the wall. We attach the 6-mil black plastic to the wall with a water-based adhesive mastic (Figure 3), then fasten the foam board over it with powder-driven masonry nails (Figure 4). The wall poly extends onto the ground about a foot, leaving an edge flap for us to seal the floor poly to later.
Figure 3.The author brushes mastic onto the block wall (top), then applies 6-mil black poly (middle and bottom). Mastic creates a strong adhesive seal on many different materials, even if the surfaces are dirty.
Figure 4.The author attaches foam board to the foundation wall using powder- actuated nails (five nails per piece of foam). Although some building departments have required foil-faced polyisocyanurate foam (top), he generally uses extruded polystyrene (bottom). Either way, the R-10 foundation insulation meets the energy code without the need to insulate floor cavities with fiberglass. But air sealing and vapor sealing, not insulation, are the main reasons sealed crawlspaces reduce the load on the hvac system.
No batts in the floor. Under the energy code, insulating the foundation to R-10 means we don’t have to insulate the floor under the living space. We get rid of the usual fiberglass batts in the joist bays, where their performance is hindered anyway by air movement, poor fit, and interruption by wires, pipes, and bridging; and we locate the thermal boundary of the house with the air-pressure boundary where it should be. People concerned about indoor air quality are glad to see the fiberglass go, because it means no irritating fibers will be floating around to get sucked into the ductwork.
Sidewall penetrations. Where pipes or wires go through the side wall, we have to fit the foam board to them carefully and seal the vapor barrier around them (Figure 5). I’m working right now on a lot of houses with package heat pump units, which add another large penetration for us to fuss with.
Figure 5.The author carefully fits poly around a pipe that runs through the foundation wall, then seals the poly to the pipe with mastic. All penetrations through the crawlspace wall must be sealed.
Detailing the duct penetration is just patchwork. Where the builder runs flex duct from the unit through the wall, we have to cut a half circle on one piece of foam board and a half circle on the other, then piece them together around the duct and seal the joint.
We use a water-based, nontoxic duct-sealing mastic called PS-1, from RCD Corporation (800/854-7494, www.rcdcorp.com), for all our sealing work because it is so effective. It sticks to all kinds of materials, rough or smooth, and even to dirty surfaces. It dries in hours and is tough and strong; once a mastic joint in poly sets up for real, two men can’t pull it apart with all their strength.


