I became a self-employed builder back in 1980 not because I wanted to go off on my own, but because it was the only way I could find steady work. I started out by taking on just about any job I could find, but as the economy improved and my business grew, my crew and I focused on production. Everything had to be prehung, predrilled, and premilled just to keep up. Now, of course, business has gone back to being like it was in those early days, so keeping as much work as possible in house helps keep us busy.
On a recent project, for example, instead of ordering custom trim, we made our door trim from MDF. With a little planning, I found I can cut the material to trim out one side of five doors from a single sheet. At today’s prices, that works out to about $10 in materials per door to trim both sides. Once the tools are set up, it takes about 30 minutes to mill the stock for each door face. And because the Craftsman-inspired detail shown here uses plinth blocks and a straight head casing fitted with a fillet and cap, there are no mitered corners to fit, making installation quick and easy.
Milling the stock. To trim standard 6-foot 8-inch doors, I start by crosscutting a full sheet of 49-inch by 97-inch by 3/4-inch-thick MDF at 74 inches, using a straightedge clamped to the MDF as a guide. I then cut 3 5/8-inch-wide by 74-inch-long rippings on the table saw, starting in the middle of the 49-inch-by-74-inch sheet to make the process more manageable (1). To clean up the saw kerfs, I run the rippings on edge through a planer, a pair at a time (2). This produces five pairs of 3 1/2-inch-wide door casing stock, with enough MDF left over for the fillets and profiled casing cap.
1.
2.
From the 23-inch-by-49-inch MDF drop, I cut off a roughly 9-inch-wide block, leaving a 40-inch-long piece that gets ripped and planed down to make five 4 1/4-inch-wide by 40-inch-long head casings. (While this length is suitable for 2/6 doors, wider doors will require longer header stock.)
The 9-inch by 23-inch-wide block gets ripped and edge-planed into 4-inch-wide plinth-block stock. Because the plinth blocks need to be a full 1-inch thickness, I rip some 1-inch-wide strips of MDF, turn them on edge, and split them down the middle on the table saw, using a feather board and push blocks for safety (3). I then plane these strips down to 1/4 inch thick and glue and pin them to the plinth-block stock with 23-gauge headless pins to build the plinths out to 1 inch thick (4).
3.
4.
Profiling the stock. After sanding the edges of the plinth blocks smooth, I round over the edges with a handheld router (5). Different profile options can be used on the plinth blocks, but the profile shouldn’t be more than 1/4 inch deep, since 3/4-inch-thick baseboard and casings butt against the 1-inch-thick blocks.
5.
The door casings can also be given different profiles. Here, I’ve beaded both edges with a 3/8-inch-diameter beading bit mounted in a router table (6).
6.
The head casing has a 3/8- inch-by-1-inch fillet at the bottom and a cap molding at the top. I use an ogee bit mounted in a handheld router to profile both sides of the stock, then rip the stock down the middle to produce the cap molding (7). To size the stock, I add about 1/4 inch to the height of the router bit profile I’m using, and then double that.
7.
The length of the head casing equals the distance between the two side casings from outside edge to outside edge. After cutting the head casing stock to length, I fasten the fillet — sized to extend past the head casing 1/4 inch at each end — to the bottom with glue and pins (8). The casing cap is also glued and pinned in place at the top, and it has mitered corners (9).
8.
9.
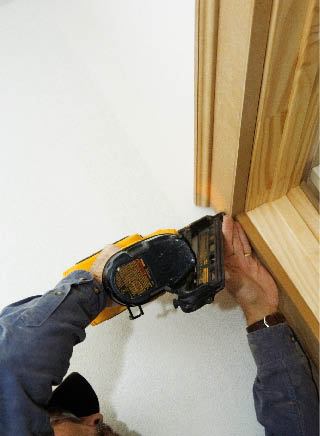
Installation. Sized so that they are 1/2 inch to 1 inch taller than the baseboard, the plinth blocks are installed flush with the door jamb (10). I install the side casings next, giving them a 1/4-inch reveal on the door jamb and on both sides of the 4-inch-wide plinth blocks. After touching up the glued corner joints with sandpaper, I nail the head casing in place (11).
10.
11.
12.
The cost per door to the client ends up being about the same as it would be with standard lumberyard trim — but dressed up with a paint finish, the MDF looks like a premium upgrade (12). Clients love the look and my crew enjoys the work.
Gary Striegler is a builder in Springdale, Ark.


