Putting trusses up successfully depends on a few easy routines. Over the years, I’ve developed several techniques that I use on all my truss jobs, regardless of whether they’re on a huge production tract or a single custom home. Doing prep work early on is where you can save the most time on a truss job. Although a truss roof can’t go up till the trusses are delivered, there’s a lot you can do while you’re waiting for the load. The real benefit of prep work is that most of it can be done on the ground where the work is both safer and faster.
Layout and Blocking
The first step should be to lay out the interior wall top plates with reference marks that will ensure the proper placement of the floating truss clips later on. This only takes a few moments when the building is not covered by a load of trusses. Don’t bother laying out the exterior walls because the eaves blocks will automatically do that for you.
Simultaneously, another carpenter can cut backing for ceiling drywall that will later be nailed flat to the top plates. By quickly scratching the truss layout on the floor, you can identify the walls that need backing. I prefer to use 2×6 backing where possible, and only use 2x4s when a truss chord runs down the middle of a wall or along one side. A good trick for measuring lengths is to spread the stock alongside wall partitions and cut it in place, allowing a few extra inches to run past the corners.
Once all the backing is cut, you can save time by temporarily hanging the material where it can be reached later on when standing trusses. Backing, eaves blocks, and outriggers with at least one nail started in them can be hung from nails placed on the inside of the exterior walls, a few inches down from where the stud butts the top plate. If you are using metal eaves vents, hang them up as well so they can be put in place as you stand the trusses. The metal flange on the ends is thin enough to allow it to be slipped in place between the two top plates. The important thing about hanging materials is to make sure that the pieces are completely out of the way below the plate line.
With large spans with no center walls to stand on when raising trusses, it’s a good idea to build a catwalk. The most common areas for catwalks are in the garage and the living room. Keep the highest point flush with the top plate or just below. I prefer to use a flat 2×6, held on each end by a cleat fastened to the wall, with 2×4 legs nailed on for mid-span support. Catwalks should be plenty strong for safety’s sake.
Prepping Truss Braces
I use 1x4s nailed to the top chords to secure trusses as they are tipped up to their proper spacing. Other 1×4 bracing, called “lacing,” is nailed in permanently at locations specified by the truss manufacturer’s engineering plans. Truss installers have to follow the manufacturer’s plans exactly to ensure that a truss roof system performs to its designed capacity.
To save time, I gang together as many pieces as I think I’ll need for the top boards and the lacing, and lay them out all at once. This usually works out to about five to six times the length of the building. I use either 12- or 16-foot lengths because 8 and 10 footers are too short and pieces longer than 16 feet are too hard to handle. I mark the outside edges of the truss layout on the outer ganged pieces and transfer marks to the other pieces with a straightedge. To designate which side of the layout marks the trusses should go on, I run keel lines parallel to the pencil lines to represent the leading edges. This avoids the hassle of making hundreds of small Xs.
Fill package. On most production jobs, the truss manufacturers send out a “fill” package with each truss order that contains cut-to-length eaves blocks, outriggers, and barge rafter stock. Smaller job-site fill packages might not include outriggers or barges. In these cases, they should be cut beforehand.
Once cut or removed from the fill package, it helps to mark and prep all the outriggers at one time by ganging them together and marking them at 221/2 inches and 24 inches from one end. This locates the end truss relative to the butt end that will be attached to the first interior truss. The remainder provides the extension for the overhang. Set a 16-penny nail in the face of the marked 11/2-inch space. Then set a toe-nailed 16 at the end that will butt into the receiving truss (the longer side). Hang the riggers up by hooking these nails onto other nails tacked at a convenient height along the gable-end wall.
Sway braces. At this time, I also cut a sway brace for each end. These braces run diagonally from the end wall top plate to the ridge block of the third regular truss, and are used to plumb the first few trusses at each end. A 10-foot 2×4 works well for a typical 6-foot-tall truss. I prep the sway brace by cutting a 45-degree angle on one end, then hang it on the interior side of the end wall just below the top plate where I can reach it later.
Loading the Trusses
When the trusses arrive on the site, there’s still some ground prep work to do, but first the trusses have to be loaded on the building. Crane operators will put the trusses wherever the crew tells them to. In production situations, trusses aren’t doled out one at a time. You’ll get bundles dropped on the plate line as quickly as the crane operator can swing the boom, empty the load, and head back to the plant to load up for another delivery.
One thing to be on the lookout for, especially on the bustling tracts, are end-truss studs that have been knocked loose in a busy lumberyard. Once in the air, a bundle that contains a damaged end-truss can drop loose studs that fall like spears.
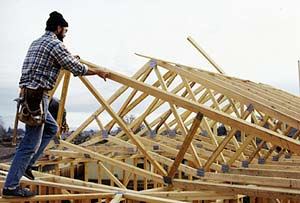
Loading strategy. The length of the building and the size of the trusses determine the best loading order. A truss that spans 30 feet and has a 4/12 pitch will only be 5 feet tall. Trusses in this ballpark, say 5 to 7 feet tall, are fairly easy to maneuver. I like to spread these out from one end of the building to the other before raising them (see Figure 1).
But if trusses are larger, say a 50-foot span with a 6/12 pitch, it ends up being too hard to move them twice. If there is room, I’d rather load these so that they can be pulled off a bundle and stood one at a time.
However the trusses are loaded, I always make sure the end trusses will be in a position that allows them to be notched for outriggers before being stood. Climbing up an already raised gable truss, with saw in hand, to cut out spaces for outriggers, is an excruciatingly slow job and is to be avoided.
After all the truss bundles have been loaded on the plates and the truck is gone, it’s time to break into the fill package again to prep the eaves blocks. I place them inside the house, butted up on edge along a wall. This aligns the blocks so that a toe-nail can be started into each one. I set the angle of the nail so that it will come out of the block with plenty of nail going into the truss. If set too flat, the blocks will fall off the nails when you try to hang them on the exterior walls. If set too steeply, the nails will not penetrate the trusses sufficiently.
The last preparation task to take care of is to precut the barge rafters. The length can be measured off a truss, and stock pieces can then be crowned up and cut plumb. It helps to nail a ridge block on one of each barge rafter pair. This block should be cut about 1/8 inch short to compensate for the truss plates. I also like to tack a small handful of 16-penny galvanized nails onto the top edge of the barge. This saves groping for stray galvies later on when nail bags are full of 16-penny and 8-penny sinkers.
Upright end-truss braces. Before standing any trusses, temporary 2×6 braces are nailed vertically near the center of the gable-end walls to hold end trusses close to plumb while nearby trusses are raised. Avoid placing these uprights too close to the peak where they will get in the way when installing barge rafters. The 2x6s need to be long enough to reach from the bottom plate of an end wall, up along a stud, to the top chord of the end truss after it’s raised.
If the trusses are over 8 feet tall, a separate upright brace is necessary on each side of an end truss. For tall trusses, you’ll have to position upright braces farther from the center where you can still reach the top chord.
Once the uprights are in place, spread out the bracing pieces that were marked earlier. Lean the lacing high enough on the gable walls so you can easily pull them up into the truss cavities. This way they can be scattered into their locations as the trusses are stood, which is easier than fighting them into place afterwards. The remaining braces should be spread around the building exterior so that they lean a few inches below the plate where they won’t interfere with spreading the trusses or walking on the plate.
Outrigger notches. With saws and nails placed up within reach of crew members on the top plates, it’s almost time to spread and tip trusses. The final prep work involves notching the end trusses to accept outriggers for the roof overhang. One foot down from the peak is a good measure for the top outrigger on each side. The rest are located 4 feet on-center down from these top notches (closer for tile roofs, to prevent sagging). I also like to place one close to the eaves to provide extra support for the barge rafter, especially when no fascia board is being used. At this point, I prefer to nail at least the upper outriggers into place because they can be very hard to reach later on.
Before tipping a notched end-truss into place, I start 16-penny toe-nails along the bottom chord at 16 inches on-center. That way, when the truss is raised, I only have to lean over and finish driving the toe-nails as I adjust the chord flush to the edge of the wall with my foot. Raising an end truss often involves pushing on the truss studs. To be safe, it is vital to check that the studs are solidly attached before you begin to stand the truss. As a precaution, you can take this one step further and toe-nail the studs with 8-pennies to beef up the connections.
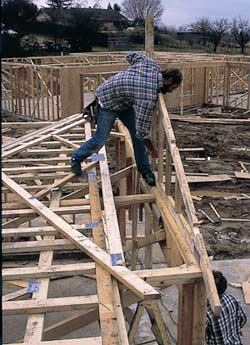
Figure 2. With the upright braces in position and toe-nails started along its bottom chord, an end truss is tipped into position and nailed off. On taller trusses, the author preinstalls the top outriggers to avoid later hassle.
While one person is holding the truss upright, another positions it by moving it back and forth until the heel intersection of the bottom and top chords lines up with the outside edges of the wall. Once adjusted to position, tack the upper chord to the upright brace and nail the bottom chord to the plate (Figure 2).


