I’m a chimney mason and sweep in coastal North Carolina, where I do restoration work on fireplaces and chimneys in historic structures. At the other end of the spectrum, I tear out a lot of old prefab wood-burning fireplaces every year and replace them with new ones.
A prefab fireplace is more like a kitchen range or other household appliance than a masonry chimney or fireplace, which can last for generations if it’s maintained and repaired as needed. Prefab fireplaces have a definite and limited service life and are designed to be used up and periodically replaced. As a mason, I can’t get enthusiastic about them. But they’re a high-profit item for builders, so they’re often installed in new houses. That popularity, combined with their limited life expectancy, provides me with a steady supply of work.
Anatomy of a Prefab Fireplace
The rules for installing UL-listed prefab fireplace systems are entirely separate from those that regulate masonry fireplaces. Each prefab fireplace system has its own distinctive installation instructions. Specific information, such as clearances to combustibles and chimney terminations, varies from one manufacturer to the next, and it’s up to the individual installer to follow the directions in the manual provided with the unit.
In simple terms, prefab fireplaces are basically double-walled metal boxes lined with cast refractory panels that are usually made to look like firebrick (see Figure 1).
Figure 1.Prefab fireplaces can be installed in an alcove in an interior wall or in an exterior chase. This chased installation includes a ceiling-level firestop, which is required by most building codes. The firestop itself and the exterior walls below are insulated with fiberglass batts. The inner wall of the chase and the upper portions of the three outer walls above the firestop should be left uninsulated.
Some models have blowers to circulate air between the inner and outer walls, while others rely on convection. (Even blower-equipped models shouldn’t be seen as heating devices, though; like traditional masonry fireplaces, they typically let much more heat escape up the flue than they add to the living space.) Many wood-burning fireplaces are designed to accept atmospherically vented ornamental gas logs as an aftermarket add-on. This is a popular modification, even though a fireplace that’s been converted to gas can no longer be used with wood.
Prefab fireplaces are vented with a double-wall pipe that exits from the top of the unit. The inner wall of the flue is stainless steel, while the outer wall is typically galvanized or painted. The entire assembly is often enclosed in a wood-framed chase built against an exterior wall. The chase itself may be supported by cantilevered joists or rest directly on a bumpout in the foundation. Prefabs can also be installed in a framed alcove in an inside wall.
How fireplaces wear out. Most prefab fireplaces come with warranties that run from 20 to 30 years, although they often contain disclaimers or exclusions to limit coverage of damage related to environmental conditions. In our coastal service area, where prefabs are under constant attack from salt-laden air, we regularly replace fireplaces that are between 15 and 30 years old. Units located right on the coast fail sooner than those that are farther away.
The way a fireplace is used also affects its life expectancy. A fireplace that sees a lot of hot fires won’t last as long as one that is used only occasionally. Chimney fires are especially damaging; they can quickly destroy the stainless flue liner. Widespread rust caused by water that’s leaked through a rusted-out chase cover, bad flashing, or a missing termination cap is another common discovery (Figure 2). Customers sometimes tell us that they’d heard water dripping but thought it was insignificant because they didn’t see any water in the house.
Figure 2.Most failed or failing prefabs are discovered in the course of a routine chimney cleaning, not because the homeowner realizes something is wrong. A missing termination cap (top) or leaking chase cover can quickly cause internal rust. This sort of damage is often evident around the damper at the top of the firebox (middle) or behind the louvers of a circulating fireplace (bottom).
We often encounter fireplaces so far gone that we can easily poke a hole through the metal with a cleaning brush or even a finger. At that point, the only practical solution is to replace the entire unit.
Out With the Old
When you consider the limited service life of typical prefab fireplaces, it’s surprising how little thought goes into their eventual replacement. Every case is different, but our goal is always to remove the old unit with as little disturbance as possible to the interior finish.
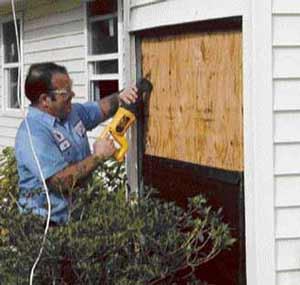
Cut to the chase. If the front of the fireplace is faced with brick, tile, or some other finish that was applied after the unit was originally installed, we prefer to come in from behind so we don’t have to tear the fireplace surround apart and rebuild it when we’re done. That often means cutting through the outside wall of the chase (Figure 3). If the fireplace is built into an inside wall, it’s usually possible to cut away the drywall and framing on the other side of the wall.
Figure 3.Removing a fireplace from the back eliminates the need to dismantle and later rebuild the existing interior finish. An opening in the exterior chase provides the working space necessary to disconnect the flue and remove the fastenings that hold the old fireplace to the framing (top). The unit can then be pushed back into the chase and out the access hole (bottom).


