With its long tradition as a garden structure, a free-standing gazebo makes a fine addition to an outdoor living space. There’s no rule that says that a gazebo has to have eight sides, but octagons are eye-pleasing shapes that are relatively straightforward to frame.
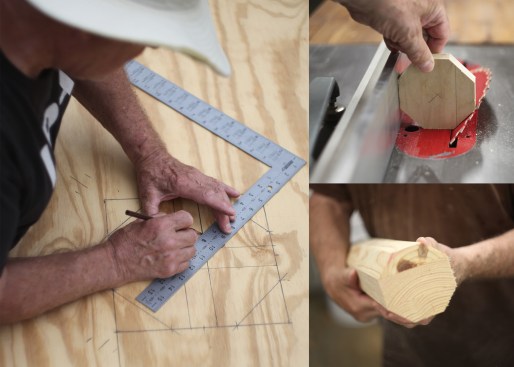
The author lays out an octagonal ridge block (left). He demonstrates the 45-degree cut (top right) needed to make an eight-sided king post (bottom right).
In a previous article (“Framing Square Basics: Octagon Layout,” Nov/Dec/22), I demonstrated how to use a framing square and dividers to lay out octagons measuring less than 67 inches wide. For larger octagons—a gazebo or a turret, for example—knowing that the length of one-half of one of the sides can be determined by multiplying the octagon’s width by .2071 and that all of the angles are 45° or its complement simplifies the layout. Following the example in that article, the sides of a 12-foot-wide octagon will measure (.2071 x 12 feet) x 2 = 59 5/8 inches.
Framing the roof for an octagonal structure is a little more complex. If you ever have to build an octagonal roof, I recommend that you start by fabricating an octagonal ridge block or, perhaps, an eight-sided king post that extends down to the floor or to a beam at ceiling height. The first eight rafters, which are common rafters, will bear on the eight flat sides on the ridge block or king post. To avoid an awkward cut on the next eight rafters, which will be hip rafters, it’s imperative to make the flat sides the same width as the rafter material.
Ridge Block
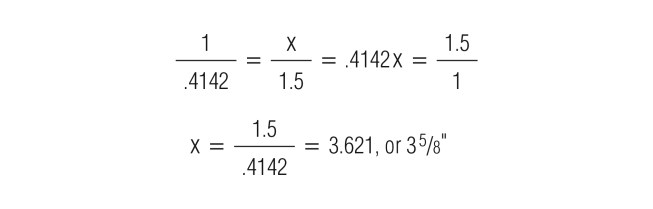
If you’re using 2-by material for the rafters, you’ll need to make the octagonal ridge 3 5/8 inches wide. I arrived at that dimension for the width of the octagon by drawing a full-sized octagon 10 inches wide using my framing square. Next, I drew in the eight converging rafters, making them the full thickness of the rafter stock and centering them on each side. By connecting the points where the rafters in the drawing converge, I could see the size of the ridge I’d need, which is 3 5/8 inches.
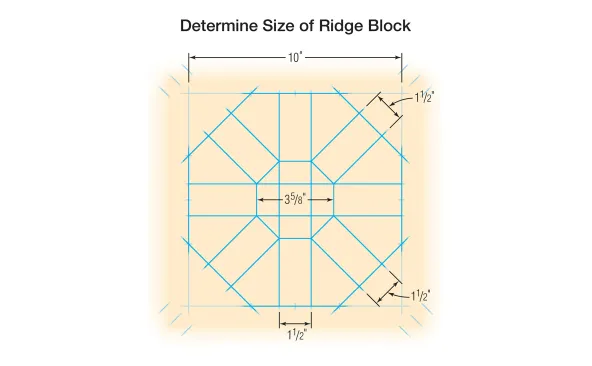
Start by drawing a full-sized octagon 10 inches wide using a framing square. Then draw eight converging rafters sized to match the thickness of the rafter stock and centered on each side. Connecting the points where the rafters in the drawing converge determines the size of the ridge block, which in this example is 3 5/8 inches wide.
As noted above, the length of one of the sides of a 1-inch-wide octagon is .4142 inch (that’s double the .2071-inch dimension used to lay out octagons). So, the math would look like this:
If you’re using 2-by lumber for rafters, then, make the octagonal ridge block 3 5/8 inches wide. If you’re using thicker timbers, make a drawing or use algebra to determine the proper size of the ridge block.
Laying Out the Frame
If you have the space, making a full-sized drawing of the frame in plan view is the simplest way to find the key dimensions for laying out the ridge and rafters of an octagonal roof. The floor of the gazebo, for example, might be used for this purpose. If you don’t have that space, you can also calculate the dimensions needed using simple math and a bit of geometry. In this section, I’ll show both approaches as I explain how to lay out the roof frame for a 12-foot-wide gazebo.
The material for the rafters of this hypothetical gazebo will be 2x8s, all bearing on a 3 5/8-inch-wide ridge block. The plan is to have the bottoms of the rafters meet the inside edge of the beams (or top plates). The desired roof pitch is 6-in-12.
Step one: Determine the height of the ridge block and the measuring length of the eight common rafters. With the exception of the thickness of the ridge, the technique described here is exactly like the one I described in the second article in my JLC “Framing Square Basics” series (“Rafter Layout,” May/22).
The eight common rafters extend from the layout marked at the center of each beam to the flats on the octagonal ridge. If you’ve drawn the beams, the rafters, and the ridge full-sized on the floor, you can simply measure the distance from the inside of a beam to the flat face of the ridge along one of the rafters to find the critical dimension you’ll need.
If you don’t have a full-sized drawing, you can calculate that distance. After measuring the distance between the inside faces of the beams, subtract the thickness of the ridge, then divide the remainder by 2. The result in this case, 66 11/16 (66.6875) inches, is the dimension needed to calculate the height of the ridge block and the distance between the plumb cut and the birdsmouth cut on the rafter.
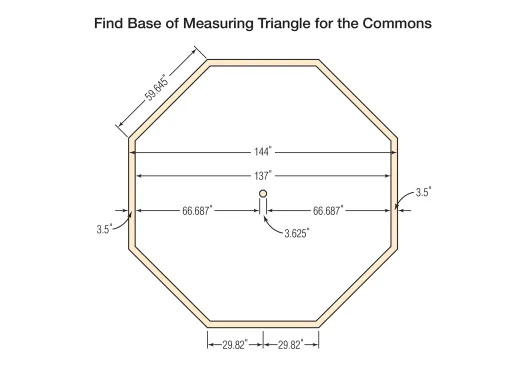
Find the base of the measuring triangle for the common rafters by measuring the distance between the inside faces of the beams (137 inches). Then, subtract the thickness of the 3 5/8-inch-wide ridge block, and divide the remainder (133 3/8 inches) by 2, which comes to 66 11/16, or 66.6875, inches.
As shown in “Determine Height of Ridge, Measure Length of Commons” illustration below, the 66.6875-inch dimension is the base of the measuring triangle needed to find critical dimensions for the ridge and the rafters. As noted previously, the desired pitch is 6-in-12. The hypotenuse of a triangle with an altitude of 6 inches and a base of 12 inches is 13.42 inches. This number is etched directly under the number 6 on the rafter table on most framing squares. The objective now is to expand this little 6-12-13.42 right triangle into a larger triangle with a base of 66.6875 inches.

Use the length of the base (66 11/16 inches) and the roof pitch (6-in-12) to determine the height of the ridge and the length of the common rafters. In the rafter table on a framing square, a right triangle with a base of 12 and height of 6 has a 13.42 hypotenuse. Divide 66 11/16 by 12 to find the common increment (5.557). Multiplying each of the sides by 5.557 results in a triangle with 66.6875-inch base, a 33.342-inch height, and a 74.575-inch hypotenuse, as shown above.
To create this larger triangle, start by dividing the base dimension, 66.6875, by 12. The result, 5.557, is the number of 12‑inch increments in the base. Next, multiply 6 by 5.557 to determine the altitude of the large triangle, 33.342. And, finally, multiply the hypotenuse of the little triangle, 13.42, by 5.557 to find the hypotenuse of the large measuring triangle. This comes to 74.575. In essence, you’ve expanded the smaller pitch triangle by a factor of 5.557 into the larger measuring triangle. And, because you’ve multiplied all three sides by the same number, you’ve preserved the same angles and the same pitch of the smaller triangle.
Step two: Lay out and install the ridge block and the common rafters. If there are provisions to keep the walls of the gazebo from spreading, an octagonal ridge block that’s at least the height of the plumb cut (8 1/8 inches on this roof) on the rafters may be used. In other cases, an octagonal king post that rests on the floor or on a structural beam at ceiling height may be called for. Either way, the bottoms of the joists should meet the ridge block or king post at a point that’s 33.342 (33 5/16) inches above the top of the beams.
The short points of the plumb cuts and the birdsmouth cuts should be 75.575 (75 9/16) inches apart. I discussed how to lay out these cuts in my “Rafter Layout” article, so I won’t go into those techniques here. The rafter tails can be cut in place later, after all the rafters are installed. For more on that process, see my article “Framing Eaves and Rakes” (Aug/16).
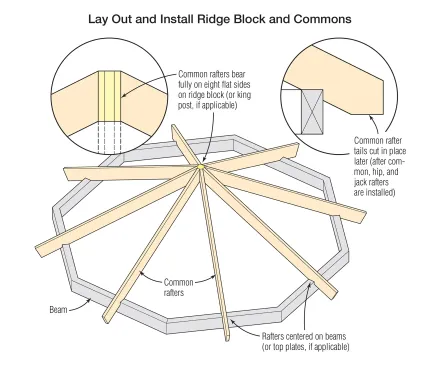
Common rafter measurements are taken from the bottom of the plumb cut and inside edge of the seat cut, or birdsmouth. These rafters are centered on the beams (or top plates) and should bear fully on the ridge block or king post, as shown.
Step three: Find the length of the base of the measuring triangle for the eight hip rafters. As with the common rafters, the length of the base of the measuring triangle provides the key to laying out the hip rafters. If you have a full-sized drawing, you simply can measure the distance from the point of the octagonal ridge to the inside corner where the beams meet. If you don’t have a full-sized drawing, use the basic proportions of an octagon as shown here.

The side of an octagon that is exactly 1 inch wide measures .4142 inch, and the distance across the octagon from point to point through the center is 1.0824 inches.
So, for every inch going straight out from the flat side of the octagon, there will be 1.0824 inches going diagonally out (at a 22 1/2° angle). This ratio applies to any size octagon. To calculate the length of the base for the measuring triangle, then, all you have to do is multiply 66.6875 by 1.0824, which comes to 72.1825.

Multiply the length of a common rafter (66.6875) by 1.0824 to find the base of the measuring triangle for the hip rafters, or 72.1825. Dividing this number by the 5.557 increment determined in step one yields a new increment of 12.989 inches for the hip-rafter measuring triangle, which can be rounded up to 13. The pitch of the hip rafter is 6-in-13.
Step four: Determine the pitch of the hip rafters. Because the base of the measuring triangle for the hip rafters is longer than the base of the measuring triangle for the common rafters, the pitch of the hip rafters is milder than the pitch of the common rafters. This difference affects the angles of the cuts used to fit the rafters to the ridge at the top and the beam at the bottom.
Fortunately, there’s a simple method for finding the pitch of the hip rafter. As we found in the section above, there are 5.557 12-inch increments in the 66.6875-inch-long base of the measuring triangle for the common rafters. The base of the measuring triangle for the hip rafter is 1.0824 times longer, or 72.1825 inches. If we divide that dimension by 5.557, we find that the increments are 12.989 inches long, which can be safely rounded up to 13. (12.989 inches is 1/64 inch shy of 13 inches.) So, the pitch of the hip on this roof is 6-in-13. In fact, changing the base number in the pitch from 12 to 13 for the hip rafters works with all octagonal roofs, regardless of pitch.
Step five: Prepare the lumber for the hip. In addition to changing the angles of the plumb and level cuts needed at the top and bottom of the hip rafter, the milder pitch of the hip also affects the dimension of the lumber needed. If you lay out a plumb cut for a 6-in-12 common rafter on a 2×8, the line measures 8 1/8 inches. If you lay out a plumb cut for a 6-in-13 hip rafter on the same board, the line measures 7 15/16 inches.
If left in place, this 3/16-inch difference in the height of the plumb line detracts from the appearance of the frame (which on a gazebo is open to view) because the cuts on jack rafters will hang down 3/16 inch below the hip rafters. For me, though, a more important issue is that this difference makes a layout that’s already complicated more complex. The solution is to use wider material for the hip rafter.
For the plumb lines of the hip rafter to match those of the common rafter, the lumber has to be 7 7/16 inches wide. However, you can simplify the layout by adding another 1/8 inch and making the hip material 7 9/16 inches wide. To get material this wide, of course, you’d have to rip it out of 2×10 stock.

Wider stock for the hip rafters is needed to match the lengths of the plumb cuts of the hip and common rafters. As shown above, the amount marked above the bottom edge of the pitch block (about 1/8 inch) is the amount that you’d need to drop the hip if you opted not to cut the backing angle on the hip rafters.
Here’s why 7 9/16-inch-wide material would work best on this roof. One of the trickiest parts of laying out hip rafters is getting their top surface precisely even with the top surface of the common rafters. If the center of the hip is precisely in plane with the tops of the common rafters, the corners will protrude above that plane. Carpenters often calculate the layout along the centerline, then adjust the birdsmouth cut so that the entire hip drops, leaving the top corners in plane with the tops of the common rafters. This process is called “dropping the hip.”
Another way to get the top of the hip in plane with the common rafters is to rip a double bevel on the top of the hip. Instead of dropping the hip, you cut away the part that protrudes above the plane of the common rafters. I prefer this second approach, both because it provides a better nailing surface for the roof deck and because I find it simplifies the layout.
Backing angle. The angle of this bevel cut is called the “backing angle.” To find the backing angle, mark and cut a 6/13 pitch block on a scrap of 2-by material. (If you have a sliding compound miter saw, you can get the correct angle by setting the saw to 24 1/2°.) Place the pitch block on a drawing of an octagon in which the layout for the hip rafters is marked. Mark both sides where the layout lines intersect the pitch block, extend these marks with lines parallel to the inclined edge of the pitch block all the way to the square end, then bring the lines around the end and draw the bevel, as shown.

Set the pitch block so that the point is even with the outside corner of the octagon and mark both sides where the layout lines intersect the pitch block (left). Extend these marks with lines parallel to the inclined edge of the pitch block all the way to the square end. Then bring the lines around the end and draw the bevel, as shown (middle). Measure the angle drawn on the end of the pitch block with a bevel square, and transfer that angle to a board and measure it with a layout square; in this case, the angle is 8°. Ripping 8° bevels along both edges of the pitch block puts the center in plane with the sides (right).
To measure the angle drawn on the end of the pitch block, set a bevel square to the angle on the end of the block and transfer that angle to a board. Then measure the angle using a layout square. In this case, the angle is 8°. Ripping 8° bevels along both edges of the pitch block puts the center in plane with the sides.
Step six: Find the distance between the short points of the plumb cut and the birdsmouth cut for the hip rafters. In step three, we established the base of the measuring triangle for the hip to be 72.182 inches. In step four, we used that dimension to demonstrate the pitch of the hip to be 6-in-13. You could use these numbers to calculate the altitude and hypotenuse of a measuring triangle for the hip rafter. But that triangle would be in the center of the thickness of the hip. So, you’d have to transfer the dimensions to the outside of the board in order to lay out the cuts at the top and bottom of the rafter. This transfer can be difficult to visualize and mark accurately.
I’ve found it’s easier to use a measuring triangle that runs along the outside edge of the rafter material. This will have a base that is significantly shorter than the one in the center. It starts at the short point of the 67 1/2° bevel where the hip rafters meet the common rafters at the ridge block and ends 5/16 inch short of the point where the beams forming the octagon converge. All told, it’s 2 1/8 inches shorter than the base at the center of the rafter. If you have a full-scale drawing, of course, you could just measure this dimension directly off the drawing. Otherwise, you need to subtract 2 1/8 (or 2.125) inches from 72.1825 to find this base, which is 70.057.

Because the hip rafters must fit between the commons, use a measuring triangle that runs along the outside of the rafter material rather than the center, as shown. The base of the triangle then starts where the hip rafters meet the commons, and ends short of the point where the beams (or top plates) of the octagon converge.
The altitude (or height) of this new measuring triangle is slightly shorter, too, because it begins slightly downhill from the altitude of the center triangle. Because we are dealing with a 6-in-13 pitch, we know that the altitude will rise 6 inches for every 13 inches along the base. Dividing the 70.057 base by 13 shows that there are 5.389 13-inch increments. So, multiply 5.389 by 6 to find the altitude. This comes to 32.334.
The hypotenuse of a right triangle with a base of 70.057 inches and an altitude of 32.334 inches is the dimension needed for the hip rafter layout. If you don’t mind doing a little geometry, you can find that dimension using the Pythagorean Theorem and a basic calculator, as shown in “Measure Length of Hip Rafters” illustration below. You can also plug these numbers into a construction calculator, or you can simply measure and mark 32 5/16 inches up the side of a sheet of plywood and 70 3/16 inches along the bottom. Measuring diagonally across from mark to mark should give you the hypotenuse within 1/8 inch.

Divide the base of the measuring triangle (70.057) by 13 to determine the number of 13-inch increments (5.389), then multiply that number by 6 to find the height (32.334). To find the length of the hip rafters, use the Pythagorean Theorem as shown above. The hip rafter length is 77.159 inches.
Step seven: Lay out and cut the plumb cut at the top of the hip. The plumb cut on the top of the hip rafter is a compound miter. To lay out the miter, use a framing square or a rafter jig to lay out the plumb cut for a 6-in-13 roof. Techniques for doing this are described in detail in my “Rafter Layout” article.
After marking this line on both sides of the rafter material, you have to cut a double bevel along the lines. This bevel should run at 22 1/2° from the face of the rafter and meet in the middle of the thickness.
This cut, which permits the hip rafter to fit snugly in the 45° space between the common rafters, is difficult to make. The problem is that most circular saws cannot be set to the 67 1/2° angle required when running the saw along the face of the rafter material. The only exception I know of is the 10 1/4-inch Big Foot Saw with the 75° Swing Table.
Another tool that might make this compound miter is a radial arm saw. Its modern successor, a sliding compound miter saw, can’t be set for this severe of a bevel, however.
A completely different approach would be to make a 90° cut along the plumb layout line, then mark the face of the miter cut with a centerline. Using a sharp handsaw, reciprocating saw, multi-tool, or circular saw set to 22 1/2°, cut along the centerline to create the bevel.
Step eight: Lay out and cut the birdsmouth at the bottom of the hip. The next step is to measure and mark 77 3/16 inches along the bottom of the rafter. Start at the short point of the bevel cut at the top. After making the mark at the bottom, use a framing square or a 6-in-13 rafter jig to draw a level line out from it. The birdsmouth will need to be about 4 1/4 inches deep to clear the point of the octagon at the outside of the beam. Because you’ve beveled the top, there’s no need to drop the hip.
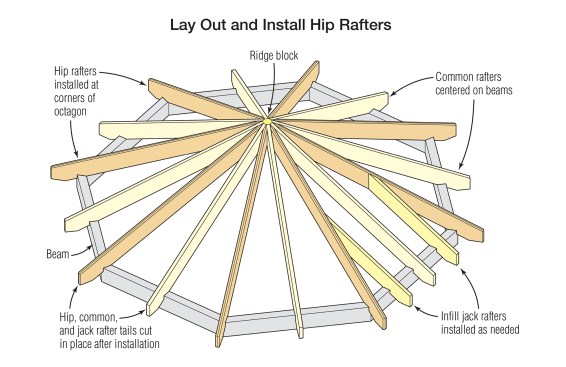
The hip rafters fit in the 45° space between the common rafters at the ridge block and require a plumb cut for a 6-in-13 pitch roof that is beveled 22 1/2° on both sides. Use a 6-in-13 pitch block or rafter square to lay out the birdsmouth, which starts 77.159 inches from the short point of the plumb cut along the bottom edge of the hip rafter. Finally, install the jack rafters, which have the same birdsmouth cut and plumb cut as the common rafters, except with a 67 1/2° bevel.
Step nine: Lay out the jack rafters. A single jack rafter between the common rafter and the hip rafter would probably be necessary on this roof. The jack rafters should be the same pitch as the common rafters, which is 6-in-12. The birdsmouth cut at the bottom is the same as that for the common rafters. The layout for the top is the same plumb line as on the common rafters. However, the cut must be beveled at a 67 1/2° angle to fit the hip.
Photos by Matthew Navey; illustrations by Tim Healey