In This Series
Framing Square Basics: Foundation Layout
Framing Square Basics: Rafter Layout
Framing Square Basics: Octagon Layout
The real challenge in roof frame layout is not the math; it’s visualization. You have to be able to see how the triangle fits the roof you’re trying to build. Using quaint language (the framing square) or high-tech calculators that work in feet and inches doesn’t help if you don’t know how the geometry fits the roof. In a previous article (see “Rafter Square Basics: Foundation Layout,” Apr/22), I explained how the brace table etched on a framing square can be used to unlock the geometry needed to quickly and accurately lay out a foundation. In this article, I’ll focus on the rafter table on the front of the square, and how the numbers it contains can be used to lay out the rafter cuts needed to frame a roof.

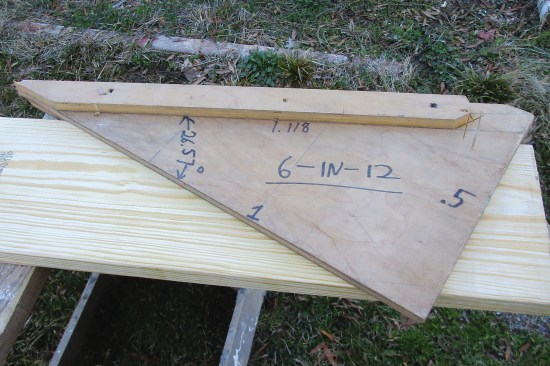
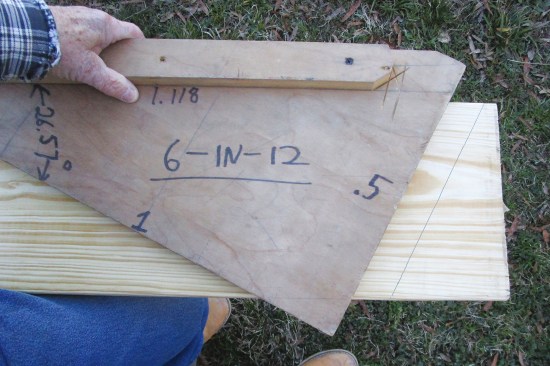
The front of a standard framing square is etched with rafter tables on the wide blade and the octagon scale on the narrower tongue.
Unlike the brace table, which uses the same isosceles triangle for the first 13 entries and the familiar 3-4-5 triangle for the final entry, the rafter table provides the base, altitude, and hypotenuse for 34 different right triangles, each with angles that are different from all the rest. These triangles are well-camouflaged on the square, but they are there, and learning how to decipher them in the 1970s proved to be a turning point in my own quest to learn how to frame a roof.
Ridge height and common rafter layout. On the first line of the rafter table (length of common rafters per foot run), the base of the triangle for all the entries is 12. The altitude is the number above the table. It’s cleverly hidden in the 24-inch scale along the edge of the square. The hypotenuse of the triangle is provided in the decimalized number just under the number indicating the altitude.
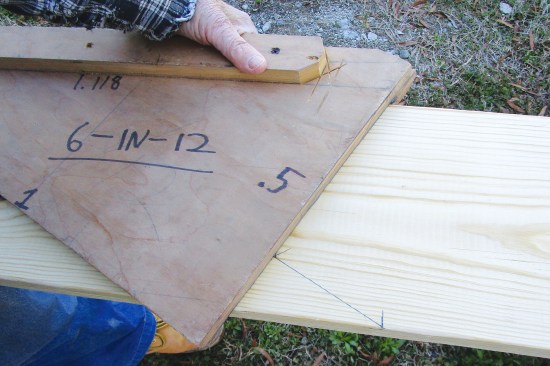
For a 6-in-12 pitch roof, then, assume a base of 12 and look under the number 6 to find the hypotenuse, or 13.42 (see annotated framing square, below). The task now is to expand this little, 6-12-13.42 triangle into a much larger triangle that preserves the angles of the little triangle and fits the roof you are building.
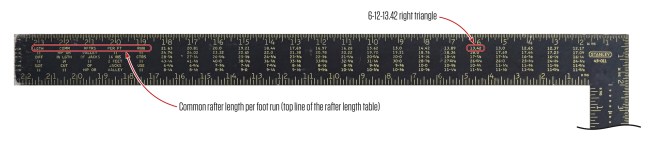
To find the diagonal for a triangle with a rise of 6 and run of 12 (for a roof with a 6-in-12 pitch), look up the first entry beneath the number 6 on the framing square’s top scale. A 6-12 right triangle has a diagonal—or hypotenuse—of 13.42.
First, establish the size of the base of the large triangle. In the drawing of the 24-foot-wide building (“Ridge Height and Common Rafter Layout”) shown below, the short point (sometimes called the heel) of the birdsmouth cut of the rafter lands 2 inches in from the inside of the building’s 2×6 wall. Opting to have the hypotenuse of the big triangle run along the underside of the rafter means the base of the large triangle equals 139 3/4 inches.
To find how many 12-inch increments there are in 139 3/4, convert 3/4 to .75, then divide 139.75 by 12. This comes to 11.65, which is the common multiplier needed to expand the 6-12-13.42 triangle into the larger, 69.87-139.75-156.34 triangle. This triangle provides the height to the bottom of the ridge, 69.875, which converts to 69 7/8 inches. It also provides the distance between the short points of the ridge cut and the birdsmouth cut of the rafter, 156.343, which converts to 156 5/16 inches.
In this example, note that the building width is measured from the outside of the framing rather than the outside of the sheathing. This is because I frame to match the foundation footprint, then lap the sheathing over the foundation. Because I take rafter measurements along their bottom edge, the most important building measurement is actually the distance between the inside edges of the wall framing.
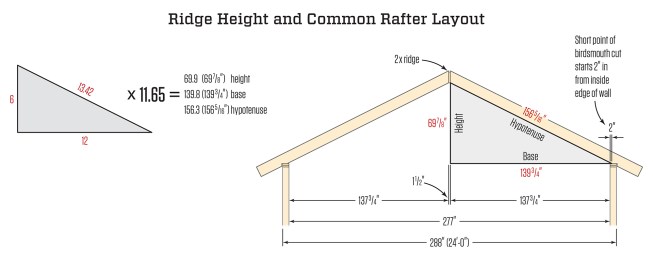
The 6-12-13.42 right triangle can be expanded as shown above to match the building dimensions needed to find the length of the common rafters. For layout purposes, measure the building width from inside edge to inside edge of the wall framing, as shown at right.
Converting from sixteenths to decimals and back. Doing the math for this layout, including the decimal to fraction conversions, would have taken me less than 10 minutes in 1976, working longhand on paper. That’s a glacial pace today, when these numbers can just be punched into a calculator. But, in the scheme of things, it had little impact on the overall productivity or cost of the job.
In the mid-1970s, the back of most tape measures had a decimal-equivalent table. So, to convert from sixteenths to decimals, I could glance at the back of my tape. After a while, I had committed the decimal equivalents of halves, quarters, and eighths to memory, and I had to consult the table only for sixteenths.
When I had to go the other way and convert from decimals to sixteenths, I couldn’t use the conversion table so easily. The decimal inch is usually expressed in hundredths, and there are 6.25 hundredths per sixteenth. So, if the result of my math yielded the number 0.42, for example, I could look at the conversion table and know it was about midway between the entries for 3/8 (0.375) and 7/16 (0.437). I could just pick one or the other and be well within a sixteenth of 0.42 inch, which would be fine for framing.
The fractions and decimals can alternatively be converted by using division or multiplication. To convert the fraction 7/16 to a decimal, for example, divide the upper number by the lower number: 7 ÷ 16 = 0.4375. To convert the decimal 0.39 to a fraction, multiply it by 16: 0.39 x 16 = 6.24. The result, 6.24, is the number of sixteenths. After rounding this number, I’d know I had 6/16, or 3/8.

One way to convert decimals to fractions and back again is to refer to a decimal-equivalent table, which was once a common tape measure feature. Conversions can also be done with a construction calculator.
Laying Out the Cuts
Laying out the cuts at the top and bottom of a rafter can be a bit confusing at first, but like most layout problems, it becomes much easier once you can visualize how the parts fit together. Because the sloping rafter has to fit the side of the ridge, which is plumb, and the top of the wall, which is level, the angled lines needed for the layout are called plumb and level lines. On this roof, the angles of these lines are the same as the ones in the 6-12-13.42 triangle used to create the larger, 69.87-139.75-156.343 triangle discussed above.
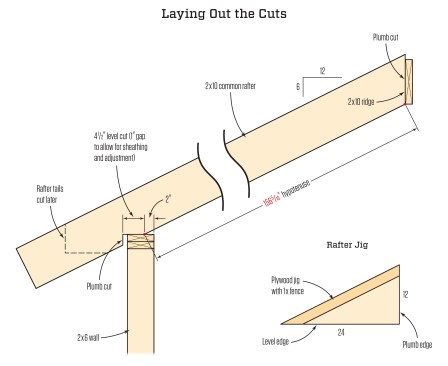
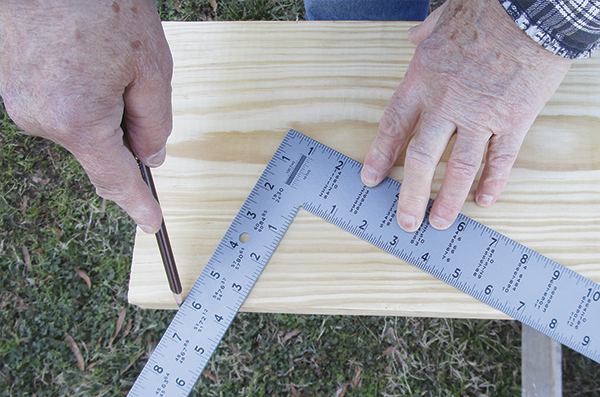
Using a framing square. To accurately lay out the plumb and level lines needed for these cuts, hold the framing square so the numbers representing the pitch align with the edge of the lumber. For this roof, the marks at 6 inches and at 12 inches should align with the edge of the rafter board. Scribing along the 6-inch side marks the plumb line; and scribing along the 12-inch side marks the level line.
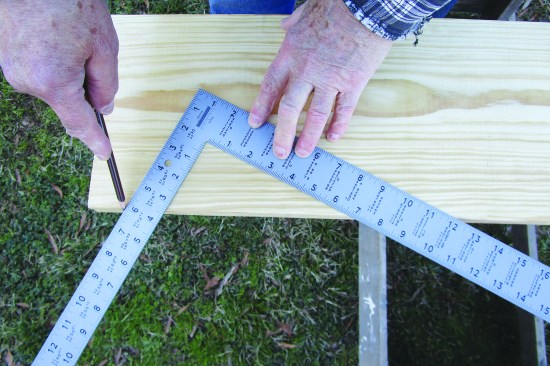
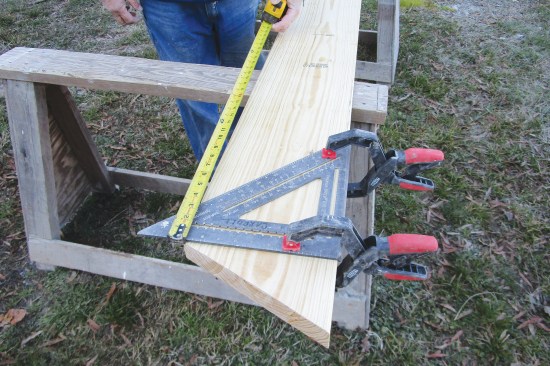
Holding the square with the 6-inch mark on the tongue and the 12-inch mark on the blade lined up with the edge of the lumber, scribe the plumb cuts using the 6-inch side and the level cuts with the 12-inch side. For greater accuracy, multiply the sides by 2 and make a plywood rafter jig with a fence, as shown in the illustration, “Laying Out the Cuts”, above and in the “rafter jig” photos below.
Holding the framing square precisely, even with two marks, and at the same time scribing a line is a little tricky, so it’s helpful to clamp a fence at the marks. If you use a fence, here’s a handy tip: You can expand the size of the layout triangle by multiplying the 6 and 12 dimensions by 1.5. By placing the fence at the expanded dimensions, 9 and 18, you can mark the lines almost all the way across a 2×10.
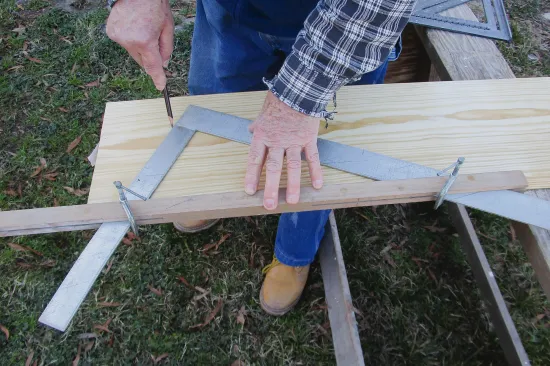
You can multiply the sides of the triangle by 1.5, then clamp a fence to the 9-inch mark on the framing-square tongue and 18-inch mark on its blade.
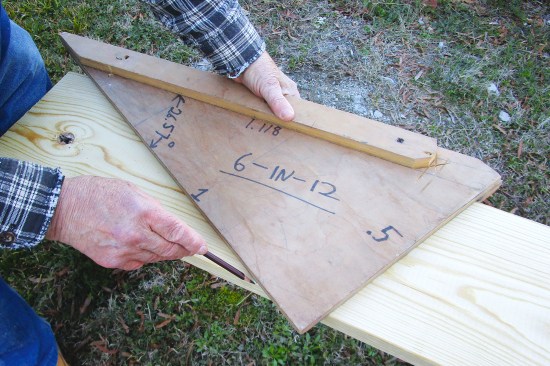
Site-built rafter jig. To help lay out the plumb and level lines on wide rafter stock, I like to make a simple plywood jig that I fabricate on site. To make the jig shown here, I start by expanding the 6-12-13.42 triangle by a factor of 2:
2 x 6 = 12
2 x 12 = 24
2 x 13.42 = 26.84
Doubling the size of the 6-12-13.42 triangle makes the jig big enough to reach across the width of a 2×10. Using a square scrap from the end of a sheet of plywood, I measure and mark up 12 inches up from the corner and 24 inches out from the corner. After marking a sloping line that connects those two points, I make a second parallel line 2 inches above the first, then cut the triangular piece along this second line. I complete the jig by attaching a 1×2 fence along the sloping line on both sides of the template.
To lay out the plumb cut, I hold the jig against the top edge of the board and scribe along the vertical side. Next, I measure and mark 156 5/16inches from the short point of the cut to lay out the location of the birdsmouth cut. To provide a surface to hook my tape measure to, I clamp a Swanson Big 12 Speed Square across the board and over the short point of the cut, and hook the tape to the part of the square that extends past the edge of the board.
Fabricated from scrap plywood with a true 90-degree corner and carefully measured dimensions to match the roof pitch …
… a rafter jig is an accurate layout tool.
At the 156 5/16-inch mark, I use the bottom edge of the jig to lay out the level line of the birdsmouth. To do this, I keep the jig oriented in the same position, with the fence against the top of the board and the vertical side to the right. I slide the jig until the bottom aligns with the mark, then scribe the level line along the edge. To finish the birdsmouth, I make a mark on the level line that will be slightly beyond the outside of the wall. In this case, I measure and mark 4 1/2 inches along the level line. Keeping the jig in the same position, I slide it down the board until the vertical edge aligns with the mark on the level line, then scribe along the vertical edge to mark the plumb line of the birdsmouth.
The author measures the rafter length from the short point of the plumb cut …
… to where the level cut for the birdsmouth begins.
The long edge of the rafter jig is used to mark the level cut, which for this rafter is 4 1/2 inches long. The short edge of the rafter jig …
… is used to mark the plumb cut of the birdsmouth.
Sometimes, near the end of a board, there isn’t enough surface left to hold the fence against. If this happens, you can rotate the jig (or the framing square/fence assembly) 180 degrees and hold the fence against the bottom edge of the board. You can also do this when, on wide material, the vertical edge of the jig or square doesn’t reach to the bottom of the rafter board.
After laying out and cutting the birdsmouth, you can lay out the rafter tails for the eaves. I generally wait until I have installed all the rafters, then I lay out the rafter tails in place. I described this process in the JLC article “Framing Eaves and Rakes” (Aug/16).
Hip and Valley Rafters
The second line of the rafter table provides the hypotenuses of 17 triangles, which all have as their base the number 16.97. To crack the code for this number, you have to go back to the phrase “per foot run.” As indicated above, that phrase means 12 inches. But, since the hip or valley runs diagonally across the layout (in plan view), the base of the little triangle is actually 12 x 1.414 (the diagonal of an isosceles right triangle if the sides equal 1.0), which is 16.97. As with the common rafters, the altitude is in the scale above the table, and the hypotenuse is in the table.
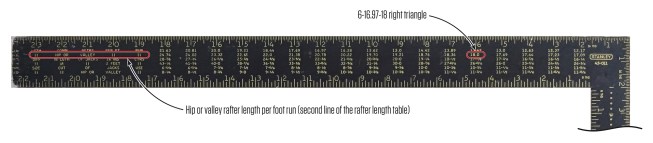
The second line of the rafter table is used to determine the length of a hip (or valley) rafter. The second number under the 6 on the 24-inch scale, or 18, is the hypotenuse of a triangle with a rise (or height) of 6 and a base (or run) of 16.97, rather than 12.
For a 6-in-12 roof, then, the little triangle for a hip or valley is 6-16.97-18. To find the length of a hip or valley to fit the 6-in-12 roof just described, use the same 11.65 multiplier used above to find the length of a common rafter. Both the altitude and the base of this triangle have already been established by the layout of the main roof. The altitude, which determined the height of the ridge, is fixed at 69.875. The base is 1.414 times the length of the base for the common rafters. The math looks like this: 1.414 x 139.75 = 197.61.
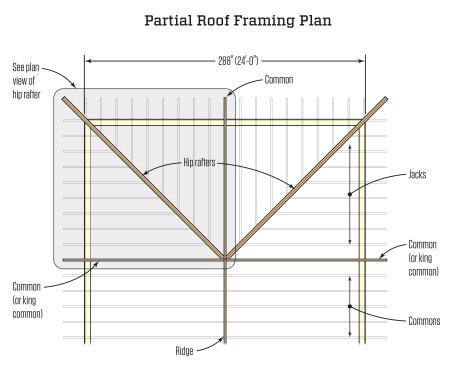
Because hip rafters have longer spans than common rafters, they typically are framed either with engineered lumber or with doubled sawn lumber, as shown above in the “Partial Roof Framing Plan”; in either case, measurements must be made in the middle of the assembly.
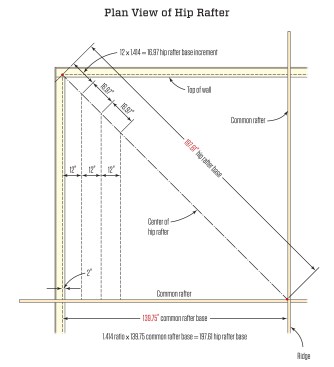
To find the length of the hip rafter base, multiply the common rafter base (139.75) by 1.414.
To double-check the lengths of the altitude and base and to find the only dimension missing—namely the distance between the short points of the ridge cut and the birdsmouth—multiply all three numbers of the little triangle by 11.65. As you can see in the elevation view below, the altitude and the base check out and the critical dimension for the hip or valley is 209.7 inches, or 209 11/16 inches. This dimension, by the way, has to be measured and marked in the center of the thickness of the hip or valley.
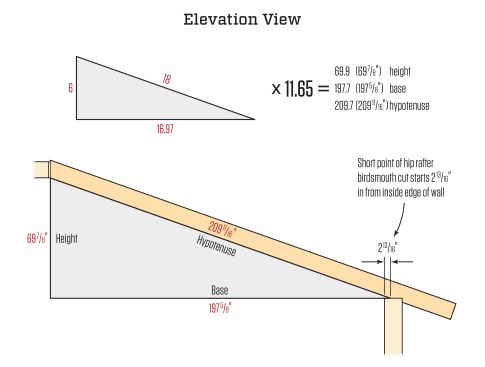
Dimensions can be determined by expanding the triangle dimensions found in the rafter table by the 11.65 multiplier already calculated when determining the length of the common rafters.
Photos by Matthew Navey; illustrations by Tim Healey