Last fall, my company, DBS Remodel, completed extensive renovation work on a Cape-style home located in Millbrook, N.Y. Our job scope included remodeling the home’s two existing full baths, and adding a full bath in the master bedroom and a half-bath off a second-floor bedroom. The existing kitchen was taken down to the studs and redesigned to have an open floor plan to improve maneuverability and flow. On the exterior, we tore off the existing roof and ran new asphalt shingles over ice barrier membrane to guard against ice damming and re-sided the home with vinyl clapboard siding.

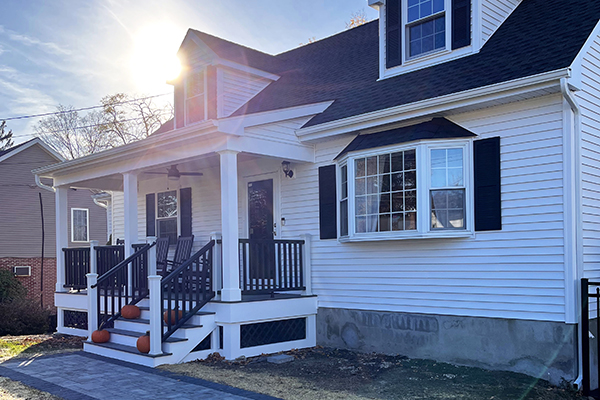
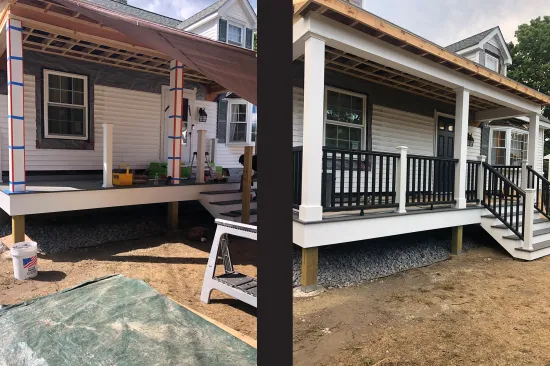
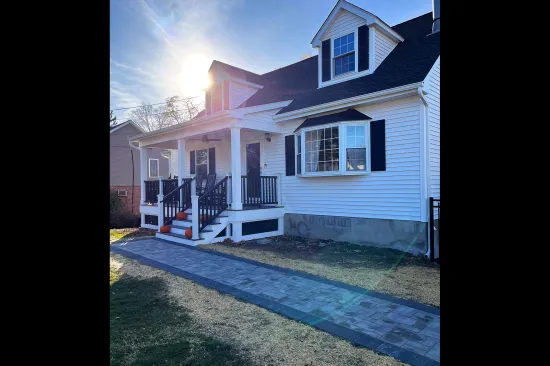
A new porch enhances the curb appeal of a homeowner’s mid-1950s Cape while offering the family a better transition to the outside.
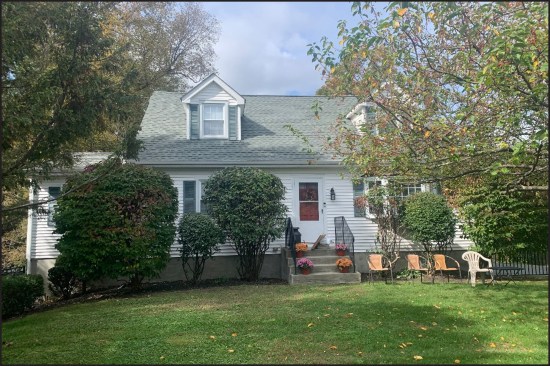
Originally, a masonry stoop with wrought-iron railings (typical of Capes in the Northeast) led up to the little-used main entry door, the focal point of the home’s prerenovation front façade.
During the project’s design phase, the homeowner asked if we could improve upon the home’s bland front façade; its east-facing elevation had a seldom-used front door with a masonry stoop leading up to it. We suggested adding a front porch, which would enhance the home’s curb appeal and allow her family to take advantage of the property’s spacious front yard. (The homeowner had four children—the oldest of whom were teenage triplets—and the new porch would provide a place to hang out and connect to the outdoors.) She liked the idea, so we designed the porch to be large enough to fit four rocking chairs (and two side tables) while being careful not to overwhelm the proportions of the Cape’s front façade. To avoid an existing bay window, we offset the porch to one side.
Foundation Prep
Starting out, we removed a few small trees and shrubs from the front foundation to make room for the new 7-foot-by-18-foot porch. Next, we marked the layout for the three concrete piers needed to support the porch and broke up the existing block and poured concrete stairs, using some of the pieces to fill the void left by its removal. To provide drainage and a measure of protection against rodents burrowing under the porch, we covered the ground with landscape fabric topped off with 1 1/2-inch crushed stone.
After digging 4-foot-deep holes for our footings, we set our three 14-inch-diameter forms. After the town inspection, we filled the forms with concrete and began laying out the rough framing.
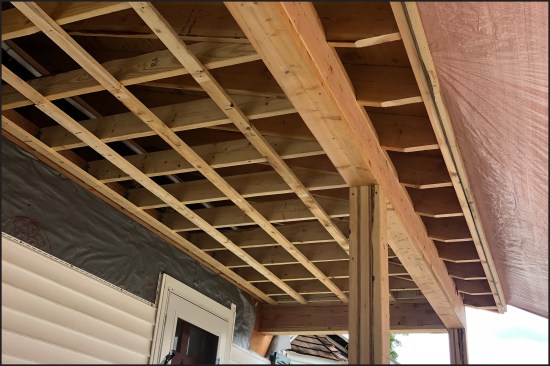
Framing the Porch
The original stoop had 8-inch-plus-high risers, making the steps hard to climb, so we redesigned the stair layout to include an additional riser. This resulted in more comfortable stairs with 7 1/4-inch-high risers, along with a 4-inch step down from the door threshold to the porch decking. Typically, we like to install the 2-by ledger 4 to 7 inches below the entry door to help prevent any issues with drifting snow and wind-driven rain.
After clearing the front foundation of shrubbery and demoing the…
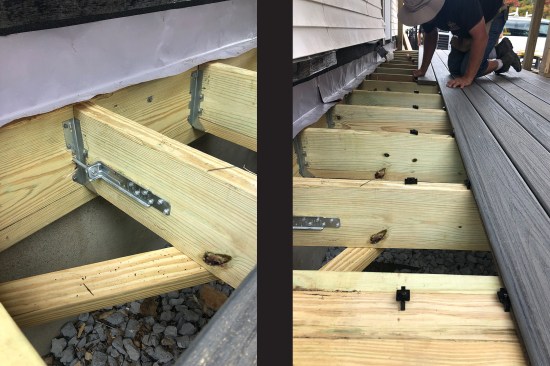
We removed a few bottom courses of the existing siding, snapped a level line to field-verify the stair layout, and inspected the house framing to make sure that it was structurally sufficient to hold the new ledger. We removed a section of the existing 2×8 rim joist where we found some rot and confirmed the layout of the existing floor joists (we also checked for any electric or plumbing that might have been in the way).
After replacing the rotted section of rim board and sheathing, we ran a 2-foot-wide-by-20-foot-long piece of peel-and-stick membrane from the bottom of the sheathing up the wall, then secured the new pressure-treated 2×10 ledger board with 4-inch LedgerLok screws 6 inches on-center in a staggered pattern, top and bottom.
At the three footings, we installed 6×6 adjustable post base anchors for the new pressure-treated posts to sit on. We transferred the elevations from the ledger board using a transit, then began to build the flush-framed deck, which consisted of a double pressure-treated 2×10 flush girder and pressure-treated 2×8 floor framing at 16 inches on-center. To prevent lateral movement, we installed Simpson DTT1Z deck tension ties every 4 feet and 1 foot in from each end of the porch deck framing. We secured them with 3/8-inch-diameter lag screws, which we embedded 3 inches into the existing mudsill.
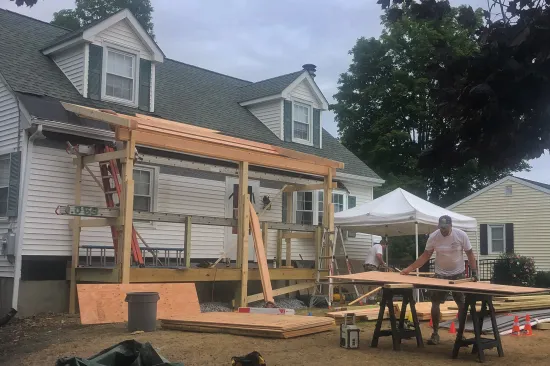
We framed the porch with three site-built “laminated” 6×6 posts, which supported an upper girder. Because we planned to wrap the rough columns with a white composite trim, we assembled the posts out of three spruce 2×6 studs with a layer of 1/2-inch CDX plywood glued and nailed between each stud. We’ve found these laminated rough posts guard against any twisting over time, something we’ve seen with longer length pressure-treated SYP 6x6s.
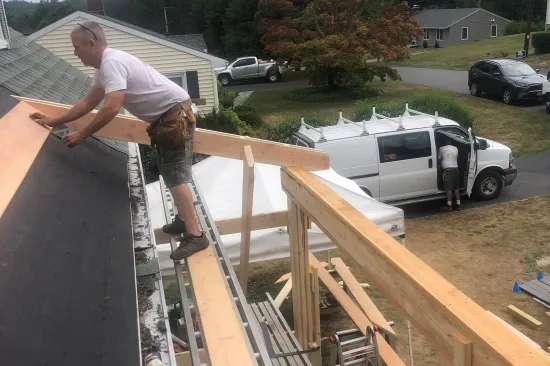
With the posts up, we installed a triple 2×8 header, then 16-inch-on-center 2×8 rafters and 2×6 ceiling joists. We applied ice barrier membrane over the 1/2‑inch CDX plywood roof sheathing, then moved on to decking and exterior trim. Later, we shingled the porch with GAF Timberline charcoal laminated shingles, matching the main roof.
Finishing Up
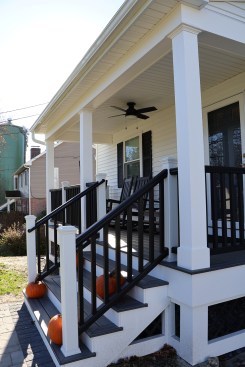
A Trex composite guardrail system encloses the completed porch.
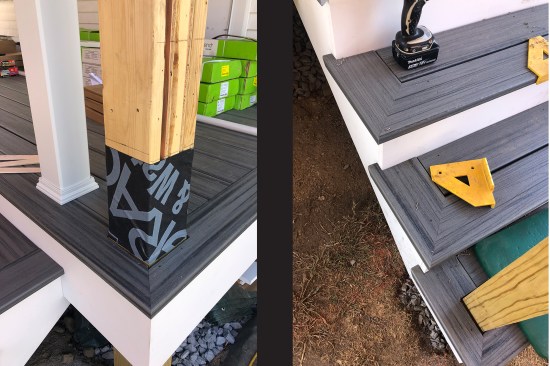
We flashed the top of the ledger with lengths of 12-inch-wide YorkShield copper flashing bent into an L-shape, then wrapped the bottoms of the laminated 6×6 posts with peel and stick to guard against moisture damage. Next, we installed Trex Transcend island-mist decking, which we fastened to the framing with the company’s hidden fastener system. The Transcend had a nice finish look and was a big time saver as far as the installation time was concerned, though we did end up using some color-match trim-head screws to fasten the perimeter edge board and the stair treads.
We wrapped the posts with Perma-Snap Wrap and Snap Columns, a 1/2-inch-thick white composite trim that folds around the posts and is joined with adhesive. For the railings, we used the Trex guardrail system; we matched white newel posts to the support post columns and installed black handrails and balusters per the homeowner’s request. All exposed pressure-treated framing was trimmed out with 1-by Azek exterior composite boards fastened with trim-head screws and white composite plugs.
Finishing up, we used a solid triple 4-inch vinyl soffit for the porch ceiling and installed a ceiling fan to help with airflow on the hotter days of summer. To complete the welcoming front porch on the homeowner’s renewed Cape Cod–style home, we laid a hardscape walk from the driveway to the stairs.
Photos by DBS Remodel and Tim Healey


