Most of our clients don’t start out a renovation project with any kind of plan. They may have a general sense of what they would like to end up with, but rarely do they have specific details on hand when they’re shopping around for contractors. In my career as a deck and porch building specialist, I hear the same things repeatedly, such as “I want to redo my deck,” or “We want to rebuild our deck and add a screened area.” These vague, open-ended concepts are not very useful starting points for coming up with a plan, but I don’t blame prospective clients for being unprepared; in our market, it is commonplace to start with a contractor instead of a design professional.
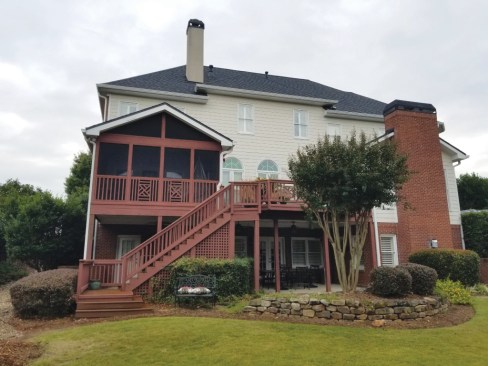
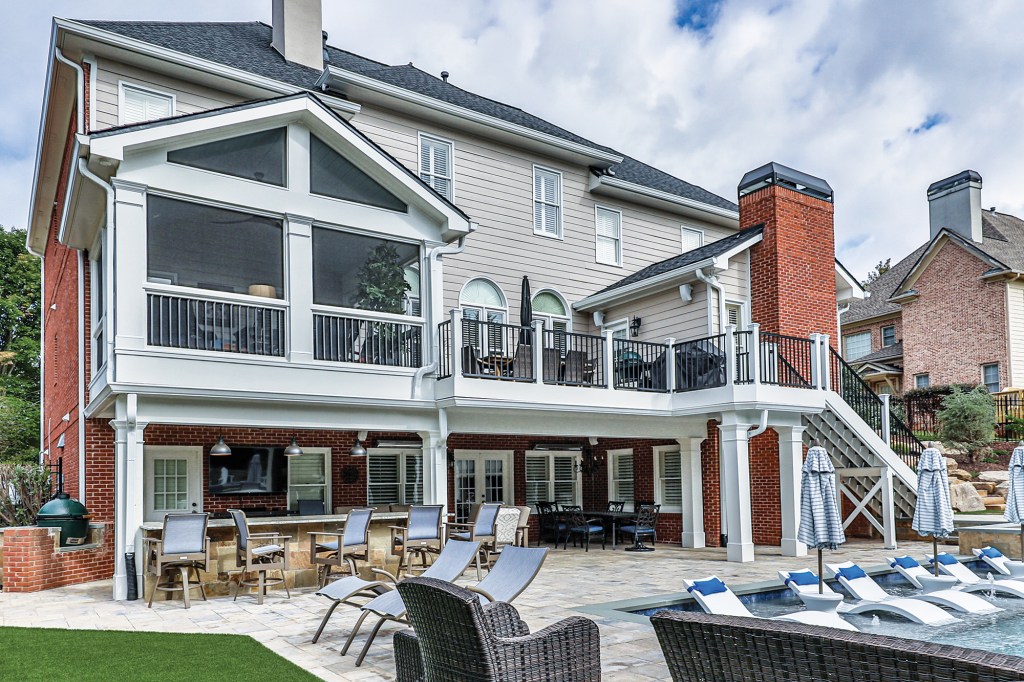
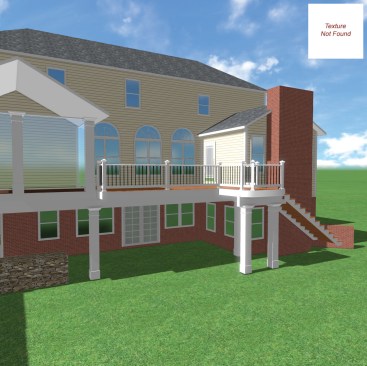
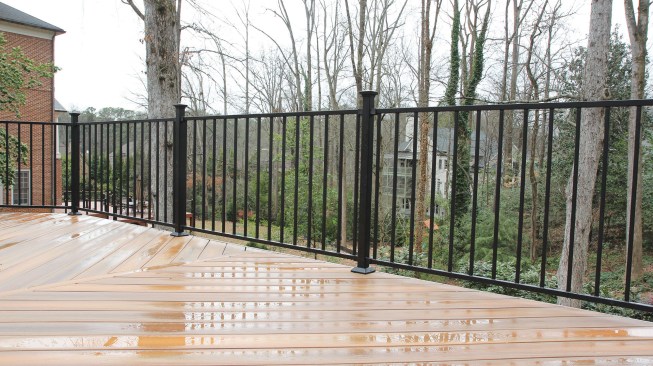
Shown here is a home's existing deck as seen during a preliminary site visit by the author. This article will walk through the process that resulted in the outdoor living space shown above, from initial contact to the final design.
My first job as the contractor is to move the clients past their vague concepts through the design process and into an executable contract. My contracting firm is small, consisting of a full-time office/business manager, a project manager keeping the wheels on the bus every day, and me. We don’t have a dedicated design staff to work through all the decision forks to nail down details in order to create a scope of work and a budget, which on a big project, can take weeks or months and become a significant cost factor. Like the majority of residential contractors, I have to work through the design while keeping up with all the other daily requirements of running the business. To do this, I’ve come up with a system that helps streamline the process.
Processing Leads
The first part of streamlining is developing a sales-call process that is consistent and repeatable with every new lead that comes in. What I mean by this is, how do you handle the “first touch” with a new lead? Do you call or text or email them? How long do you wait to respond back to them? What is your deadline for this? How do you track that correspondence systematically so you can keep track of whom you are talking to what about? What questions do you ask the first time you communicate with prospects? Do you even have a list of standard of questions? (Spoiler alert: You should.) What kind of information does that client need to give you before you consider taking a meeting with them (general scope, how much research have they done, budget, time to start, etc.)? What information do they need to know about you (lead time to start, area of expertise, budget compatibility, etc.) before they take a meeting with you? (See “First Touch Lead Questions,” below)
First Touch Lead Questions
1. Is now a bad time to talk?
2. How are you hoping that I can help you?
3. Part one: Can you give me an idea of where you’re at in this process?
Part two: Have you talked to other contractors yet?
4. How long have you been thinking about doing this project?
5. What has made you decide to want to do it now; what’s changed?
6. When are you hoping to have it done?
7. Have you worked with other contractors or have you done similar projects? Have you ever hired a contractor for any project in your house before?
8. Who else is excited about this project?
Scheduling estimate meetings. One effective way that I’ve found to make this process easier is to determine what the best times are for me to meet with prospective clients. I let the clients work around my schedule; I don’t work around theirs. If they are serious, they will carve out the time to meet with me. I say, “I have this time, this time, or this time available to meet with you … which one would you like?” You tell them, not the other way around. This is the same concept as setting up a doctor’s appointment or a dinner reservation.
I have eight appointment slots every week. This never changes—ever. The slots make the best use of my time, dodge bad traffic conditions, and work to my advantage. Driving is unproductive time for me, so I minimize it. All of the slots are during standard office hours, and all are guaranteed to get me home no later than 5 p.m.
During the home visit. When I am meeting with prospective clients for the first time, I am like a robot. It is not that I’m mechanical or not personable, but I know what I need to find out, what I need to discuss, and what details I need to take back to the office with me to get a design going. I created a worksheet that I always bring with me to take down relevant information and use for a drawing (below).
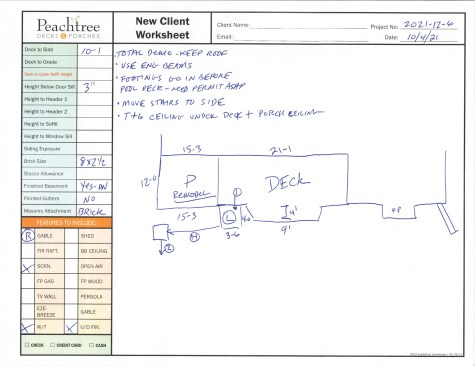
During his preliminary site visit, the author records basic measurements and the client’s design goals on his company’s “New Client Worksheet,” then uses this information to create his proposal and estimates.
Always remember that you are the professional, and you run the show. Even though it is their house and their project, you are the one steering the ship and conducting the meeting. The last thing you want to be bogged down in is paint colors and door knobs when the client doesn’t even have a scope of work. If you let Mrs. Jones go down rabbit holes of Pinterest day-bed swings she likes at this meeting, you are doing it wrong. All you need to know is that Mrs. Jones wants an area to hang a swing—that’s it.
To keep conversations moving in the right direction and not get into the weeds, create a repeatable meeting template and use it. It can be very simple (see “Meeting Template,” below).
Meeting Template
1. Greeting.
2. Small talk to establish empathy (Do the clients have a dog? Ask about it. Interesting thing on the wall? Where did you get that? And so on).
3. Look at the work area together and listen to clients as they explain their ideas.
4. Propose potential ideas you see for the project and see if they are in agreement.
5. Take measurements and documentation while they look at your portfolio (before/after photos are great here).
6. Answer questions that they might have.
7. Discuss timeline for your proposal.
8. Leave them with a clear understanding of what their next step should be.
Custom Look, Standard Details
The word “custom” is thrown around quite a bit in our industry, but what is the true definition of “custom”? Every job I have ever built is custom in the sense that no two are alike. So, I consider our work to be custom in every respect when describing it. But to make designing and building much simpler—and less expensive—for both me and my clients, we have developed a library of repeatable details that we work into every project. These details allow me to design, estimate, and build considerably more efficiently than if I had to go to the drawing board every time I met with a new prospective client.
It is an approach that can be scaled up or down as needed for your particular enterprise, though it may require taking a step back and looking at your existing processes and how you execute them to embrace it to its fullest potential. Here’s how it works:
Design phase. After the estimate meeting with a client, I take the data and measurements that I’ve collected and work on a design using our standard design features. These features are versatile and look great on almost every home style we work on in our area. The look we have developed for our projects is upscale and impressive, so that our clients will feel that their project will be the nicest one in their subdivision when done.
I have prebuilt pricing models for everything in our repertoire, and they make designing and estimating efficient. For a typical deck and porch project, I can design it and have a proposal prepared in under 30 minutes of seat time. I don’t have to wait on pricing from suppliers or do many, if any, calculations. I use the standard design features as building blocks and am just entering quantities in my estimating software. That being said, I have invested a significant amount of time on the back end to make this quick day to day. It is worth it. If you have not invested in an estimating system, you should.
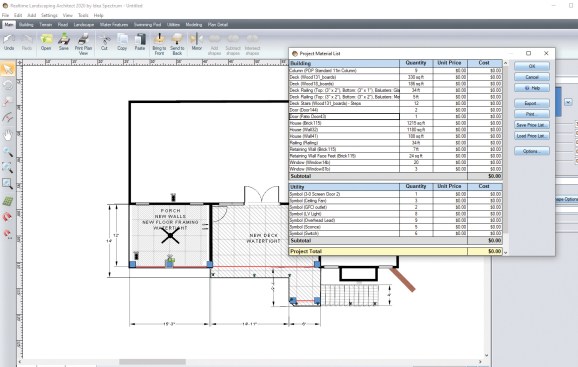
The author uses information from the client worksheet and his library of standard details to create potential plan views (above) and 3D renderings (right) in Realtime Landscaping Architect CAD software.
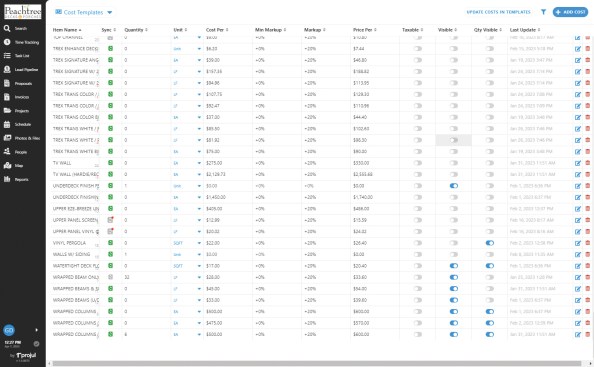
He then loads the deck’s square footage and component list into Projul construction management software, which he has preloaded with pricing, to determine a project’s estimated cost and share it with a client in the proposal.
Standard details. A standard detail is exactly what it sounds like: your company’s default method of building a component using the same materials, dimensions, and finishes. Or, if your work requires components that have a lot of variables, start your estimating with the most popular recurring option to establish a baseline budget. Take a door, for example. A 3′-0″ x 6′-8″ entry door could vary in cost from $350 to $10,000. Find a popular door that you like and that most of your clients like and make it a standard design feature for the sake of getting your proposal out quickly.
For instance, if you remodel bathrooms, you might want to have three standard shower-door options in your library to use as a basis for a preliminary budget. During your estimate meeting, ask your client to pick one for now—the choice can always be changed later, but you need a starting point. The goal here is not to get too specific too quickly. Your client came to you with nothing, and you are helping her through decision forks by limiting options at this stage. When you have standard features that can be plugged into a design, you can develop budgets quickly and keep the design process moving along. It’s not until a client is under contract that I get quotes on custom items; otherwise, it would probably be a waste of both my and my vendors’ time.
Our company includes three brands of decking, four different railing systems that can be mixed and matched, and two different roof design styles among our standard details. How we install and build these never changes, so it is easy to estimate and—more importantly—easy for my crews to build them in the field.
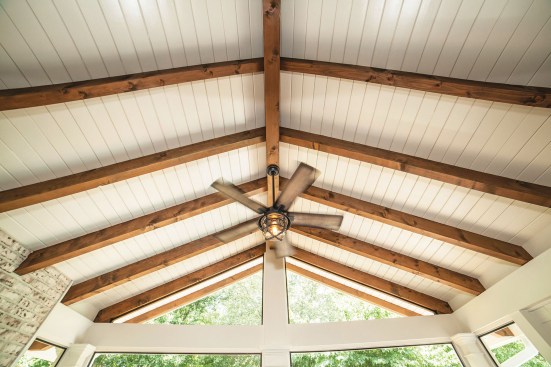
One of the two standard porch ceiling options offered by the author is exposed Douglas fir rafters and T&G roof decking.
John Humphries
He also offers standard roof framing with a T&G ceiling. Pricing for both is based on roof pitch and square footage.
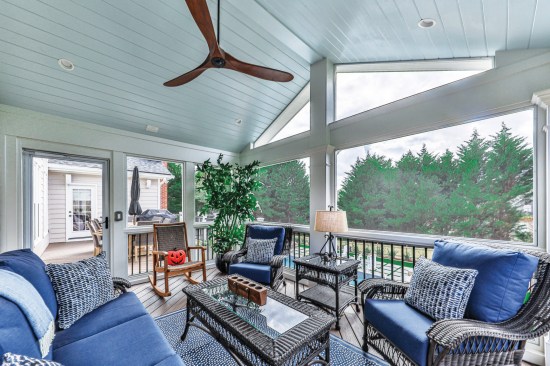
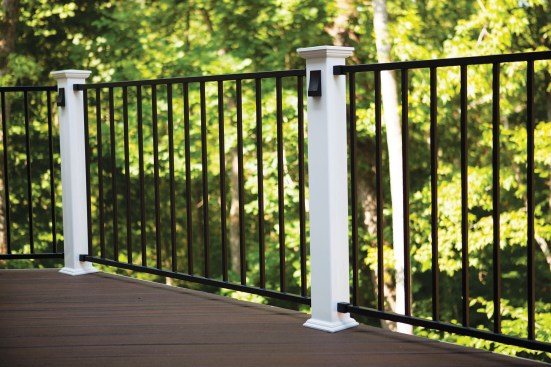
Another way the author streamlines the design and estimating process is by offering a limited number of railing options. In the two examples shown above and at right, the same black aluminum railing panel is shown with two different post styles.
Finalizing the design. Once a potential client is under contract, we use our standard details to build their project. Here’s the thing—clients don’t necessarily look at them as standard details. Walking through our showroom, they see these details as beautiful options that can be worked into their project. It’s like selecting items from a menu: A little of this, some of that, and in 30 minutes, we will have designed and specced out a $150,000 outdoor project. It’s painless for them—fun, even—and easy for us. Everything is black and white and locked in.
Sure, there are times when we do add custom components. We would be crazy not to offer them, but working with standardized options is much easier. The feedback I get all the time from clients is that they hate having to make decisions when there are too many options. Three to five options is a good range for most people. In some cases, we simply say, “This is the way we do it because we’ve found it’s the best way,” and they typically will defer to our judgment.
John Humphries
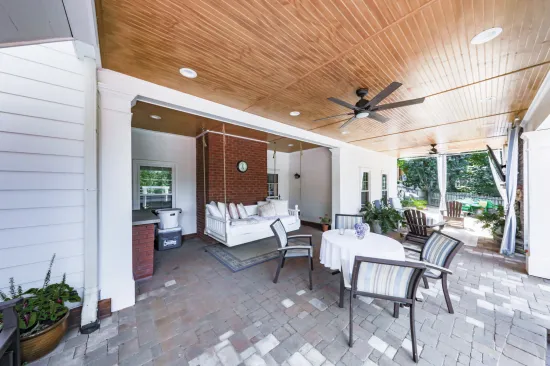
Under-deck ceiling options can also be standardized. The author’s premium waterproofing package includes column wraps, wood ceiling, and crown molding.
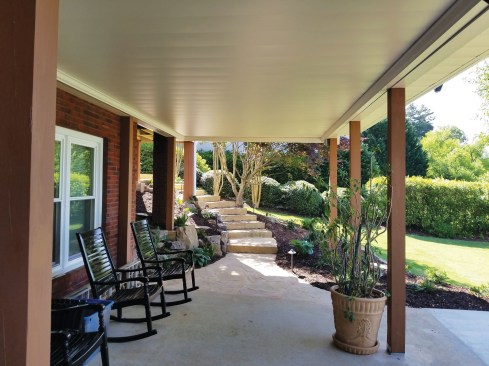
The basic waterproofing package that he offers uses an aluminum under-deck system and costs considerably less.
Standard Details in the Field
Creating standard details that are repeatable in the field is where the rubber meets the road. Several factors make me a strong believer in developing repeatable construction details.
The primary reasons are that it saves time, eliminates errors, and tends to produce better results with time. The less my crews and subs have to think in the field, the more time they are in “go” mode making things happen. Standardized details also save my project manager’s time because he doesn’t have to worry about so many minor specifics. It sounds crazy, but you can start to take certain things for granted once your team has the standard details down to a science. Every project has nuances we have to worry about, but I don’t want to waste time even thinking about a column trim detail we have built a thousand times—we just want it done.
The way we do this is by drawing out the details in plan and section form and saving them in a library of drawings in the cloud that the crews can access at any time if they have a question. What we’ve found is that most of crews memorize the details after a couple of jobs. They love the fact that they aren’t standing around scratching their heads on every job and can just do what they know.
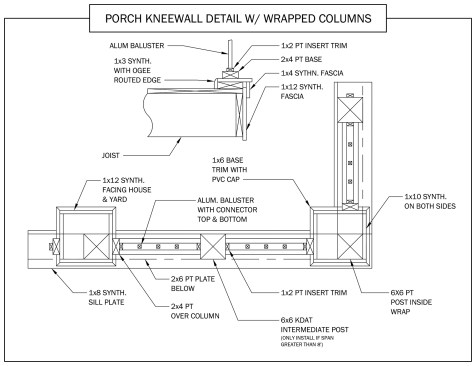
Workers in the field can refer to the author’s cloud-based library of construction details, such as the porch knee-wall detail shown here, which have been standardized to eliminate errors and produce repeatable results.
Using standard construction details results in fewer estimating/take-off mistakes, which means more profitability. We know exactly what we’ll need on site to build them. No less, no more. And because the crews have had a lot of practice building the same thing the same way over and over, we see a lot fewer mistakes. They know exactly what materials and tools they’ll need that day to complete the job.
Lastly, training is much simpler. The quality of labor is not likely to get better any time soon, if ever, so it is important to simplify as many things as we can to keep build quality up with a less-experienced work force. The simpler we can make it, the better off everyone is. ❖
Photos by Greg DiBernardo, except where noted.