Construction law firms often cite water damage as the most common complaint leading to lawsuits against builders. While some of those water-damage lawsuits result from burst water pipes, most are caused by water leaking through the exterior of a building.
This article explores principles and details that carpenters need to know to avoid liability. Think of it as a checklist of items to watch out for when working on the exterior of a home.
Critical Elements
I’m not an expert on roofing, but the worst leaks start there, so I’ll begin with a few notes about roofs.
Omitting roof drip edge can result in severe deterioration
Whenever I work on the exterior of a home—even if I’m not repairing damage caused by a roof leak—I first survey the condition of the roof. My goal is not to guess how many years the shingles have left but to get a sense for the slope and overhangs. How efficiently does the roof get rid of water? Is there a correctly installed drip edge that directs water away from the eaves, or is water leaking in behind gutters and fascias? Are roof-wall intersections properly executed with step flashing and kickouts? Much has been written in JLC about the importance of roof flashings. Two must-reads are Mike Guertin’s “Drip-Edge and the IRC” (May/18) and “Kickout Flashing: Required by Code, Yet Often Overlooked” (Oct/19). Just installing the drip edge and kickout flashings correctly will avoid a high percentage of the most common roof leaks.
Installing the water-resistive barrier (WRB) well will also prevent headaches down the road. The big takeaway here is to lap it correctly—a lesson all carpenters need to take to heart as they begin to integrate the WRB with their flashing and woodwork. Plastic and metal materials are just like shingles and clapboards: Each higher piece needs to lap over the piece below it; any vertical legs of a metal flashing must be overlapped by a WRB or piece of flexible flashing.
Carpenter strategies. Thinking about roofs with good overhangs is a good way to begin thinking about the wood components of an exterior. Wood lasts longer outdoors if it is part of an assembly that sheds water. Equally important, exterior wood must be detailed to absorb less water and be allowed to dry naturally. Finally, wood must be protected from UV radiation and treated to resist decay-causing organisms. Let’s take each of these strategies in turn.
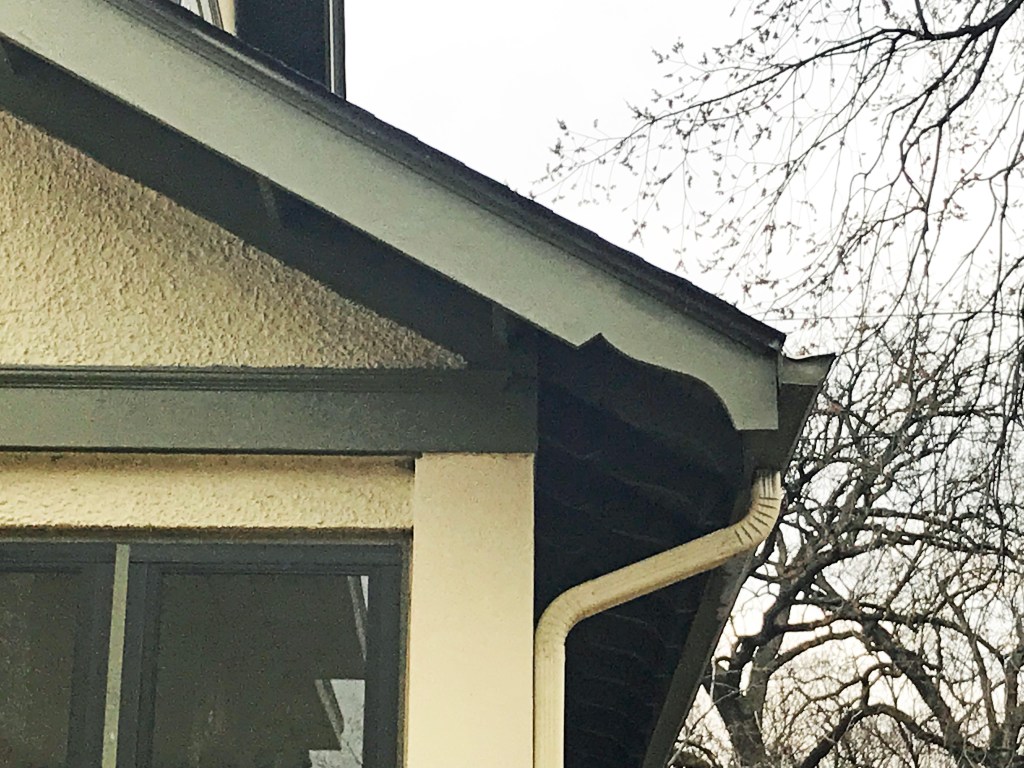
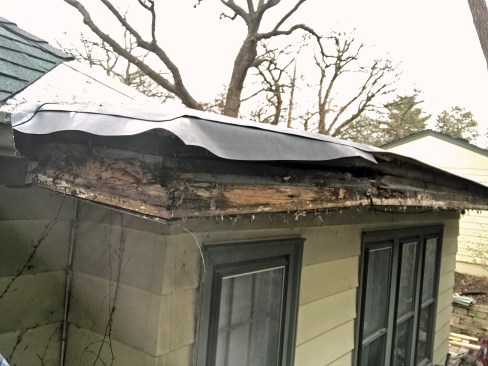
Water highway. The rot on this window head occurred because an ice-melt wire, which ran down a valley and was plugged in under the eaves, created a “water highway” that soaked the wood. Surface tension caused the water to cling to the wire and travel along it until it drained off the dip just over the window.
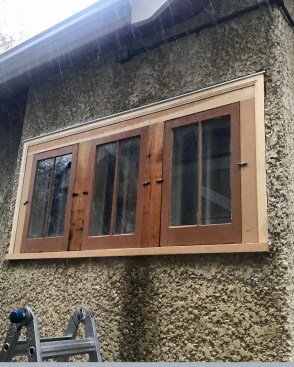
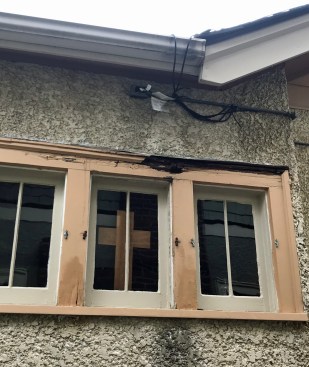
After rebuilding the window, the author advised the owner to move this outlet (and replace it with an exterior-rated GFCI unit). In this photo, the outlet has not been moved but the wire is gone for the time being.
Shedding Water
Horizontal surfaces must be sloped to allow any water to run off. The top edges of deck ledgers, skirtboards, transition rails, sills, thresholds, headers, porch and deck railings, and post caps are all elements that need to be beveled at least 10 degrees. The steeper the bevel, the faster it will shed water.

Fail. A wood head cap can serve as an effective way to shed water, but in this instance, it is a fail—the premilled drip kerf should have been installed face down, not up.
Flashing. Ideally, horizontal edges should be flashed with metal that bends up the wall to divert any water running down the wall over the horizontal surface. But take care. Too often, I see metal flashing on windows and doors that is overbent, with the L less than 90 degrees; as a result, it holds water rather than sheds it. It’s best when the metal is underbent, creating a 95‑or 100-degree angle. The metal can then be pushed onto the horizontal surface, creating a slight tension that will keep the flashing straight. I slope flashings about 10 degrees and extend them 1/4 inch beyond the horizontal member. This extension should bend down to create a drip leg.
I also like to bend end dams on head and ledger flashings to guide water off the front and prevent it from spilling over the edges where it can dump into the wall system and be absorbed into open end grain. The video below is the best I’ve seen on how to bend these.
End dams are also effective on sill flashings. In Europe, metal window-sill flashing on top of the sill (not to be confused with the equally important sill pan under the sill) is a common detail. It typically has end dams and a healthy overhang to keep water well away from the siding below. This is a smart detail that we should adopt more often in this country.
Long cap flashings on skirtboards and ledgers are best if they’re continuous. If you have to join lengths, though, overlap the seams a couple of inches and use a high-quality caulk to seal the lap.
Another caution with metal flashing concerns the use of dissimilar metals. Too often, steel fasteners are used to install aluminum or copper flashing. The different electrical properties of the dissimilar metals interact and cause corrosion. It’s surprising how fast even a medium-gauge metal can dissolve under the force of galvanic corrosion, leading to extensive water damage in a very short time.
On porch and fence posts, copper caps are ideal for blocking water from being absorbed into the end grain, and the copper won’t react with the copper treatment used in pressure-treated materials.
Absorbing Less Water
Along with detailing exterior wood to shed water, we need to think about how materials soak up water. A few simple rules come into play to limit the absorption of water into the wood.
Provide capillary breaks. Capillary action occurs whenever there is a small gap. The surface tension of water wants to hug the surfaces of the materials and can draw water upward, against gravity. This is how water moves up the pores of a tree, and this speaks to how powerful the mechanism is; capillarity literally pumps water up small gaps. This is why end grain, which exposes the open pores in the wood, is at particular risk of absorbing water. But water can be absorbed into any unsealed wood surface, and the longer the surface stays wet, the more water is absorbed.
Capillary action can draw water in between two pieces of material that are layered. A metal flashing without a drip leg over fascia is one example where water will be drawn up the fascia, and because the space is so small, it won’t dry out very readily and can quickly rot out the eaves. This also occurs with two wood layers, such as where a column base is applied to a column face.
The solution is to provide capillary breaks. In the case of the metal flashing, a drip leg moves the edge of the metal out away from the surface of the fascia. The surface tension of the water draining down the metal is not strong enough to hold the water on the edge and it drips off. A drip kerf on the bottom of a wood overhang is a version of this.
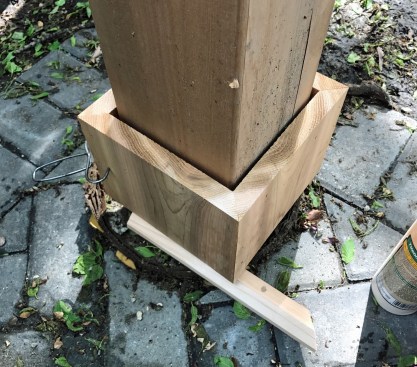
To build a durable base for an exterior column, the author creates a ventilation space, oversizing the base about 1/4 inch on all sides.
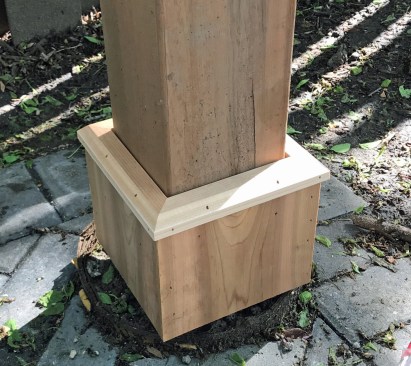
This space can be capped, leaving a smaller space of about 3/16 inch between the trim and the column.
With a column base, provide space between the two wood layers. I build each side of a column base about 1/4 inch larger than the sides of the column. A few shims provide a nailing surface with minimal exposure to capillary action. Then I close the gap at the top of the base with a drip cap. I have to resist my impulses as a finish carpenter to make the cap fit tight to the column, though. Wood butting wood presents a minute gap that can wick and hold water, so instead of butting the cap to the face of the column, I leave a gap of about 3/16 inch to allow any water to drain through.
Another example of a capillary break is a 3/8-inch gap between the siding and a window head or skirtboard. Wherever there is a chance for water to pool rather than drain off quickly, increase this gap to an inch or two. Examples include the gap between siding and the flashing surface at roof-wall intersections and the gap between siding and the top of the flashing on a deck ledger. In these two cases, it is often the sheer volume of water in these locations that increases the chance that the water will be deeper than 3/8 inch. Similarly, open the gap to an inch or two any place wood runs to grade (though where there is the possibility of roof runoff splashing back, this space needs to be at least 8 inches).
Allow for drying. The gap around the column base points to a third important strategy to avoid water damage: The gap not only breaks the surface tension of water and prevents capillarity, but it also allows air to circulate between the column and the base to allow drying.
In general, we need to assume outdoor materials will get wet. In spite of all our best efforts to shed water and prevent capillary action, wood will get wet. Trying to create a barrier against water using tight joints and caulk is likely to fail. A much more effective strategy is to open things up to let water drain through and let enough air circulate. Fungal decay sets in when wood is not able to dry and remains wet for extended periods. On the other hand, if it gets wet and then dries relatively quickly, there is little chance for decay.
Rainscreens for any cladding are a well-known example of this strategy. We should be applying the same reasoning to any piece of wood we use on the exterior of a building and thinking about how we might create a capillary and air gap between the wood pieces. It’s not always practical, since structural connections need wood-to-wood contact, but where not just cladding but also trim work is applied, a rainscreen strategy can go a long way toward increasing the life span of the building.
Seal exterior surfaces. Another important, though somewhat more obvious, strategy in preventing wood from absorbing water is sealing surfaces. Primer and paint are the most common materials for sealing exterior wood. It’s not just the exposed face we need to worry about, however. Because water will get through, it’s critical to seal all six sides of a board. Prepriming, and especially back priming before installing wood pieces, is needed.
Wherever possible, the author seals end cuts: This is critical for cuts through pressure-treated wood to maintain the treatment in high-exposure and ground-contact situations.
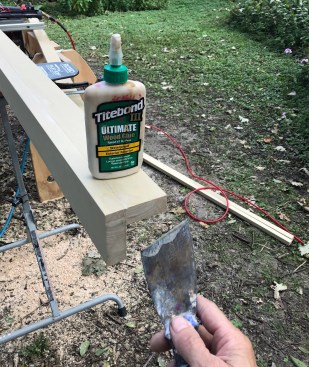
For painted trim work, the author seals cuts with an exterior wood glue.
As stated earlier, end grain wicks water more readily than the face and edges of boards, so focus on the ends. I make it a habit to keep a bottle of Titebond 3 (Ultimate) wood glue near my cut station and smear cut ends with this. It serves to seal the end even if I’m not depending on the glue joint, per se. Of course, often I am purposefully creating a glue joint. In that case, I smear the entire surface with glue, and I clamp the connection to ensure a truer bond.
When using preservative treated wood, I use an end-cut sealer matched to the type of treated wood I’m using—something like Wolman CopperCoat for green wood or Nisus Bora-Care for borate-treated woods.
Avoid film-forming finishes. With wood that will be left natural and not painted, it’s best to use a stain—even a neutral one, if you don’t want to change the color—or penetrating sealer. Urethanes, varnishes, and other film-forming surfaces require regular maintenance. Look for a penetrating finish that provides UV protection. Ultraviolet light from the sun degrades the lignin that bonds wood fibers together, and the sun can degrade wood in a matter of weeks. Products such as Sikkens Cetol, Owatrol Deks, Rubio Monocoat, and Osmo UV-Protection Oil are a few, but by no means the only, such finishes to consider.
Wood Selection
The topic of wood selection is an extensive one, but I will touch on it here as it is an important strategy in combating water damage in exterior woods and deserves at least a mention. I recommend carpenters refer to the the USDA Forest Products Laboratory’s “Comparative Decay Resistance of Heartwood of Native Species” (PDF). This document provides a useful comparison of different U.S. species, underscoring the fact that decay resistance is entirely in the heartwood. This provides an important lesson in itself: Wherever possible, select out, or rip off, the sapwood to ensure the greatest durability.
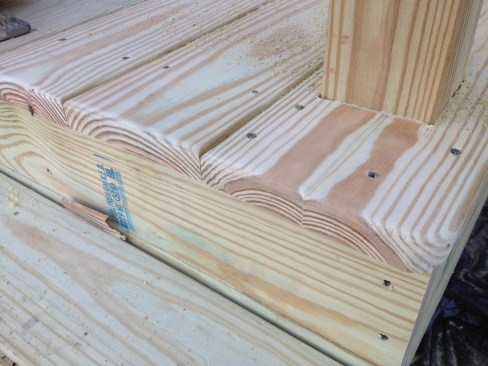
For this simple set of exterior steps, the budget was tight, but the author was still able to incorporate several principles to prolong its life. A gap between each step and riser allows water to drain and the wood to dry freely. In addition, the deck boards are installed with the growth rings curving down (bark-side up). The author believes this is the best way to ensure that pressure-treated deck boards that cup will drain water rather than hold it (see discussion of why below).
Bark-side up or bark-side down? As carpenters, we should also pay attention to the grain. I think on porch and deck boards, it’s best to install the growth rings so they curve down (bark-side up). I feel this is the best way to ensure that the boards will shed water when they cup, rather than hold water. Whether boards should be installed bark-side up or barkside down, however, is the subject of avid debate. Here’s my thinking on this topic:
In theory, the original moisture content of a piece of lumber is the best predictor of a board’s final shape. Wet, or air-dried, lumber will tend to cup toward the bark side as it dries. In essence, the growth rings will want to flatten out, causing the board to cup towards the bark side. This argues for installing boards bark-side down. But it’s not always so simple as that. Kiln-dried lumber behaves quite differently; it is usually surfaced after the lumber has been dried and will tend to cup away from the bark side as it gains moisture. When using a kiln-dried after treatment (KDAT) decking product it makes more sense to install boards bark-side up.
In practice, no matter which face is up, the final shape of a board will depend on its in-use moisture content. If one side is wetter than the other, that side will expand and cause the board to cup. With a deck built close to the ground, it’s usually the underside of the board that swells, as the underside experiences higher relative humidity than the upper surface, which is exposed to wind and sun and boards usually cup upward. With any deck that is close to the ground, it’s critical to provide as much air circulation under the deck as possible.
But there are still other issues that need to be taken into account with deck boards that argue for installing them bark-side up: For starters, heartwood is difficult to impregnate with wood-preserving chemicals, while sapwood is easy to treat. As a result, the most resistant face of pressure-treated (PT) wood – the face that is 100% treated – is the bark side. This argues for placing the bark side up when using PT deck boards.
In addition, repeated cycles of wetting and drying can cause the layers of earlywood to separate from the layers of latewood. This separation, called shelling, occurs infrequently but when you see it, it is usually on deteriorated PT deck boards that are laid bark side down. Placing deck boards bark-side up reduces the chances for shelling on the exposed face of the board. For more on these issues, see the Forest Products Laboratory factsheet: “The Bark-Side/Pith-Side Debate” (PDF).
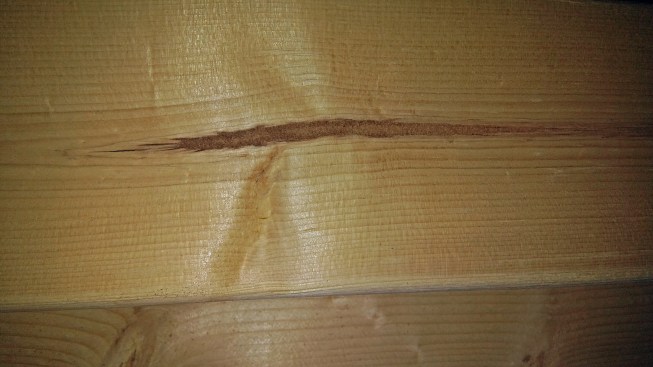
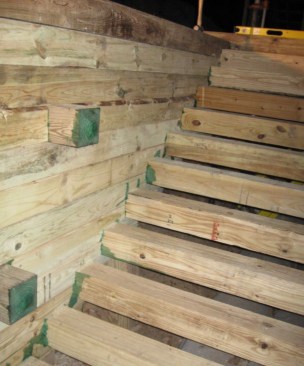
When selecting boards at a lumberyard, avoid selecting boards with pith, like the one shown here. Studies suggest that lumber without pith is stiffer and less likely to deform in service conditions.
Avoid diagonal grain and pith. I always tell carpenters to avoid boards with grain that runs diagonally across the face and to avoid boards with pith—grain that shows full-circle growth rings on the end or the dark center of a limb on the face of the board. Both types of boards will tend to bow and twist more over time, even if they are fairly straight when you buy them.
The very best, of course, are boards with growth rings as close to 90 degrees from the face of the board as possible. Wood will move, and the straighter the grain, the more evenly and predictable that movement will be, limiting how much a wooden assembly will work itself apart with changes in temperature and humidity.


