
Done right, exterior wood trim can last a long time. I’ve seen 17th and 18th century homes in New England whose original moldings — everything from cornices to watertables — were still solid after centuries of exposure to the elements. But done wrong, exterior trim will be one of the first parts of a house to go. While working on contemporary homes on the West Coast, I’ve encountered 10-year-old window casings and porch railings that needed repair or total replacement.
Why do some trim jobs last while others don’t? Unfortunately, there’s no simple answer or single solution. Instead, I’ve found it best to pursue a combination of strategies. The first line of attack is to include using rot-resistant woods and designing joints and surfaces to shed water. Finishing the wood certainly also helps but no amount of finish can make up for a poorly designed joint
Choosing Rot-Resistant Woods
Since the end of the last century, the first choice for exterior trim has been the naturally rot-resistant woods of America’s Northwest. These include redwood, red cedar, Alaskan yellow cedar, and Port Orford cedar, all of which may last a century or more without protection. In addition to their durability, these woods are easy to work, take a crisp profile when routed, and fasten and paint well. Their innate drawback is softness — they tend to dent quite easily.
The use of these species brings other problems, as well. The dust and oils found in redwood and cedar are relatively toxic to those of us who must cut and sand the stuff. I, for one, break out in a rash if I so much as touch a piece of roughsawn redwood (gloves and a dust mask are musts). And because these woods are cut from a dwindling stock of old-growth trees, their cost has shot up in the last few years, pricing them out of all but the most high-end jobs.
Fortunately, there are good alternatives to these old-growth woods. Depending on what part of the country you live in, you may be able to get high quality cypress, white oak, or locust at reasonable prices. These species offer nearly the same rot resistance as redwood, and they are harder and more dent-resistant.
A step down the ladder are woods classified by the U.S. Forest Products Laboratory (FPL) as “moderately” rot-resistant. They include eastern white pine, southern longleaf pine, larch, and swamp oak. In my experience, these woods last for many years if they are installed properly and well-protected with paint — though in more questionable installations they are not as forgiving as either redwood or cedar.
The FPL’s “slightly or nonresistant” hit list includes alder, poplar, cottonwood, hemlock, the spruces, the maples, red oak, and all other pines and true firs. Unless you can guarantee that no water ever reaches the raw wood of these species — at least without a way of quickly drying off — you shouldn’t use them for exterior trim.
Regardless of species, you should avoid any board containing sapwood. This lighter-colored layer of wood lies between the heartwood and the bark, and carries sugar-saturated water up the trunk of the tree. As far as hungry bugs are concerned, using sapwood for trim is like using gingerbread for shingles. Also stay away from boards with splits, surface cracks, or loose knots. These almost always get worse with exposure to the elements, providing safe harbors and nurseries for bugs and fungi.
Finally, try to use exterior wood with a moisture content (as read by an electronic moisture meter) that’s stable with the outside environment. In most parts of the United States, this falls between 15% and 20%, though it may be lower in the Southwest desert. One way to achieve this is to use wood that has been thoroughly air dried. Don’t use any board that still contains sap (it’s too wet), or that has been kiln dried and stored inside (it’s probably too dry).
Designing Good Details
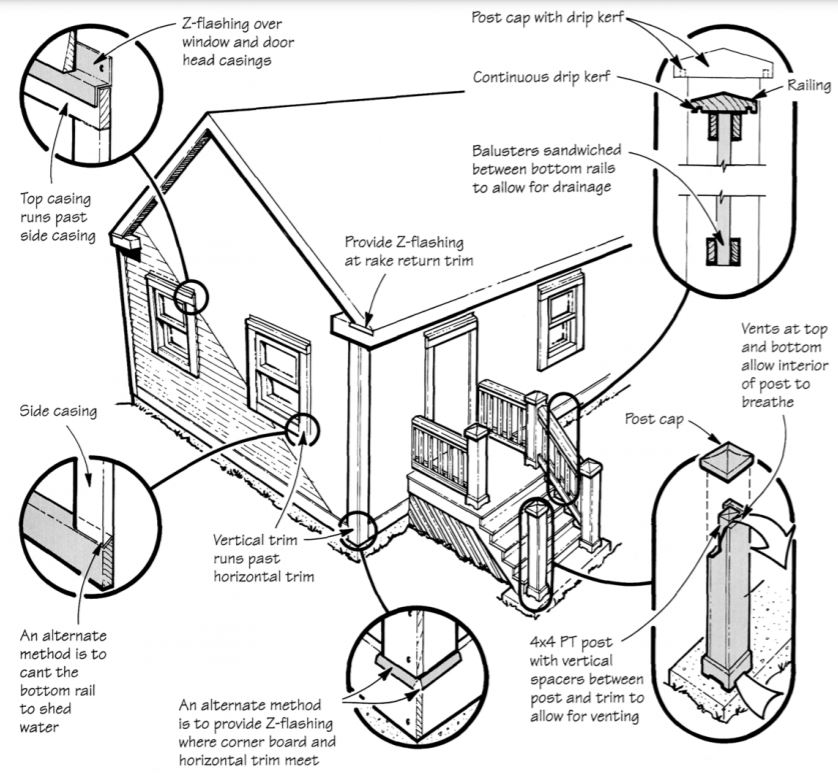
Exterior joints should be designed to shed water (see illustration). Trapped water will cause excessive wood movement, splitting, and — ultimately — rot, bugs, and fungal infestations.
Run verticals past horizontals. Where a vertical down board or casing stile meets a horizontal skirt board or rail, I either run the vertical past the horizontal, or bevel the top edge of the horizontal board. I also arrange vertical trim pieces so that there’s no exposed end grain, which is the part of the board that’s most likely to absorb moisture. That’s why I cap the same stile at its top edge by another rail.
Avoid miter joints in exterior trim work. When a miter joint inevitably opens as the wood shrinks, the end grain of both boards will be exposed to the weather. Dadoed tenons and lap joints can be made to work outdoors, if they’re made according to the same principles. I also use metal flashing wherever possible to help water find a path away from horizontal trim pieces.
Slope top surfaces. Railings, thresholds, and other flat surfaces can be made to shed water by bowing or sloping their top surfaces. In addition, saw or rout a drip groove along the underside edges. An example is the built-up post in the illustration above. I’ve cut the top cap in sloped facets and routed a drip groove on the underside. Drain and ventilation holes at the top and bottom of the post keep condensation from accumulating inside.
Assembly Techniques
One way to keep a joint dry is to make it as tight as possible — and to make sure it stays that way. Having worked on wooden boats, where joints get heavy abuse, I’ve learned a number of tricks for meeting this challenge.
The first is to make sure that adjoining surfaces meet uniformly at all points; no amount of glue or fasteners can compensate for a sloppy joint. The second is to apply a “luting” compound to any joint that’s likely to absorb water, as where a window casing meets a sill. A luting compound is anything put between two boards to prevent water intrusion. Nineteenth century boatbuilders used pine tar and Irish felt, but nearly anything put on a raw joint surface to seal it before assembly will extend its life. A simple coat of latex paint or a wax-based sealant like Thompson’s Water Seal has proven longevity. If you want a stronger joint, try an epoxy or a resorcinol or urea formaldehyde glue like Weldwood Resin Glue. However, the latter two compounds get brittle after a time, so they may eventually crack and invite moisture into the joint.
To fill unflashed cracks between trim boards and siding, I use any of the standard butyl or silicone-based caulks. Even the most expensive grades rarely promise to last more than 25 years, though, so I don’t spend my money on the best. Instead, I expect that my caulk beads will be inspected and replaced where necessary when the trim is repainted.
If you are selecting a highly rot-resistant wood such as teak, or using a synthetic material with a long life span, chose fasteners that will last at least as long as that material. Bronze or stainless-steel pins, bolts, or screws are suitable to hold joints together with these materials.
For more ordinary woods used on homes, I’ve found that galvanized fasteners hold up for decades if the coating isn’t chipped. Note that not all galvanized fasteners are created equal. I suggest using only the hot-dipped variety — it has a much thicker coating than the electroplated type.


