A few years ago, after I’d been doing whole-house restorations for more than two decades, I started getting calls from clients who just wanted old windows repaired. At first I took on these jobs to fill in periods of downtime between the larger projects. But after I’d done a couple of them, the trickle of calls became a torrent. Some callers were simply hoping to qualify for generous new federal and state rehabilitation tax credits. Most, however, had learned to appreciate the precise joinery, wavy glass, and unique divided-light patterns that made their original windows so valuable. Now all I do is windows.
Long-neglected windows may be inoperable and unsightly, but the damage is almost always superficial — peeling paint, cracked putty, broken glass, frayed cords, frozen pulleys — and relatively easy to fix. Most old windows in my area were crafted from long-leaf heart pine, which is a remarkably stable and rot-resistant material. Although it’s not unusual to find localized outbreaks of rot, especially in end grain that’s been long exposed to the weather, these areas are easily repaired with epoxy.
In my experience, once the surface issues have been addressed and the moving parts properly tuned, a century-old window will operate as smoothly as any modern unit — and look a whole lot better.
Sash Removal
Unless I’m asked to perform a minor fix, such as reglazing an otherwise first-rate window, I always remove the sash and take them back to my shop for repairs. To access the bottom sash, I cut the paint line where the window stop meets the frame. I use a small pry bar backed by a stiff-bladed putty knife to pop off the stop (without marring the frame), then cut the old sash cords and lift out the bottom sash.
Removing the parting bead that divides the top sash from the bottom is always a challenge because it’s set in a groove, so there’s no easy way to slip a pry bar underneath and force it out. I’ve had some success using a painter’s 5-in-1 as a makeshift prying device. Another strategy is to clamp the face of the bead in a Vise-Grip locking sheet-metal tool (Irwin, 800/464-7946, www.irwin.com) and yank it out. Fortunately my lumberyard keeps parting bead in stock, so I don’t panic if I break one from time to time.
Even though they’re designed to be as operable as bottom sash, most of the top sash I encounter are painted totally shut. I separate the paint seal with a sharp utility knife (a small saw called a window zipper makes this task a bit easier — but it’s another tool to keep track of, and I prefer to keep things simple). If the sash remains stuck after the paint lines are cut, I look around for the screws or nails that a previous carpenter must have installed.
Whenever I’m dismantling several windows at the same time, I mark the unfinished vertical edge of each sash with a code to ensure that it goes back in the proper jamb. Since the edges should never be primed or painted, a pencil mark is sufficient. In many cases, when I’ve looked closely, I’ve found that the original installation codes were still visible.
Frames
Before returning to the shop with the sash, I remove any paint that may have accumulated on the inside running surfaces of the window frame. I’ve tried dozens of paint removers over the years; my favorite is the Speedheater (Eco-Strip, 703/476-6222, www.eco-strip.com), which uses infrared light to soften paint as effectively as a conventional heating device, but at a much lower temperature.
If the metal pulleys are also encrusted with paint, I remove them and let them soak in a 1-to-1 mixture of Simple Green and ammonia. After several days, I’ll rinse them with water to remove the accumulated paint.
Because they lack moving parts, window frames are much less susceptible to wear and tear than sashes; just the same, rot never sleeps in this part of the country, so I poke around every surface with a 5-in-1 to check for signs of sponginess. I treat minor infestations of rot with an epoxy repair system (System Three Resins, 800/333-5514, www.systemthree.com). Before returning to the shop, I cover the empty jamb with insulating foam board to keep out the elements, or with plywood to keep out the riffraff.
Sash Repair
Once I’ve decided to bring a sash back to the shop for repair, I strip it down to bare wood, then sand, prime, paint, and reglaze it. The old glass is often filthy and badly stained from decades of pollution and rainwater; since I don’t want to wait until the soft new putty is in place, I give the glass a serious cleaning before I take it out. With the sash laid flat on the bench, I apply a generous coating of liquid glass cleaner, then run a safety razor back and forth over the surface of the glass before polishing it with a cloth.
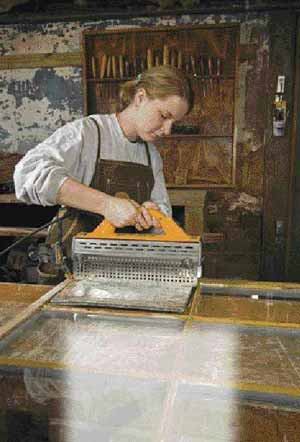
I use the Speedheater to soften up the glazing at the same time as the paint. To protect the glass from rapid temperature swings (which could cause cracking), I cover it with a scrap of hardboard wrapped in aluminum foil. After exposing one 14-inch section to the heat for about 60 to 90 seconds, I slide the unit down the rail and scrape away the loosened paint and glazing compound. To remove the glazing compound without damaging the glass, I use an Eco-Strip chisel with an attached wheel that serves as a depth stop.
When the glazing is out, I carefully extract the glazier’s points with a small pair of needle-nosed pliers. To properly prime the sash, I try to remove all the old glass panes; then I set them aside in a secure place until it’s time to put them back in. I hate to break irreplaceable glass, so if a particular pane remains stubbornly bonded, I leave it and work around it.
To replace cracked or broken panes, I keep a supply of antique glass on hand, which I can cut to size as needed. Most of my stock is reclaimed from windows that were too badly damaged to save, or was purchased from a local salvage yard (which also ships by mail order; www.caravatis.com). In addition, I’m aware of two manufacturers who reproduce various types of antique glass: Bendheim (www.bendheim.com) and Artisan Glass Works (www.artisanglassworks.com).
With the glass out of the way, I repair any minor rot damage with an epoxy wood repair system. After allowing the epoxy to cure (usually overnight) and tooling the patch smooth, I lightly sand all surfaces with 100-grit sandpaper. Then I apply a generous coating of Benjamin Moore’s Fresh Start — an alkyd primer suitable for both interior and exterior uses — to all surfaces except the vertical edges. I’m especially careful to fully coat the rebate (the part that holds the glass) because the glazing compound will not bond to bare wood.
Once the primer has dried, I spread a thin frosting of glazing compound on the rebate, then gently press the glass into place. Instead of push points that stick out and catch my knife when I’m tooling the glazing compound, I use triangular glazier’s points to secure the glass. With a putty knife, I push the points into the wood just far enough for them to be covered by the new putty. For small panes of glass, such as you’d typically find in a 6/6 window, one point in the middle of each mullion is sufficient. On larger pieces, I leave about 12 inches between points.
Before applying the glazing compound, I clean the glass one last time to make sure I’ve left no paint or putty on the surface, then apply a coating of NoStreek Glass Polish (Gel-Gloss, www.gel-gloss.com), which adds a brilliant sheen and helps repel dirt.


