Three years ago, Tim Uhler wrote an article describing how he switched from using fiber-cement siding to LP SmartSide (see “Working With SmartSide,” Mar/18). I’ll use a similar format in this article to describe how I work with another type of engineered siding—TruExterior, which has grown to be my go-to siding for exterior projects.
Unlike Tim Uhler, who builds homes on spec, I work primarily on renovation jobs and the siding choice is not always mine; most of the time, we install what the homeowner demands. SmartSide is popular in other parts of the country but isn’t as popular on Long Island where I do most of my work, though I have occasionally installed it by customer request, and it is a nice product. Fiber cement is probably the most common siding product used here; I’ve installed it on many projects and will likely continue to in the future. But lately, TruExterior siding and trim has been getting a lot of attention.
What is TruExterior?
TruExterior is a composite blend of 70% fly ash and 30% polymer (generically dubbed “poly-ash,” though Westlake Royal Building Products is currently the only company making it for the building trades). It is an extruded material made using a process similar to the one used for making cellular-PVC boards, but the material itself is different. Poly-ash stands apart from just about any other exterior product. While it looks like fiber cement, it doesn’t have any cement. It’s extruded like PVC, but it doesn’t perform like PVC. And it has a texture a bit like MDF; however, there is no wood in it. Fly ash is the byproduct of burning coal. Years ago, this ash went into the atmosphere—not good if you lived downwind of a coal-burning power plant. Technology was developed to remove the ash and store it for use in other products, notably as an additive to concrete. You can’t store fly ash outside in the open air or the wind will pick it up and redistribute it to the neighbors, so some facilities store it in containment ponds as a slurry or bury it as waste in landfills. Boral Industries found ways to store, clean, and process fly ash for use in building materials, such as brick and cementitious products. The company also developed a process to combine it with a polymer to produce trim and siding boards. Currently, this product is branded as TruExterior and made by Westlake Royal Building Products.
What makes this material different? If “TruEx” (as we have come to refer to it on the job) is properly stored and installed, it does not move much from temperature or moisture. This makes it unique among exterior trim and siding products. You can install it with tight-fitting joints because you don’t need to accommodate expansion and contraction caused by absorbing water and drying (a process we call “water cycling”). You don’t have to maintain wide clearances above roofing, windows, doors, and hardscaping, and the manufacturer does not require back priming the boards or end priming cuts. You only need to paint what you can see after the material has been installed. And I don’t know of any termite in the world that would choose to munch on poly-ash, so ground contact is fine. However, as with any siding, water can still get behind it, so you do need to provide water drainage to help protect the rest of the structure.
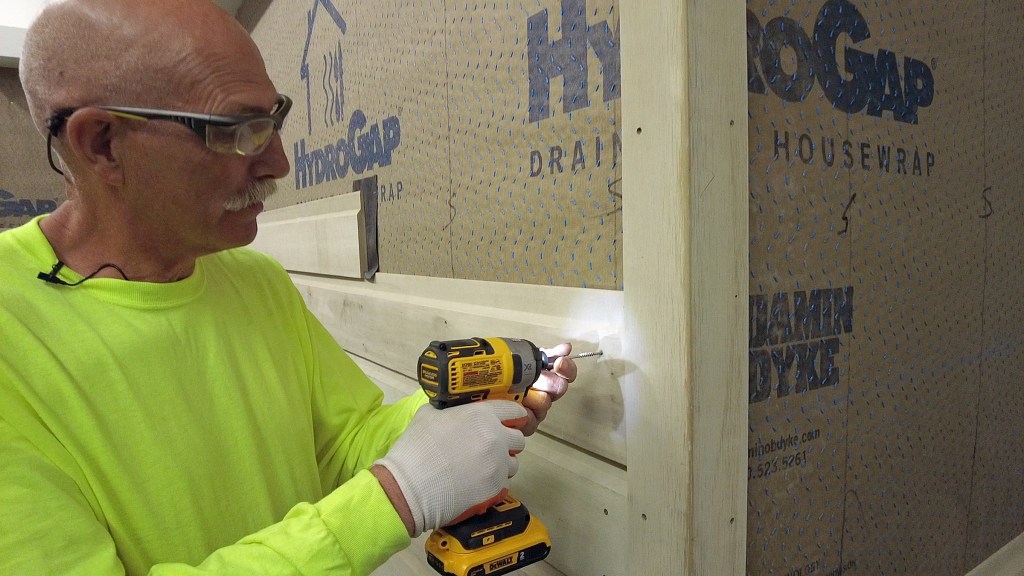
TruExterior needs to be fastened to studs, so the author marks t…
Product line. TruEx comes as trim boards and a few siding profiles. The trim and siding lengths are 16 feet long, which is great for minimizing seams. Trim comes in most nominal sizes from 5/8×4 to 5/8×12, 1×3 to 1×12, 5/4×4 to 5/4×12, and 2×2 to 2×12. Because it mills so easily, I regularly use it to make window trim, corner boards, and panels. If you can do it in wood, you can likely duplicate it in TruEx.
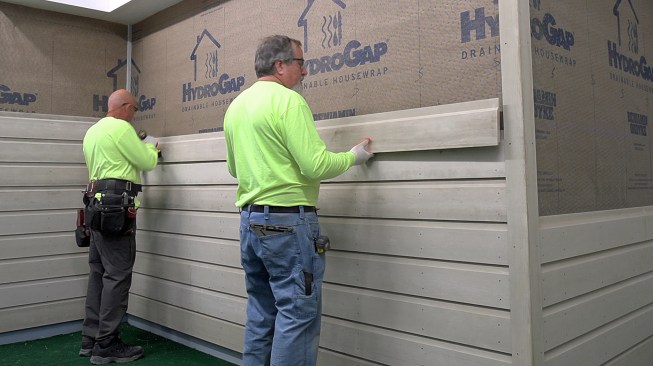
Most of the time we install horizontal siding, but one nice advantage of TruEx is the varied siding profiles available. Aside from the more traditional channel bevel and cove/Dutch lap horizontal panels, TruEx also comes in V-rustic, shiplap, nickel-gap, and channel siding profiles that can be installed vertically or horizontally.
Also, several aftermarket companies sell custom trim and profiles, as well as millwork for historic restoration work. Duration Moulding & Millwork has provided me with a number of custom applications, including windowsills and surrounds as well as classical exterior moldings. (For more on using Duration millwork, see “Restoring a Gothic Porch” by Marc Brahaney, Jul/19).
Product Questions
There have been no glaring questions about TruExterior. Poly-ash seems to be extremely stable under the most demanding environmental conditions, and no special tools other than carbide-tipped saw blades are required to cut it. The only issues that could be raised are with the dust created from milling and cutting it, but these seem to be minor. It’s a heavy nuisance type of dust; it settles quickly. For personal and crew safety, dust must be managed with engineering controls and personal protective equipment (PPE). Outdoors, an N95 mask is recommended when cutting and milling it. But the MSDS for TruExterior does not specify the same safety controls that are required under OSHA’s silica rules for fiber-cement products.
Installation
If you can install wood, you can install TruExterior. The process is almost the same. The big difference is that most of today’s exterior siding products have less tolerance for water and move more with seasonal changes, so you need to provide gaps at butt joints and intersections and fully prime and seal boards on all sides. Not having to do these last two steps at every intersection and every cut with TruEx saves an enormous amount of time.
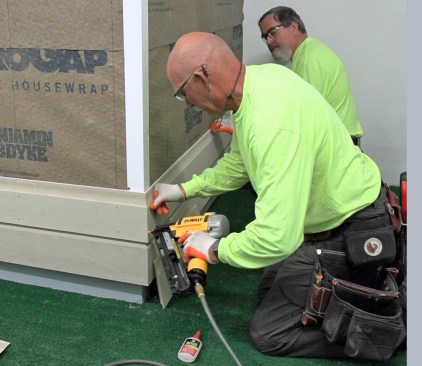
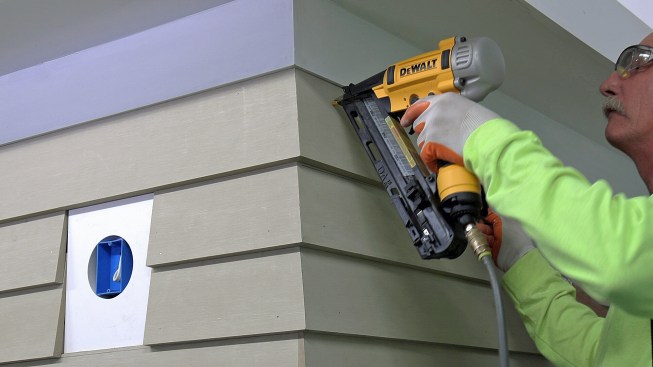
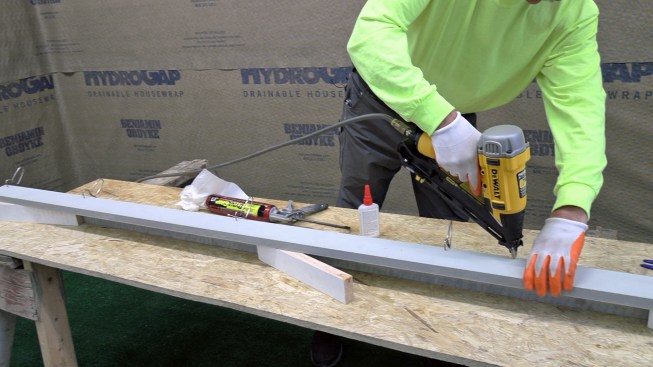
TruEx siding is typically face-nailed with 8d (2 1/2-inch-long) hot-dipped galvanized or stainless steel ring-shank nails, following the on-center spacing of studs so nails are driven into framing, not just through sheathing. Two nails in each stud works for siding exposures up to 8 inches; wider boards require three nails. We occasionally screw boards in place, particularly for homes along the coast where we want the greater withdrawal resistance to high winds. When we do, we follow the same schedule the manufacturer requires for nails.
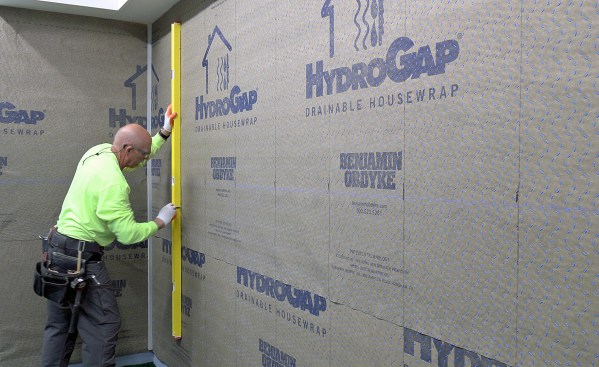
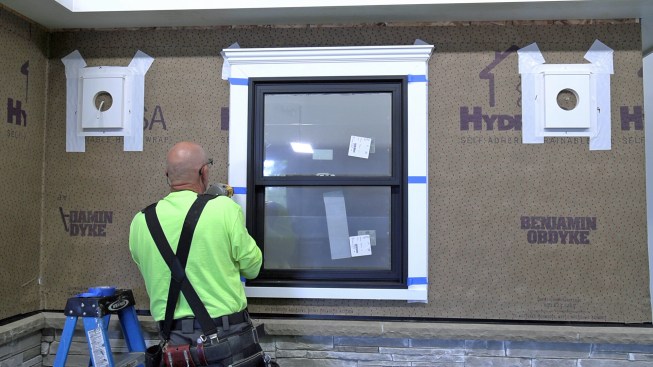
Though TruExterior is hydrophobic (naturally water repellent), water will still leak behind it or be drawn through gaps by capillary action, as with any siding. Therefore, it is important to establish a drainage plane behind the siding before installing it. I don’t think flat housewrap or black paper cuts it as a water-resistive barrier (WRB), as water tends to get held by surface tension between the back of the siding and the WRB and is slow to dry. The water can’t hurt the siding, but there has long been evidence that with a pressure differential, water can seep through most housewraps into a framed wall, mostly through nail holes (see “Water-Managed Wall Systems” by Joe Lstiburek, Mar/03). I recommend a drainable housewrap or a rainscreen. I typically use Benjamin Obdyke’s Hydrogap housewrap, which leaves a 1mm (about 1/16 inch) drainage space behind the siding to allow water to drain down the wall. Remember to look for where the water will escape at the bottom and plan for drainage with drip caps and flashing at head trim, transition boards, and skirt boards. Drainage gaps should not be caulked; the water must be able to drain freely away.
Field joints on siding runs can be butted; no gap is required. I like to install flashing strips behind field joints to minimize water intrusion, but it’s not required by the manufacturer. (Bearskin makes 6-by-12-inch joint flashing strips; I cut my own from a roll of Benjamin Obdyke InvisiWrap housewrap, which is UV stable, using a saw.)
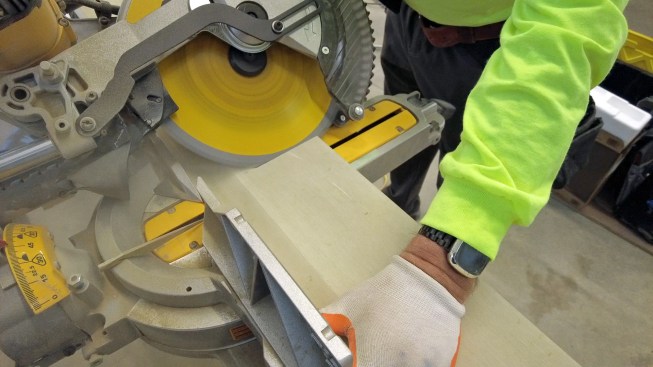
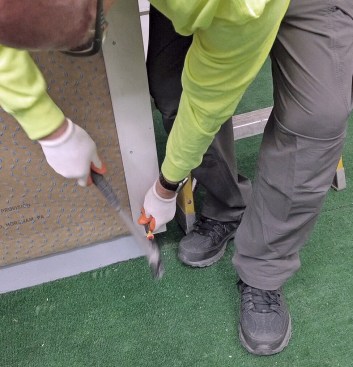
Where siding butts corner boards and door and window casings, a tight fit is also acceptable. A good miter saw will give a perfect “factory-look” finish to cuts. (I use the stock 32-tooth blade that came with my saw.)
At roof-wall intersections and above door and window heads, the only requirement is to leave a small drainage gap. Generally, 1/4 inch is sufficient, but at roof intersections and above exterior decks, the manufacturer calls for 1/2 inch to limit fine debris collecting. This gap is still much smaller than the 1 inch or more needed for wood and fiber cement. It’s also important to install kickout flashings at the end of roof-wall intersections (see “Kickout Flashing: Required by Code, Yet Often Overlooked” by Mike Guertin, Oct/19). This is not for the siding’s sake; it’s needed for keeping the volume of water that gathers here from leaking into the structure.
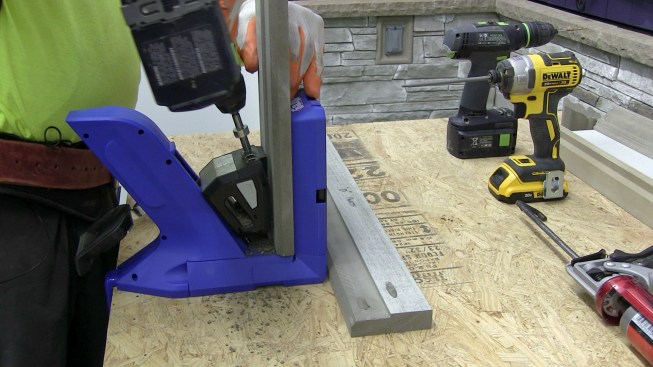
When the author does use corner boards, he preassembles them fro…
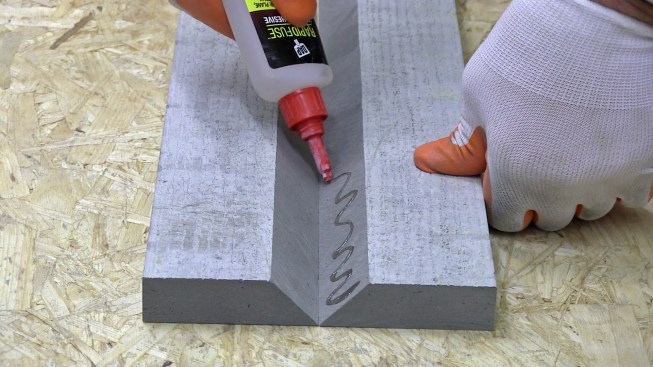
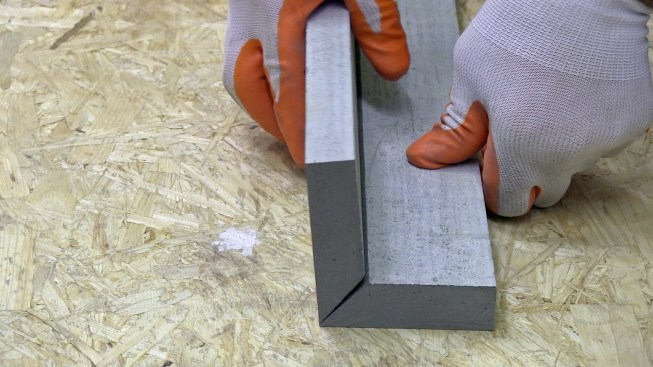
Corners. TruExterior currently does not make corner boards. We rarely use them; instead, we miter the siding boards, gluing and clamping the miter before nailing it off. (We have used a polyurethane glue, such as Gorilla Glue, and recently have been using Dap RapidFuse Wood Adhesive—a hybrid glue that creates a strong bond on poly-ash and sets up fast.)
When we do use corner boards, we preassemble them using a miter at the outside edge. I have also joined corner boards with lock miters, cut with carbide bits on a 2-hp router on a table, as shown above. But to be honest, a lock miter is overkill; a mitered corner looks just as good, and because the material doesn’t move around, it works as well too. You could also use a lap joint, as you would with a wood corner; it works well to apply a bead of compatible glue and nail the corner off with hot-dipped galvanized or stainless steel nails. However, I prefer the clean look of the mitered edge, and miters have never opened on us.
Mounting blocks. For outlets and fixtures, you can go one of two ways: Using 5/4 TruEx stock, you can make your own mounting blocks, or you can purchase premade poly-ash blocks from SturdiMount. These are easy to flash using peel-and-stick flashing tape.
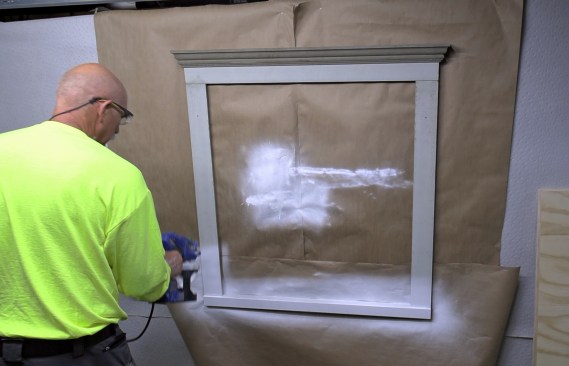
Finish. Before installing material, I typically apply a coat of finish paint (I use Sherwin-Williams Emerald Rain Refresh). This is especially important with a nickel-gap profile—you do not want to paint those nickel-size gaps later. Remember, though, that with TruEx, there is no need to paint anything that is not exposed, and paint will last a lot longer on TruEx than on wood since there is no water cycling.
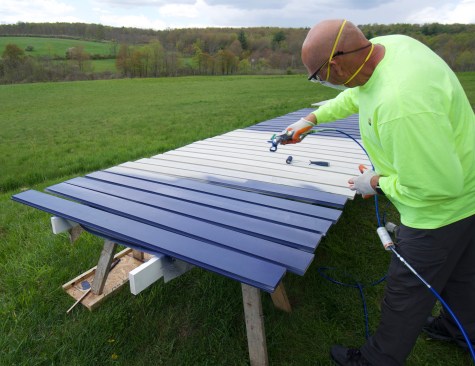
The author prefers to prefinish both siding and trim before installation. Here he uses a Graco 390PC airless sprayer.
One piece of advice: If you spray finish the siding, finish it off with a roller as per the manufacturer’s recommendations. The spray finish develops air bubbles that need to be knocked down with the roller for a smoother finish.
What We Don’t Like
There’s not a lot we don’t like, but there are a few things we miss that we’re accustomed to with fiber cement. We can blind-nail fiber-cement siding, and when we use prepainted material, we walk away with almost no painting. With TruEx, we need to follow the face-nailing pattern. Not a big deal; traditional clapboard is always face-nailed. But it does mean we have to fill nail holes and have considerable touch-up painting, as most clients prefer a classic look without the nails showing prominently.
If you insist your siding be blind-nailed, Duration does offer a clapboard profile that can be blind-nailed, and the company can prefinish it for you, as well.
One drawback of TruEx is the weight of 16-foot boards. One person can carry them if the wind isn’t blowing too hard, but it’s a lot easier with two people, and they need be carried on edge or they snap under their own weight.
While standard wood cutting tools work fine, the dust is gritty and hard. If you don’t keep your tools clean, it will get into motors and bearings and diminish tool life. I know guys who don’t like to clean their tools regularly and buy cheap throw-away tools for TruEx. That’s not my style, so I make it a habit to frequently clear the dust off tools and blow out the motors with compressed air. Also, once I use a carbide tool on poly-ash, I dedicate it to that use. The material dulls the razor edge of the carbide, and while it will cut the poly-ash just fine, it will start a fire on a piece of pine. I mark all of the tooling I use with blue paint, so I don’t mix it up. I have run thousands of feet through a half-inch-collet, classical-profile router bit, and it still cuts TruExterior just fine.


