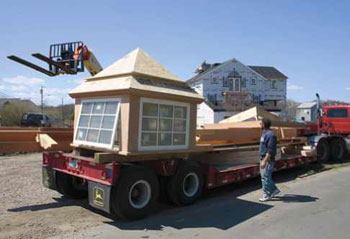
The company I work for, Baud Builders, builds custom homes in the coastal areas of Rhode Island. The homes are architect-designed and typically have plenty of interior and exterior millwork. I spend most of my time in the shop, prefabricating many of these components, to make time on site as efficient as possible. One recent project featured a glazed cupola, which lent itself to a unique approach: Rather than messing around on the rooftop, we decided it would be much easier to build the cupola in the shop, then truck it to the site and crane-lift it into place. The plans specified the general look of the cupola and the window units to be used (Eagle awning windows), but provided little else in the way of guidance or design. Our strategy was to have the framers create a square opening through the roof and build a mounting hub — like a stubby, wood-framed chimney through the ridge — based on rough dimensions provided by the building plans. The hub, framed with 2x4s and sheathed with 3/4-inch AdvanTech, measured 541/2 inches square on the outside. We took the hub’s as-built dimensions and designed the cupola to fit. The beauty of doing things this way is that it leaves no doubt about the rough dimensions suiting the finished unit, or vice versa.
We started with the windows. First, we needed a logical way to join them into a square, common unit. I began by cutting a base plate and a ceiling panel to matching outside dimensions, using cabinet-grade 5-foot-by-5-foot 1/2-inch Baltic birch plywood. I then cut out the base plate to match the top plates of the framed hub. Around the perimeter of this square, we biscuit-glued a built-up sill of western red cedar, mitered at the corners and with a sloped profile for drainage. The ceiling panel received a similar, flat cedar border that would form the cupola’s roof soffit. I sized the plywood so that only the cedar would be exposed to the weather.
We stripped the compression-fit top and bottom nailing flanges from the aluminum-clad windows and fastened the base plate directly to the windows’ bottom frames with two-part epoxy and screws. Setting the base plate and windows on a workbench allowed us to crouch down and screw the plate from below. Then, with temporary cleats tacked onto the window tops to hold them together, we lowered the assembly to the floor for easier access.
Next, we made the four outside finish corners, using 5/4 select-grade western red cedar. I “V-fold” corner pieces by first ripping 45-degree miter angles on two edges and applying a coat of epoxy to both. Then I butt the angled edges together, point-to-point, with the boards lying flat on the bench, and run strips of vinyl duct tape across the joint. The tape holds the pieces tightly together in alignment while I fold the miter shut. Light clamping is all that’s needed to keep the joint closed until the epoxy sets, which typically takes about 30 minutes.
To provide backing for the corners, we glued and screwed 2×3 cleats to the windows behind the vertical nailing flanges, then slipped in full-height corner braces behind the cedar corner boards. We clamped everything square while the glue set up.
Rafterless Roof
To apply the ceiling panel, I first clamped short guide blocks to it to help align it over the corners; then we glued and screwed it down.
We made the cupola’s regular hip roof from four equal pieces of 3/4-inch sheathing. Rather than whipping out a calculator to figure the panel cuts, I used a pair of 1-by sticks to represent common rafters and created a mock-up section of the roof to determine their exact length, plus the shape and dimensions of the backing blocks for the crown molding at the soffit. To find the hip angles, all we had to do was measure the eaves line for one side of the roof, then connect the outside corner to the ridge point.
We cut the four panels as accurately as possible, using a straightedge and a circular saw. I guessed at the blade angle for the compound cut between hip panels and got it close enough for epoxy on the second try. Before joining the panels, I used the circ saw and straightedge to cut the angle along the plywood’s bottom edge so it would match the top edge of the crown molding that would be applied later. We used a few pneumatic brads to hold the four panels together while the epoxy set up, then glued solid wood strips to the underside of the hips for reinforcement.
Meanwhile, on top of the ceiling panel we added a 5/4 pine rim to support the nailing blocks for the crown. Before applying the roof cone, we glued a layer of 2-inch-thick polystyrene foam insulation board to the back of the ceiling panel.
To install the roof cone, we lifted it onto the window assembly, checked the alignment between the birdsmouth cut and the top edge of the custom blocking, and did a little tweaking and grinding where needed. We used construction adhesive and screws through the plywood into the blocking to secure it.
As final proof of the pudding, we cut all four mitered crown-mold fascia pieces with a saw stop and installed them without a second fitting. We used construction adhesive in the birdsmouth along the top edge of the crown molding and both glued and shot the bottom edge with stainless steel finish nails. The cupola was now ready to ship to the site.
Up and Away
Before lifting, we parked the cupola in the garage to await the roofing contractor, who applied the standing-seam coated aluminum right there on the ground. The roofing crew also applied apron and step-flashing around the base of the hub. And we provided the framers with a base-plate template so they could drill the hub’s top plate for the ceiling box wire.
When everything was ready, we lifted the cupola by crane, snugging it in place with bolts from the inside. To finish up, we sheathed the interior of the hub with 3/4-inch plywood — which we thoroughly nailed into the top plates and studs for uplift resistance — followed by 5/8-inch fir bead-board paneling and trim.
Mike Randproduces millwork for Baud Builders of Wakefield, R.I.


