As a builder, I have lots of favorite tools. Often, my crew and I speculate during coffee break about what is the one most important tool that we own. We never decide on an absolute basis; it changes. For a long time, it was an impact driver, then a track saw. It often changes with the task or the job. But for the last few years, for me it has unequivocally been our blower door.
We strive for an extremely airtight home and the blower door not only tells us when we’ve reached our goal, it has also taught us how to get there with each build. I don’t believe my firm would be as good today as we are without owning our own blower door.
There are currently two popular blower-door makers selling in the U.S. market—The Energy Conservatory (TEC) and Retrotec. The author runs an older TEC model.
The HERS rater he often works with runs a Retrotec. Both work well, though there are numerous small features offered by each company that differentiate these products. In the author’s estimation, which one someone trains on first is usually considered the “best.”
Can a House Be Too Tight?
I still hear from builders who think we’re nuts to strive for extremely airtight homes. And I understand why they might think that—there’s a sort of natural aversion to living in an airtight box. Nevertheless, my answer to the question “Can a house be too tight?” is always an emphatic “No.” It is only possible to not properly ventilate a home.
The old misconception that a house should breathe has been debunked repeatedly over the last four decades, and that’s finally beginning to be reflected in our building codes. We now know that “natural ventilation”—the air that leaks though the cavities and cracks in an old house—is unreliable and never provided sufficient fresh air for healthy living. It certainly didn’t provide any comfort, to say nothing of the energy it wasted. We should be building tight homes and controlling the air with mechanical ventilation. We not only want to control the rate at which we bring in fresh air, but we also want to filter and condition any air entering our homes. And, where feasible, we want to recoup as much energy as we can from the stale air we exhaust out of the home. It’s all about control. The alternative, that we adamantly want to avoid, is having uncontrolled air—carrying water, pollutants, or all the thermal energy your clients have to pay for—moving through the envelope. Limiting all of those is a good thing.
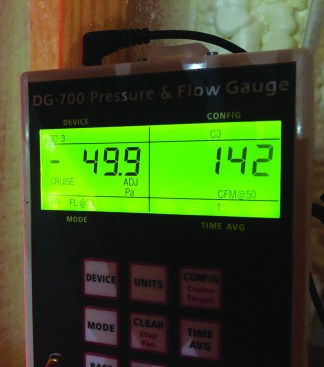
The TEC manometer is reading in CFM. The author prefers CFM, which more directly relates to the leakage level. He performs the calculation to normalize for house volume (ACH50) by hand. During a test, it can be difficult to dial in to an exact “50 Pa.,” given the sensitivity of the instruments, but 49.9 or 50.1 are both sufficiently accurate.
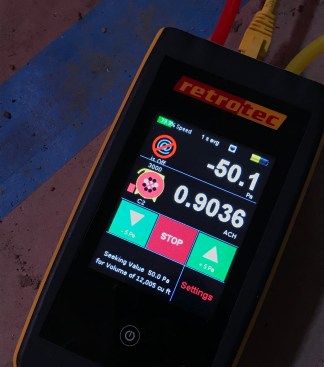
The Retrotec uses an added input for house volume to read out in ACH.
How Tight is Tight?
The energy code has pushed most builders towards building tighter and ushered in a new era in which blower doors are an essential tool. The 2009 residential energy code (Chapter 4 [RE] of the International Energy Conservation Code, or Chapter 11 of the International Residential Code) instituted blower door testing as one option for showing compliance with the energy code’s air-sealing requirement. In 2012, however, it turned blower door testing into the only way to demonstrate compliance. While currently only about half the states in the U.S. have adopted the 2012 code or a newer version, the handwriting is on the wall: All builders will have to get serious about controlling air leakage sooner or later.
The code measures the air leakage of a home in ACH50—air changes (replacement of the total volume of air in a given home) per hour at 50 Pascals of pressure. If you are in climate zones 1 and 2, you must tighten the home until you limit the air leakage to 5 ACH50 or less, and in zones 3 to 8, you need to reach 3 ACH50 or less (N1102.4.1.2).
The reason the minimum leakage rates differ by climate region is that in colder climates, the difference in temperature between indoors and outdoors is generally greater. The greater the difference in air temperature, the more energy you use to condition the air that leaks in, and the more energy you lose when the air leaks out. My firm builds in climate zone 4 and we often experience temperature differences upwards of 80°F in winter.
After those minimum leakage numbers, the two big takeaways from Chapter 11 of the IRC code (N1102.4–N1102.5) are the terms “shall be verified” and “shall be sealed.” I covered the “shall be sealed” part in “Air-Sealing That Works” (Apr/18). The “shall be verified” part—blower door testing per the newer code—is critical to the sealing part: Unlike so many other aspects of building code where we can visually verify that, for example, joist hangers, or jack studs, or backflow preventers have been installed, you cannot always see the air barrier. And even if you can see the air barrier, visual inspection can rarely ensure its effectiveness.
For reference, my firm now routinely builds much tighter than code requires. We have built a number of homes with blower-door numbers that have met or exceeded the Passive House standard of air leakage (0.6 ACH50). These homes are basically airtight and that means they are healthier, more comfortable, and more efficient than our competitors’ homes in our building market.

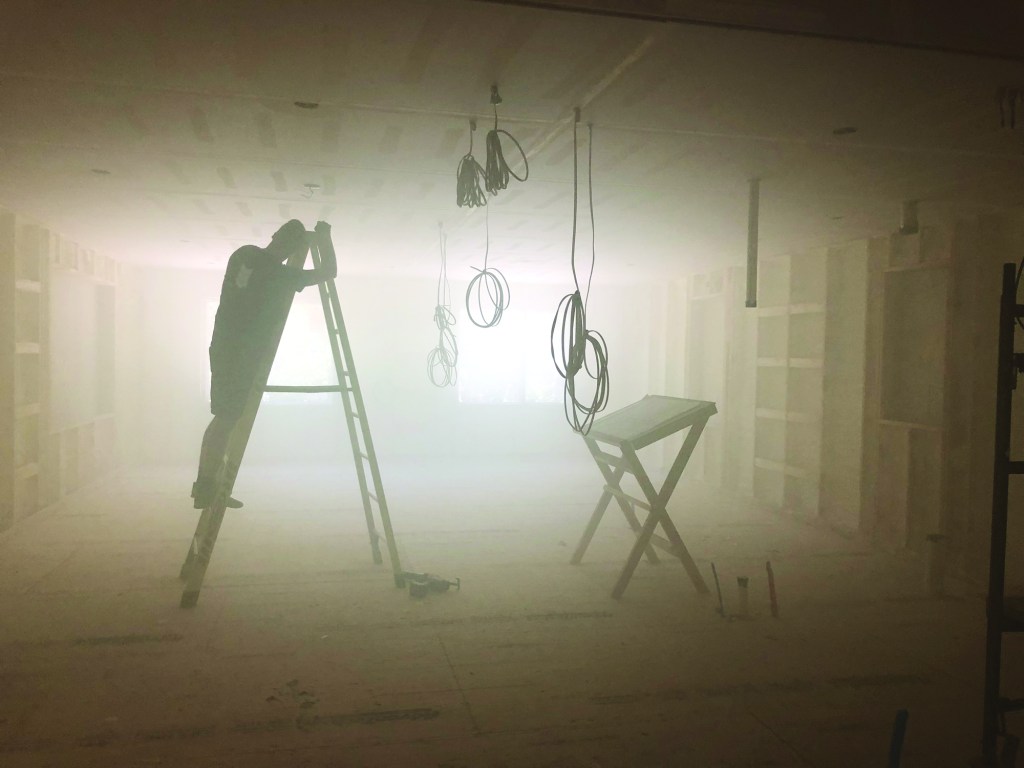
Using a Halloween fog machine ($30 to $40 on Amazon), the author and his crew pumped fog into the interior of a newly framed building. By pressurizing the house with a blower door, they were able to identify and seal myriad tiny leaks before those holes were buried in insulation. This allowed them to go from a tight 1.1 ACH50 (the initial test) to a very tight 0.35 ACH50.
Testing with a Blower Door
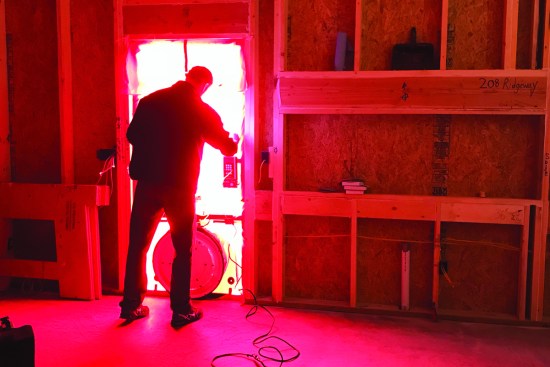
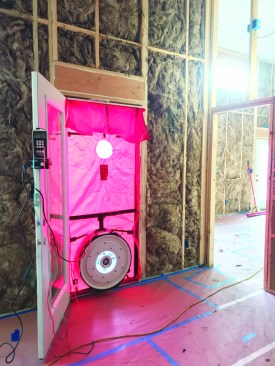
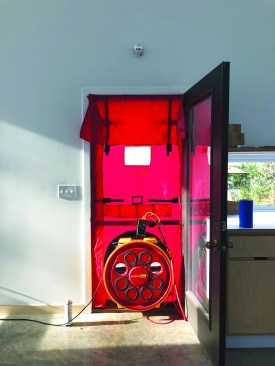
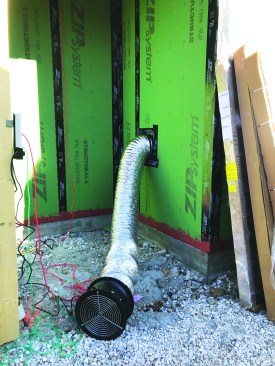
The process for verification is simple: We close all the windows and exterior doors, turn off any appliances like the furnace and water heater, turn off the clothes dryer, and shut the dampers and doors on fireplaces. Then we set up our blower door. It consists of a temporary (nylon fabric) door and a large, variable-speed fan that we install in one exterior opening, typically the front door. A small rubber tube connects a port on the fan to a manometer—an electronic device that measures air pressure. A second small tube connects to the manometer, and we position the end of this outside, somewhere protected from the wind. Then we crank up the fan’s speed, with the fan blowing out of the house to depressurize the home. (The fan can also be positioned to blow into the house, which pressurizes the interior of the home.) Because we typically run a depressurization test, the readout of house pressure on the manometer shows a negative pressure. It also shows a flow rate in CFM that gives us a measure of envelope leakage. In essence, the leakage rate is deduced from a comparison of the outdoor pressure to the indoor pressure.
Understanding the math is a little less straightforward. Most blower doors these days can be run automatically using software on a laptop that syncs up with the manometer. Once the baseline parameters of the blower door are entered into the system, a test can be run. That test will provide two data points. One shows that the home is depressurized to 50 Pascals of pressure different from the exterior air, which is the required testing pressure; and the second, a CFM number, shows the cubic feet per minute of air being drawn from within the home at 50 Pascals of pressure.
To get to an ACH50 number, you must calculate the cubic footage of the home. You can get as detailed as you like here. I generally measure the interior space without taking away for interior walls or furniture, for simplicity.
Not wanting to carry a laptop around to jobsites, I opt to run the blower door manually and do the math myself. I have even written the formulas on the back of my instruction booklet to easily refresh my memory. All I need is the volume of the home and the CFM number that is displayed on the manometer readout during the test (see photo, facing page) once the fan is cranked up and the reading from the fan shows the house is at (or very near) 50 Pascals:
Cubic Feet Minute at 50 Pascals (CFM50) x 60 = Cubic Feet Hour (CFH)
CFH / Volume of home (in cubic feet) = ACH50
As an example, this was the calculation for a recent build:
142 CFM50 x 60 = 8,520 CFH
8,520 CFH / 24,300 CF = 0.35 ACH50
This amount of air leakage is equal to an opening roughly the area of a dollar bill in 9,000 square feet of envelope area.
The math is pretty simple. Some blower doors will make the calculation in the manometer for you. My door doesn’t (it’s a few years old), but I don’t mind doing the math myself. It even helps me understand what I am testing because it forces me to think of the variables, such as the volume of air in the house and the rate at which the air moves. Otherwise, it is just a number coming out of a black box.
To really understand all the variables involved is not easy. CFM doesn’t directly correlate to the size of opening because different shapes allow for different flow rates. And knowing the number and sizes of the penetrations in your envelope still remaining to be sealed doesn’t directly correlate either. A good way to understand how much air leakage there is in a home is to test before window install with the sheathing running over the openings. You can then drill holes in the window sheathing. A 3/4-inch hole amounts to very little change in CFM. But 10 holes start to add up, and you begin to understand what kinds of things you might be trying to track down to further tighten the envelope. Another quick method we use to gain a tangible idea of the leakage is to crack a window while testing. It is controllable and easy to measure, and the crew starts to get a feel for how our readout numbers correlate in practical terms to air leaks in the home.
On homes with very tight envelopes, the author sometimes tests for air leakage with a Duct Blaster—the blower door’s tiny cousin—which provides greater accuracy when the flow rate is extremely low. A blower door can also be used effectively for low-flow readings using these two tips (both from Gary Nelson of TEC): 1. Put a bungie cord around the fan to really clamp down on the leakage between the door and fan. 2. Keep a small ziplock bag with a couple of scraps of fiberglass insulation to tuck into the corners of the door panel during tests. This will stop the biggest leaks in the corners.
Making Blower Doors Work for You
As discussed in my previous article on air-sealing, owning the door allows me to test multiple times during a build in order to track down and seal leaks. We want to find the leaks during construction, not just after the home is completed. Recently we were able to take the results of an envelope-only blower door test of 1.1 ACH50, and reduce that number to 0.35 ACH50 on our second test by combining the door with a Halloween fog machine. We ran the door for hours while pumping fog into the home. This would have cost much more to do if we were paying a subcontractor to operate the door while we crawled around the home searching for leaks.
Conducting multiple tests during construction also gives us the ability to double-check things like our window and door installation. Drywall returns to the window (no casing) are common details in our market. Once that return is installed, we can’t seal that window any better. But if we wait until the drywall is installed to test, then we don’t know if the install was executed properly until it is too late. We even have the ability to pressurize and depressurize the home to test how the windows and doors we buy are performing, and this helps us with our selections on future homes, as we constantly try to improve our product.
Having access to the equipment means we use it often. Rarely do we run a blower door test and not learn something about our processes. The information gathered from extra time with the blower door helps us understand how our envelopes are functioning and allows us time to alter or amend our approaches in order to build a tighter and more efficient home.
As a builder, owning and using a blower door has also given us the ability to check the quality of our subcontractor’s work. For example, the spray-foam crews installing wall-cavity insulation or attic air-sealing can now be held accountable immediately, not six weeks later. By being able to test and alter our approach constantly, we have raised our own expectations of what a quality home should be. In the way the track saw provides a finish quality cut or an impact driver provides more control over the torque to drive Tapcons without stripping them out, the blower door provides a level of understanding not achievable by watching an energy rater run a blower door test while clients stand outside with a moving truck.
Photos by Jake Bruton
Keep the conversation going—sign up to our newsletter for exclusive content and updates. Sign up for free.


