As a self-employed remodeler, I often take on small interior projects that require hanging and finishing no more than a few sheets of drywall. Since I’ve never found a drywall contractor who would show up to do these small jobs, I’ve learned how to get them done myself. I’m nowhere near as efficient as a professional finisher, so I still sub out the big jobs. But when I’m remodeling a bathroom or a small kitchen, it’s nice to know that I don’t have to wait on someone else for the drywall. Also, these rooms get closer visual scrutiny than most; I like being confident when I put down the sanding pole that the walls are perfectly smooth.
For the most part, I use standard finishing tools to get the job done. But I’ve discovered a couple of specialized tools that simplify the work without costing a fortune. I’ve also gotten cozy with a variety of fast-setting compounds that allow me to apply multiple coats in one day.
Prep Work
When I hang the board, I plan the installation to minimize the number of butt seams, since these joints take a lot more time to feather out and finish properly.
Before starting the finishing stage, I always make sure that my tools are clean and the materials are readily accessible. I’ll be applying setting compounds that have a limited working time — often as short as 20 minutes — so it’s critical that everything be in place ahead of time.
I begin by covering all of the factory-tapered seams with fiberglass mesh tape. Because the mesh tape is self-adhesive, I don’t have to waste time laying down a bed of mud on the seams before I apply the tape.
But mesh tape isn’t foldable, and it’s not as strong as the paper variety, so for inside corners — as well as for the unavoidable butt joints — I still use paper. To conserve working time after the mud is mixed, I cut every piece to length, creasing the ones for the corners, then distribute the pieces around the room so that each will be within arm’s reach when I need it.
Next, I put corner bead on the outside corners. I do a lot of bathroom remodeling, so I prefer to use vinyl corner bead because it won’t rust in humid environments. I fasten the bead with spray adhesive; before allowing the adhesive to set completely, I check the position of the bead — using my taping knife as a straightedge — to make sure it stands proud of the wall surface from top to bottom. Once I’m satisfied with the position of the bead, I cover the edges with a length of mesh tape to prevent cracking.
Setting Compounds
On a small job, I can’t afford to put on a layer of ready-mix joint compound and then wait for it to dry overnight, so I use a powdered setting-type compound for the first two coats. A standard setting-type compound, such as USG’s Durabond (800/874-4968, www.usg.com), is all but impossible to sand; I use the lightweight version, Easy Sand. Despite the name, this compound is nowhere near as easy to sand as the ready-mix variety, so I wipe the joints carefully.
Easy Sand comes in a range of setting times, from five minutes to five hours. I keep a bag each of the 20-minute, 45-minute, and 90-minute versions in my truck. That way, if I just have to patch a hole, I won’t have any downtime between coats; but if I’m finishing the whole room, I won’t have the mud going off in the pan before I’m done.
Strictly speaking, those printed set times are not terribly accurate, because the setting process is temperature-dependent; if you want the compound to cure faster, just use hot water; if you want to extend the working time, spread the mud out flat on a hawk, rather than leaving it packed tightly in a pan. The setting times are, however, a good gauge for when it’s safe to recoat. The mud doesn’t have to be dry enough to sand, just hard enough not to be disturbed by the application of the next coat.
I mix setting compound with cool water in a clean bucket using a D-handle drill and paddle mixer. Adding the powder to the water works better than doing it the other way around.
In my experience, you need just over an inch of water in a 5-gallon bucket to mix a bag of setting compound. I stir the compound until all the lumps are out and the mixture has approximately the same consistency as a thick pancake batter.
As soon as the setting compound is mixed, the clock starts ticking, so I work quickly.
Slinging Mud
Like many other amateur finishers, I used to apply the first coat of joint compound with a 4-inch taping knife. Then I realized how inefficient that approach was.
I now use a 12-inch broad knife for nearly all of my flat finishing because it lets me quickly and easily spread on a large quantity of mud and wipe the seams clean. The trick is to hold the blade parallel to the seam and apply the mud in one long, sweeping motion.
I cover the mesh tape with a layer of mud, then immediately wipe it down, holding the blade at a shallow angle and applying equal pressure to both ends of the knife. When I come upon the unavoidable butt seam, I apply the mud in the same manner, then embed a length of paper tape in the mud before wiping it down.
Outside corners. Once the flat work is done, the corner beads are next. Working from the bottom up, I hold the fully loaded knife blade parallel to the bead and cover it and the taped edge with mud, then wipe away the excess using the bead as if it were a screed.
Inside corners. Instead of a taping knife, I use a 3-inch lamb’s wool corner roller (Bon Tool Co., 800/444-7060, www.bontool.com) to apply joint compound to an inside corner. I screw the roller onto the end of a broom handle — which enables me to reach the ceiling without stilts, ladders, or scaffolding — then dip the roller into my bucket of mud, push it into the corner, and coat both sides at the same time. I push the tape into the corner with my fingers, using just enough pressure to keep it in place. If the joint compound I’m using has begun to stiffen, I can buy a few extra minutes of working time by dipping the tape into a bucket of clean water beforehand.
To apply and finish the corner tape, I use an ingenious device called a corner flusher (800/444-7908, www.betterthanevertools.com). This gizmo consists of an adjustable pole with a ball on the end to which various sizes and shapes of “flushers” can be affixed. The flusher — a highly refined version of those disappointing handheld corner trowels that most of us have tried and tossed away in frustration — has specially designed ridges that feather the mud evenly and capture the excess, rather than letting it squeeze out the sides.
To bed the tape, I snap on the narrow (2-inch-wide) flusher. I push the tool into the corner, apply steady inward pressure, and gently pull the tool from one end of the corner to the other.
Keep It Clean
Setting compounds are difficult to clean up if they are allowed to harden, so I make it a point to scrupulously clean all the tools between each coat. In fact, I keep a bucket half-filled with water specifically for washing tools as I work. A stiff-bristle nylon scrub brush makes short work of removing rapidly hardening compound.
I never clean the tools in a customer’s sink, because these compounds can congeal in the trap and cause a nasty clog.
Second Coat
If I’m finishing a typical 5-foot-by-7-foot bathroom, I’ll use Easy Sand 45 joint compound for the first two coats. Its 45-minute working time is all I need to cover and tool all the surfaces.
Then, after I’ve cleaned the tools, I can immediately start on the second coat. I mix the compound to the same consistency as for the first coat. I also load the flat work, beads, and fasteners the same way, using the 12-inch broad knife. But I take care to feather the edges an inch or two beyond the first coat’s edges.
When I get to the inside corners, I again roll on the compound, making sure to completely cover the tape. For this step I snap on a wider (3-inch) flusher and work the corners just as I did for the first coat. If I’ve properly coated the tape, the wider head will leave a flawless inside corner in its wake.
If I find a low spot where the corner roller didn’t leave enough mud in the corner, it’s no big deal — I just roll a little mud into the trouble spots and make another pass with the flusher.
Once I’m satisfied with the appearance of a corner, I move on to the next one, knowing I won’t have to revisit this corner until it’s time to sand.
Final Coat
After cleaning the tools, I eyeball the second coat, looking for high spots or ridges that I can shave off with a taping knife before the compound has set firmly.
For the final coat, which I will have to sand, I switch from setting compound to a medium-weight ready-mix compound (which has a red or purple lid, depending on the manufacturer). I prefer medium-weight because the all-purpose compound (green or black lid) shrinks more and is harder to sand, while the lightweight variety (blue lid), which is very easy to sand, is too susceptible to dings and scratches before painting.
There’s no way to know how long a new pail of joint compound has been sitting in a warehouse, so when I break open a bucket, I always give it a good stir with the paddle mixer. To prevent air bubbles that can leave crevices on the surface of the joint, I plunge the paddle mixer to the bottom of the pail, run the drill for about 30 seconds at medium speed, then pull the mixer to the top in one smooth motion.
For the third and final coat, I often add a small amount of water to thin the mix (usually about a soup can’s worth); otherwise I’ll have to do too much sanding to get the feathered edges to blend with the drywall.
I lay on my final coat the same way I did the previous ones, taking pains to make sure the compound overlaps the edges of the previous coat by at least an inch. For the flat seams, this means I lay out two parallel tracks of mud on either side of the joint.
At this stage, I shouldn’t have to touch the inside corners. But if I discover a gap or some other imperfection that can’t be sanded away, I will cover it with a dollop of mud and wipe it smooth with a 4-inch taping knife that I keep in my back pocket.
At this point all that remains is to clean my taping tools, pack up, and leave the compound to dry overnight. I’ll return the next morning for the final sanding.
Sanding
I’ve tried a variety of dustless sanding devices. Some were too bulky to fit comfortably in confined spaces and others didn’t produce the quality I require, so I continue to sand by hand.
To contain the dust, I seal the work area off from the occupied portion of the house, and if possible I put a fan in an outside window to create negative air pressure. To protect myself from drywall dust — which may contain carcinogens — I always wear a tightfitting respirator with replaceable filters (rather than a cheap paper dust mask) when I sand.
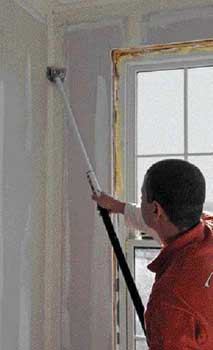
One tool I’ve found that makes this job a lot less miserable is the Radius 360 pole sander (866/675-2401, www.fullcircleinternational.com). Unlike a standard rectangular sander, the Radius 360 features an oversized (10-inch-diameter) sanding pad with a unique swivel head that lets me change directions without fear that the sanding head will flop over and dent the drywall (Figure 6). Since a nonmarring rubber bumper surrounds the head, I can rub the sander along the inside of a corner without carving a groove.
I run the sander back and forth across all the flats and fasteners. With joints, I’ve discovered that the best approach is to run the head parallel to the joint a few times and then perpendicular to it.
Sanding goes fast with the Radius 360 because I can change the pad’s direction of motion without worrying about the orientation of the head. I generally outfit this tool with 220-grit sandpaper, but even with such fine grit, I rarely have to spend more than half an hour sanding a 5-foot-by-7-foot bathroom.
The only places this tool can’t reach are the points where the inside corners meet. To polish those spots, I use a medium-grit angled sanding sponge. I put the pointed angle of the sponge right into the corner, zip it back and forth once or twice, then move on to the next corner.
After the corners are done, I take a quick walk around the room holding a powerful work light in one hand and the sponge in the other. I usually find a few minor imperfections that need further sanding.
Then all I have to do is vacuum up the dust and get ready for trim.
Greg DiBernardo owns Fine Home Improvements of Waldwick in Waldwick, NJ.


