When I first reviewed the plans for the kitchen remodel shown here, the project seemed fairly straightforward. It featured a small addition on a new stem-wall foundation at the rear of the home, a typical suburban New Jersey expanded cape. The addition would allow the first-floor plan to be reconfigured, enlarging the kitchen and improving traffic flow, but the project also included considerable work on the existing house.
As is often the case with remodels, building the addition would be easy; the tricky part would be the tie-in. For one thing, the existing 15-foot-by-20-foot kitchen floor was out of level in three different directions, resulting in a 1-1/2-inch height difference with the adjacent family-room floor — a tripping hazard the family wanted to eliminate.
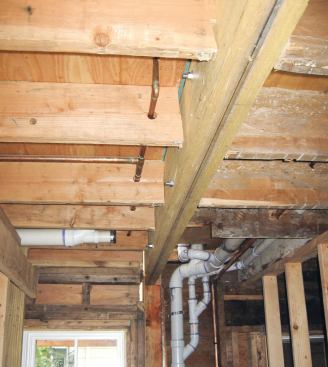
Several new headers would also be required, including one for the 12-foot-wide tie-in opening between the addition and the old kitchen. To clean up the ceiling and help make the space feel larger, we also had to remove a large interior flitch-plate drop header and replace it with a flush header.
RRP Compliance
Since this was a pre-1978 house and our clients had three children ranging in age from three to eight, our first challenge was to manage risks from lead-contaminated dust and comply with the RRP rule. Fortunately, we were able to build the footing and foundation and frame the new floor system before even opening or entering the existing house, making dust control a lot easier.
Once we installed the addition’s subfloor, we isolated the existing kitchen with dust walls and called in our demo subcontractor to gut the room down to the framing. For the past several years, we’ve subbed out the demolition phase on projects like this, because it helps control costs and saves considerable wear-and-tear on our backs. We usually hire the same company (which is RRP-certified), and since it also does commercial demolition, it has the manpower and equipment — including trucks and roll-off containers — to quickly and economically take care of this phase of the project. The cost for its services on this job was about $3,000.
After the initial demolition and RRP cleanup and verification, we were able to proceed with the job using our normal dust precautions. In the end, our compliance costs were minimal, probably less than one percent of the total project cost.
Block Foundation
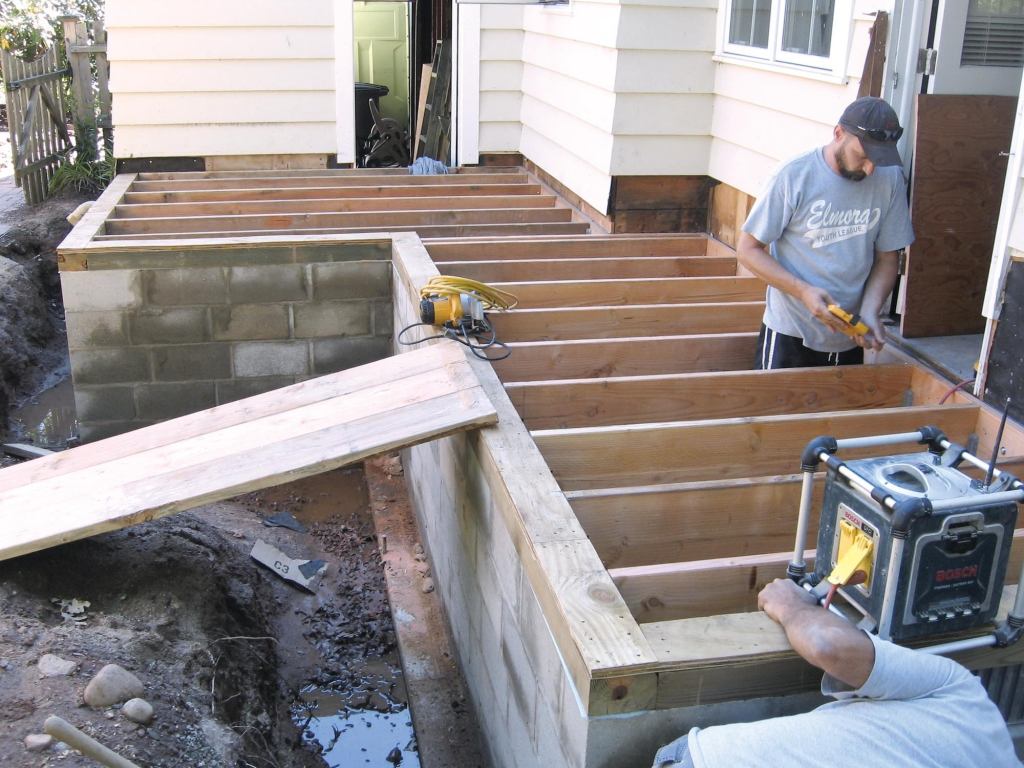
Though we sub out demolition, we typically block up our own foundations because it gives us more control over the schedule (see “Block Foundations for Small Additions,” 1/09). When we excavated this foundation and laid out the footing, we used the top of the floor joists at the center of the future opening between the addition and the existing house as our benchmark.
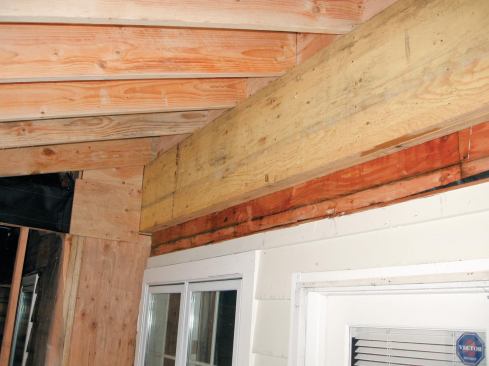
After forming and pouring the 12-inch-deep by 24-inch-wide footing, we laid up the wall using 12-inch-wide concrete block. We terminated the top of the wall with a course of 8-inch block, creating a 4-inch-deep inner shelf that we topped with a 4×6 PT mudsill set on edge. The new joists rest on this interior sill with their tops flush with the top of the outer 4×6 sill, an arrangement that allowed us to keep the floor framing close to the ground.
To establish an accurate benchmark elevation for the addition, a carpenter first exposed the floor framing in the center of the proposed opening. The existing joists were later trimmed or shimmed — and in some cases reinforced with sistered 2x10s — to smooth out the transition into the addition and to prep the kitchen for new wood-strip flooring.
Below-Grade Detail
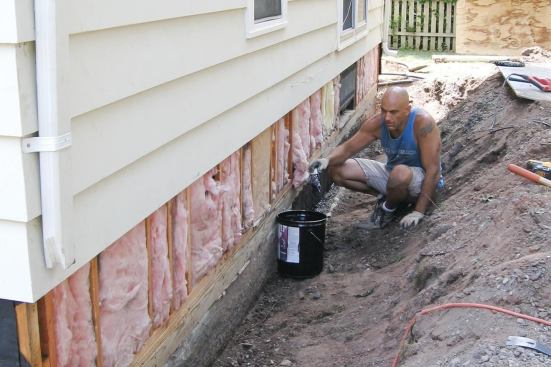
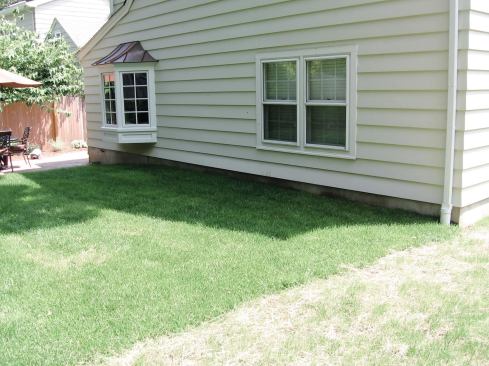
When the homeowners bought the property, they inherited an ugly railroad-tie retaining wall that prevented the ground from coming into contact with the home’s cedar siding at one corner of the house. To eliminate it, I suggested that we regrade the backyard, but the architect explained that this option had already been rejected because of cost. Instead, he provided us with a below-grade detail that called for the removal of the retaining wall, a little excavation, and replacement of the original sheathing about 2 feet above the sill with treated plywood sheathing.
This was a detail that was inadvertently left off the bid plans; in hindsight, I should have ignored it at the start of the project and brought it up as an add-on later. But we were eager to land the job and build a relationship with this architect, so I agreed to include the work for $1,000, even though my estimate was closer to $3,000 (the work actually cost $3,300 to complete).
Before installing the PT plywood, we covered the exposed part of the foundation and mudsill with a generous coating of cold asphalt. We fastened the portion of the PT sheathing that fell below the sill to the foundation wall with powder-actuated fasteners. The asphalt layer helps seal the sheathing to the foundation and keeps moisture from wicking up the wall.
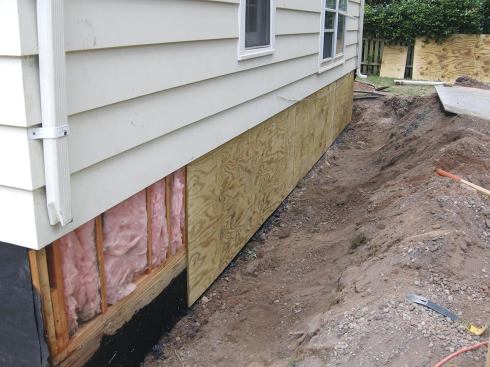
Next we installed 30-pound felt paper and galvanized wire lath over the plywood and parged the wall with a 1/2-inch-thick layer of mortar. Though parging isn’t completely waterproof, it will block most moisture from penetrating to the sheathing and old foundation wall underneath. We parged our new block work, too, so that the entire foundation would have a uniform appearance.

The architect specified a pressure-treated pony wall for resolvi…
Finally, we coated the below-grade portion of the parged wall with more cold asphalt before laying in filter fabric and drainpipe and backfilling the trench with coarse stone. Then we folded the filter fabric back over the stone and leveled out the grade.
If the decision had been left up to me, I would have insisted that the yard be regraded; we never want to bring the ground into contact with anything other than solid masonry. But this detail was an uneasy compromise with the architect and client that kept the job on track, and we did the best we could to protect the framed wall from moisture and give it the appearance of a proper foundation. The foundation is well-drained, and since this part of the basement is unfinished, the wood foundation wall can be inspected easily from the inside for signs of moisture damage. Two years after project completion, the homeowners haven’t reported any problems.
Framing
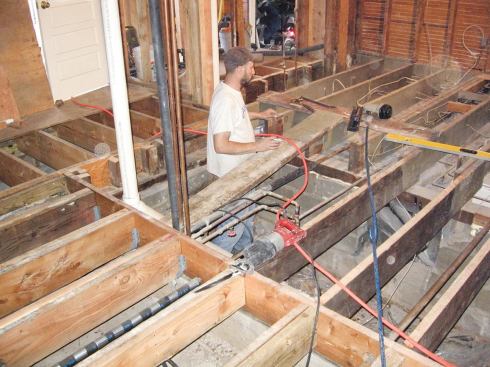
During a previous renovation, the kitchen floor had been tiled and a tapered transition installed between the kitchen and family-room floors to deal with the out-of-level floor joists. While we couldn’t completely correct the old floor system, we spent a lot of time shimming and trimming the old joists as needed to smooth out the transition between the old and new spaces. Where the old floor was framed with 2x8s, we beefed it up with sistered 2x10s.
Click to enlarge illustration below.
Tim Healey
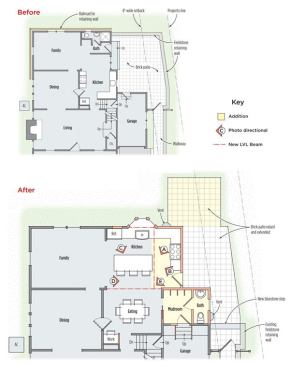
Flush Headers Are Key to Open Floor Plan: The old kitchen was crammed between a bathroom and a staircase, and had poor flow into adjacent rooms and scant natural light (top). Bumping out the rear wall and moving the bath to the new mudroom allowed the kitchen to spread into the corner, where it shares space with the family room (above). Installing flush headers, as described in the slideshow photos, created a smooth ceiling between the rooms and opened up the adjoining eating area.
Originally, the architect’s plans called for a new mudroom and powder room adjacent to the garage to be two full steps below the kitchen floor, a design dictated by the elevation of an existing exterior garage door. However, the homeowners wanted all of the rooms to be on the same level, and we preferred to build the addition foundation so that the entire floor system would be level and as close to grade as possible. Fortunately, the roof design of the new addition allowed us to open up the garage ceiling and create enough headroom to raise the doorway between the mudroom and garage. Instead of putting a pair of steps between the mudroom and kitchen, we were able to add them to the set of stairs in the garage.
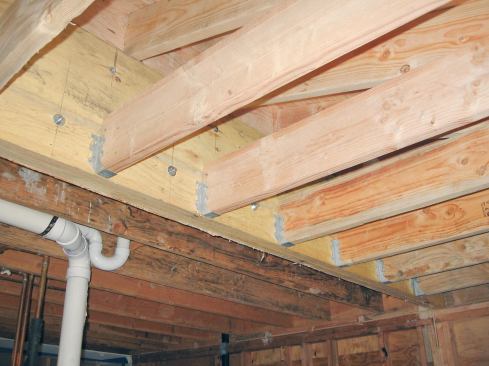
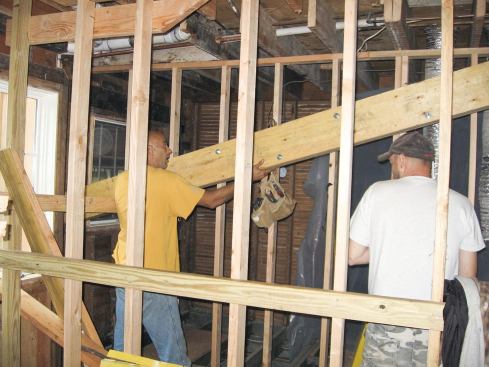
Exterior header. A 12-foot section of existing exterior wall had to be removed to connect the addition to the house. Even though the second-story floor joists ran parallel to the wall (and therefore were not supported by it), this wall still carried loads from the roof above.
We bolted two 1-3/4-inch by 18-inch LVLs through the sheathing and into the studs and the inside rim joist before demolishing the wall. At one end, this new flush header bears on another conventional LVL header that we installed for a new bay window. At the other end, it hangs from a new flush flitch-plate header.
Center wall header. During the remodel that had produced the out-of-level floor, a drop flitch-plate header had been installed to replace what had once been an exterior wall. To create a wider opening and a flush ceiling throughout the expanded kitchen, we replaced it with a longer flush flitch-plate header consisting of two 1-3/4-inch by 9-1/2-inch LVLs bolted around a 1/2-inch by 9-inch steel plate.

Rob Corbo
Before opening up the house’s rear wall, the crew bolted a pai…
After that, the project proceeded conventionally on the interior. On the exterior, we installed horizontal furring strips above the parging, which allowed us to slightly flare the new beveled cedar siding over the stucco — a nice touch.
Rob Corbo
The original unsightly railroad-tie retaining wall was replaced by a nicely graded backyard.

Rob Corbo
Thanks to a new bay window over the sink and a 12-light entry door, the reorganized and expanded kitchen gets plenty of natural light.
Cost
To land the job, I had discounted my original estimate by $5,000 to match the bids from several competitors. With a total project budget of about $111,600, this amount — plus the $2,300 we ate as a result of the missing below-grade detail — ended up being lost profit. I probably should have tried harder to stick with my original numbers, but that was hard to do during the downturn, when we were struggling to keep employees working, pay salary and overhead, and continue to chip away at our line of credit. As it turns out, our strategy may be starting to pay off: I haven’t had to discount any of my estimates lately, and recently the homeowners on this project asked us to renovate their master bath.
Photos by the author.


