I’ve been using white melamine to finish closets for years. Readily available in 12-, 16-, and 24-inch widths and in 8-, 10-, and 12-foot lengths, edge-banded melamine is perfect for building attractive, durable, and economical shelving that can be adapted to many different closet layouts.
Recently, I’ve been purchasing my melamine from a local cabinet shop rather than through a lumberyard. This saves me about 25 percent compared with the price for basic white lumberyard melamine and allows me to offer my customers a broader selection of colors and patterns. Once homeowners see how many options are available, they rarely choose plain white melamine, even though colored and special-order melamine can cost more.
Another benefit is that my cabinetmaker is willing to rip melamine to width and run it through his edge-banding machine. Although I’m limited to 8-foot lengths (the cabinetmaker buys 49-by-97-inch sheets), I can get any width I like. The shorter length isn’t a problem, because closet rods need to be supported every 3 or 4 feet anyway; I can land shelf joints on brackets that carry the rod.
This also means that I now use shelf cleats made out of melamine instead of MDF. While I could make the melamine cleats myself, I don’t want to edge-band that much material on site — it’s just too slow — and the lumberyard doesn’t sell edge-banded material in narrow widths. As for MDF, it would need to be puttied, caulked, and painted, an especially time-consuming job if the shelves are tightly spaced. When you factor in the labor, MDF cleats can be way more expensive than the shelves themselves.
Design and Layout
It seems that when people design a custom home, they decide how big the closets should be and then move on to the thousands of other decisions they have to make. In most cases, the next time they think about the closets is when the wall paint is dry and they can finally see the space. This is about the time I arrive on site. So the first thing I do is talk to the customers about what they want and describe to them solutions that have worked for my previous customers.
A layout stick simplifies planning. To save time during this process, I use an 84-inch-long layout stick instead of a measuring tape. Because it contains all of my favorite measurements, I can hold the layout stick against the closet wall and quickly show my clients where everything might go. These locations are just suggestions; the homeowners can have any layout they want. To make it easier for them to visualize the layout, I mark shelf locations by placing blue painter’s tape on the walls. If there are any doubts, I leave the tape up for a few days and let the owners move the “shelves” around till they’re happy.
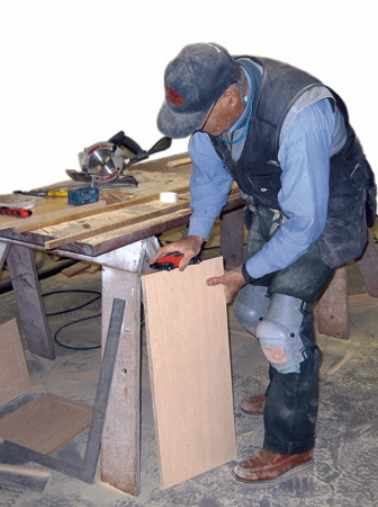
Once the layout has been determined, I mark the cleat locations on the wall. Since the walls are already painted, I always measure to the top of a cleat so that the shelf will hide my marks. At the same time that I’m laying out shelves, I mark stud centers so I know where to nail through the cleats.
Recommended Details
Closet shelving systems vary in accordance with the size of the closet and the clients’ storage needs. A basic layout might consist of a single shelf and either a single or double closet rod, while a larger closet might also have room for a stack of fixed or adjustable shelves. Another, more costly option is to include a bank or two of drawers. If the room has an otherwise empty wall, we could install a fully edged cleat with Shaker pegs or coat hooks on it.
I use a full 3 1/2-inch-wide cleat for shelves with closet rods, but only a 1 3/4-inch-wide cleat for shelves without. A typical cleat height for a single rod is 66 inches above the floor; for double rods, the cleats are typically 42 inches and 84 inches up (measurements are always to the top edge of the cleat).
When I build a stack of shelves, I like to make them 84 inches high — the same height as the cleat for an upper shelf rod. Each closet wall might have a different layout, but if they all terminate at a wraparound shelf at 84 inches, they will integrate cleanly.
Banks of shelving. Double closet rods are popular, which means that there often is a lack of shoe storage space. The solution is to build a separate stack of shelves and use the lower portion of it to store shoes. I usually install fixed shelves spaced 6 inches apart, but if the customer wants adjustable shelves, I’ll drill a series of shelf-support holes spaced 2 inches on-center. To prevent the sides from bowing out, I’ll install a fixed shelf halfway up the stack.
Another easy option is to install adjustable shelves between two stacks of fixed shelves. It’s simply a matter of drilling holes for the shelf supports in the sides of the fixed shelf units and installing them as far apart as the adjustable shelves are long.
Varied width and spacing. In a linen closet, I put the first shelf 20 inches up from the floor and the second 16 inches above the first; from there, I install shelves 12 inches on-center up to a height of 6 feet. For pantry shelving, I like to stagger the depth and height. I’ll start with a 16-inch-deep shelf, then place a 6-inch shelf 8 inches higher, then put a 12-inch shelf 8 inches above that. This arrangement allows single-depth cans to sit behind taller items while staying visible. Any really tall items can sit on the 16-inch shelf and shoot past the 12-inch shelf.
Ordering Stock
I’m not limited to standard widths when I order stock from a cabinetmaker. Most of the time I order 6-, 12-, 16-, and 24-inch shelves, but there have been plenty of times when I opted for other widths.
I don’t order cleats ripped to width because in our humid climate a narrow rip with a band on only one edge would “banana” (bow due to absorbed moisture) pretty quickly. To prevent this from happening, I order the cleats twice as wide as necessary (typically 4 inches for 1 3/4-inch cleats and 7 1/2 inches for 3 1/2-inch cleats) and ask the cabinetmaker to band both edges. This seals them up pretty well, and on the day I plan to install them I cut them to width by ripping them in half. They won’t bow immediately, so everything is fine as long as I nail them up that day.
Ripping the cleats also gives me a sharp, square edge where the shelf hits the cleat. No caulking is necessary, because there will be a good tight fit. I’m always careful to handle ripped melamine edges carefully, because they’re sharp enough to cut a person’s hands.
Edging in the field. There are often messy spots where the particleboard core is exposed. This might happen when a piece has to be ripped on site or when a shelf or cleat runs partway across the wall. I handle this by edge-banding the exposed area in the field. Instead of heat-sensitive material that goes on with a heat gun or iron, I use a peel-and-stick edging called Fastedge (FastCap, 888/443-3748, www.fastcap.com). The back is coated with a pressure-sensitive adhesive, which sticks very well and is much easier to apply than traditional edging materials.
The manufacturer also sells a handy pressure roller for pressing peel-and-stick edging onto the surface, and a dual-blade trimmer for cutting it flush to the edge of the melamine. Trimming is necessary because edge bands are wider than the thickness of the material they are designed to edge. These tools make the job so easy to do, there’s no reason to ever leave an exposed edge unfinished.
I can buy a 250-foot roll of the maple-pattern Fastedge for approximately 30 cents per foot. Iron-on edging is about a nickel less per foot, but the peel-and-stick is so much easier to use, it trumps any difference in cost.
Joining Shelves
When shelves go around an inside corner, I butt one to the other and join them with pocket screws — two near the front and one in the middle. There’s no good way to fill these holes, so I hide them by drilling them where they’re hard to see. If the shelves are below eye level, I drill from below; if the shelves are up high, I drill from above. I use an aluminum Kreg jig to guide the bit; it’s much superior to the newer plastic models.
In many closets, the top shelf goes all the way around the room, so if the heights are right, the top of the door casing can act as a cleat.
Using Dadoes
When building stacks of shelves, I like to dado shelves into the sides. This has a great “wow” factor with clients and is faster than any other shelf-support method you could reasonably do on site.
I could support the shelves with individual cleats, but that would look clunky and there would be all those extra cleats to deal with. A plate joiner might work, but whatever you gain by not cutting a dado, you lose by having to slot both sides of the joint and use glue. One of the nice things about using a dado is that it hides any chipping that occurs when you crosscut shelf pieces.
Special-size bit. I use a router to cut the dadoes. Plywood is usually undersized, but the 3/4-inch melamine I use is actually a full 3/4 inch thick. As a result, the dadoes have to be more than 3/4 inch wide or the shelves won’t go in. I make 1/4-inch-deep dadoes with a .78-inch straight bit that I bought from a specialty supplier (Woodline, 800/472-6950, www.woodbits.com). The bit’s extra three-hundredths of an inch is just enough for a perfect fit.
Laying out and cutting. I start by clamping both sides to a bench, aligning the sides, top, and bottom so that both pieces can be laid out and cut at the same time. I mark dado locations by transferring marks from the layout stick, which could be either standard locations or marks that correspond to where the clients put the blue tape on the wall. Even if the layout is slightly off, the sides will still be identical when you use this method.
Because I clamp the sides with their front edges touching, there is minimal chipping where the bit exits one and enters the other. To guide the router square across the face of the stock, I use a Clamp ‘N Tool Guide (Griset Industries, 714/662-2888, www.trugrip.com). Available in 24-, 36-, and 50-inch sizes, this aluminum rail has a built-in clamp that holds it square to the stock. I could do the same thing with a board and a couple of screw clamps, but the purpose-built guide is self-squaring and less likely to vibrate loose.
Assembly and Installation
The shelf banks are quite heavy, so I assemble them on the floor as close as possible to their final location. I put the shelves into the dadoes without glue and nail them in from each side with four 1 5/8-inch 18-gauge brads. To hold the unit against the wall, I fasten 1 3/4-inch cleats below the top and middle shelves with a 15-gauge finish nailer.
There are a couple of ways to stabilize the sides of the shelving unit where they hit the floor. If I am working on subfloor, I nail a small piece of metal flashing to the bottom of the side, allowing it to project beyond the edge, and nail through it into the floor. On hardwood or vinyl floors, I will run a pocket screw through the side and into the floor. When I’m done, I use colored putty to conceal any visible nail holes.
Some of my customers have been asking for banks of drawers. I don’t mind installing drawer units, but it is not economically feasible to fabricate them in the field. On one recent job, I ordered knock-down drawer units from CabParts (970/241-7682, www.cabparts.com). The company’s service and product were excellent, but the freight charge was way over the estimate. Next time, I’ll explore a supplier who is closer to home.
To support some inside corners and the front edge of long runs of shelving, I install narrow, edged strips of melamine stacked vertically and wedged between the shelves. Overlapping these pieces and nailed from behind, another continuous piece of melamine strengthens and conceals these joints and gives the shelving a finished look.
Chas Bridge is a finish carpenter in Sequim, Wash.


