For as long as I’d known her, my friend, Laurie, had talked about redoing the kitchen in her tiny cottage on Cape Cod. Each time the topic came up, I looked around the minute space and just shook my head. She’d always reply, “I have a plan.”
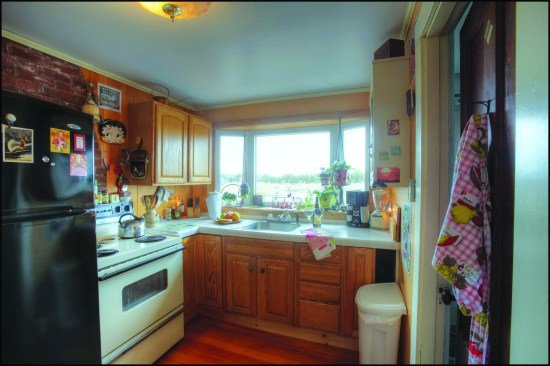
Before. Last renovated in the 1990s, the existing kitchen had full-size appliances, a tile countertop, and stock cabinets that left an open space on one side that was barely usable.
New plan on the same basic layout. On a recent visit to the cottage, I noticed that her tone regarding the kitchen upgrade had gotten more serious. Standing in the confines of less than 70 square feet, she gave me her wish list for the new kitchen, which included new, smaller appliances, a dishwasher (she’d always washed dishes by hand), and an added countertop space extending along one wall, with open shelves above.
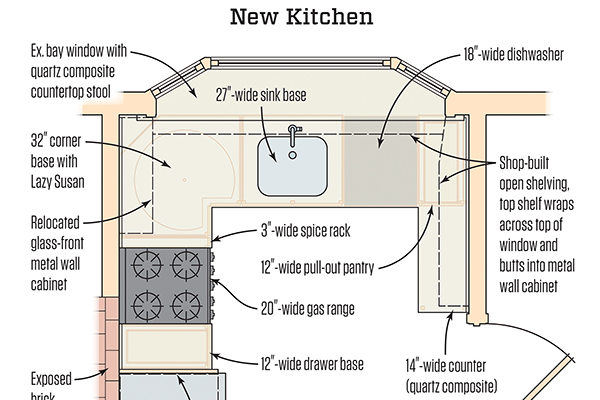
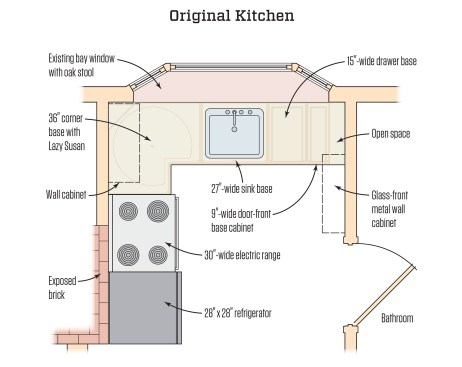
The most prominent feature—and the biggest challenge of this kitchen—was a large bay window that took up the lion’s share of the biggest wall. Below the window, the existing cabinets consisted of a 36-inch Lazy Susan in one corner with a 27-inch sink base and a 15-inch drawer base next to it. A narrow door-front cabinet and an odd, unfinished, leftover space completed that wall. Wall cabinets included a stock two-door cabinet on one flanking wall and a vintage glass-front metal cabinet that Laurie had rescued from a friend’s trash on the opposite wall.
A large bay window (with views of a tidal estuary) limited kitchen redesign options in the compact space.
As I began to sketch out the layout for the new kitchen, I started by reducing the footprints of the full-sized appliances and replacing them with more compact versions. A 24-inch refrigerator would replace the existing 30-inch model, and the stove would shrink from 30 inches to 20 inches. I reduced the Lazy Susan to 32 inches and kept the 27-inch sink base. As a result, I gained space for a 12-inch drawer base between the stove and fridge, a narrow pullout spice rack on the other side of the stove, and an 18-inch dishwasher next to the sink. To make use of the other blind corner, I had just enough space for a 12-inch pull-out pantry cabinet. Enclosing the fridge would allow for extra storage above (see plan, below).
Online cabinets. Armed with my sketch, Laurie and I went on a cabinet quest. The budget for this kitchen was limited, so custom cabinets were out of the question. But with all the odds and ends and precise space requirements, we even had to rule out cabinet outlets and big box stores after receiving several proposals that were well out of the budget.
Then I remembered the JLC article “Ready-to-Assemble Cabinets” by Gary Striegler (Dec/16). It included a list of online companies for purchasing cabinets. I went through the list, trying to find a company that could provide exactly what we needed. We settled on cabinets.com, which seemed to have all the different cabinets on our list. The order arrived on time with nothing missing, including all the various specialty items. Best of all, the cabinets were already assembled.
Adding a sink vent. Just after ordering the cabinets, we brought in a plumber. The first thing he pointed out was an S-trap with an air admittance valve on the kitchen sink drain. Adding a dishwasher would require a new, properly vented sink drain. But with the window in place, the drain would have to travel below the window and into an adjacent wall shared by a bathroom in order to be vented properly.
After stripping the window wall and the bathroom wall back to the framing, the plumber was able to run the drain through the floor, and the vent up into the attic. I took care of drilling the hole in the roof and installing the boot and final length of vent pipe.
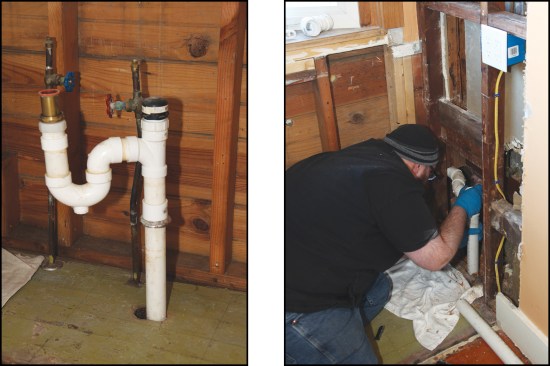
The existing sink was unvented, with an S-trap drain (above left). The plumber installed a new P-trap drain (above right)…
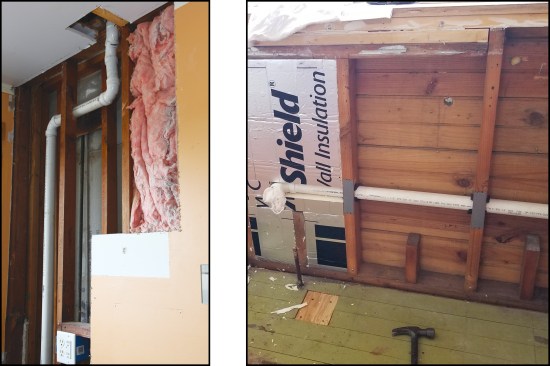
…which he vented through a shared bathroom wall (left), before the open walls were insulated (right).
Cooking with gas. Part of Laurie’s wish list was converting the stove from electric to gas (propane). So the next item on the plumber’s list was adding gas lines. This time, his inspection revealed that the existing piping for the cottage’s propane heaters was undersized. All of the piping would need to be replaced before the new stove could be installed. Luckily, none of that work impeded the cabinet installation.
Electrical work in the kitchen was minimal. The two sets of GFCI-protected outlets from the original kitchen remained in place. The electrician removed the 220-volt stove circuit, which was no longer necessary, and added a 110-volt receptacle that was required for the new gas stove, as well as a receptacle under the sink for the dishwasher.


