Fred Martin
Concrete and clay tiles are popular roofing materials in hot climates. But tile can provide a durable roof in any climate zone, provided steps are taken to deal with the prevailing conditions. In this article we’ll focus on two of the most challenging environments for tile: high-wind and cold-climate regions.
In high-wind zones, there are two primary issues to solve. The first is to keep wind-driven rain out; success here depends on the waterproofing system beneath the tile. The second is to prevent tiles from either getting smashed by wind-borne projectiles or being lifted by high winds and becoming projectiles themselves. Success here depends on the fastening system. Mechanical fasteners and two-part foam adhesive work best, although they are not the only systems allowed by code.
In cold climates, wind-driven snow can be an issue, but the main problem is ice damming. Tile is brittle and cannot withstand normal efforts to remove snow and ice from a roof, so a design solution must be found. While most severe ice-damming problems are caused by heat loss from the building and can be solved by thorough air-sealing and complete insulation, those efforts alone aren’t always enough. Solar radiation can play a role in melting snow, especially at high altitudes, and melt-water may refreeze when clouds move in or night falls. Complete success comes from building a cold roof.
Sealing the Roof Deck
For a complete waterproofing system, first seal all seams in the roof deck, using one of the following techniques:
• Minimum 4-inch-wide peel-and-stick tape applied over all joints in the roof deck, topped by roofing felt (shown at right). Depending on the surface texture or the amount of wax in the panels, OSB may need to be primed before application of any self-adhered material.
• Retrofit spray foam. An alternative to peel-and-stick tape, a closed-cell spray foam can be applied to all panel joints from the attic side.
• Properly attached synthetic underlayment with all seams taped. Synthetic underlayments generally last longer, are lighter, and shed water better than felts. Specs for fastening, headlaps, and sidelaps vary by product; manufacturer installation instructions must be followed.
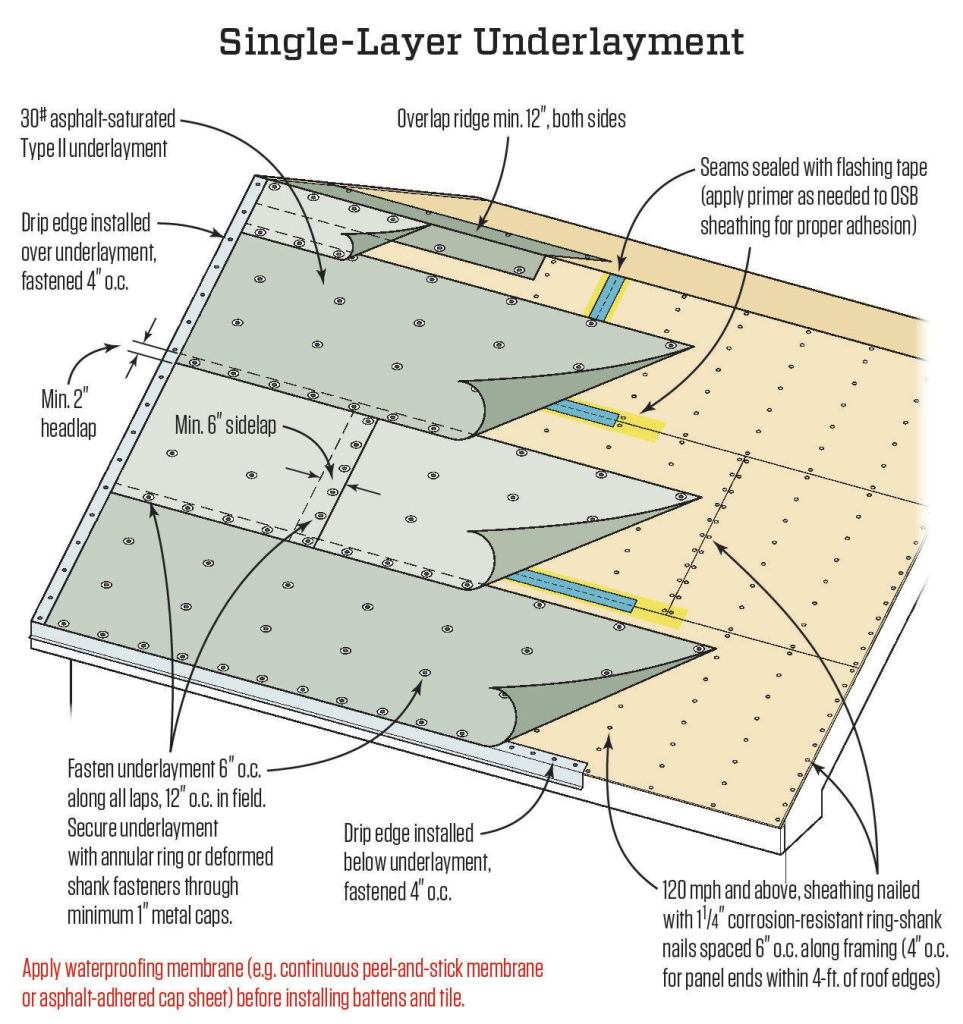
To complete the waterproofing system, a waterproofing membrane—such as a continuous peel-and-stick membrane or a 90-lb. cap sheet adhered with hot asphalt—needs to be applied over the underlayment system shown at right.
Waterproofing for Windy Regions
While concrete and clay tiles are durable, it’s the underlayment—in concert with flashings—that actually provides the waterproofing. In high-wind regions, it’s not enough to simply tack down felt. The goal is to seal the roof deck against wind-driven rain, and the underlying materials need to hold their own in the event some tiles get blown off the roof.
Continuous peel-and-stick. The simplest way to seal a roof deck is with a continuous layer of self-adhering “peel-and-stick” underlayment applied over the entire roof deck. As simple as this seems, it might not be a good idea. When applied directly to the deck, peel-and-stick usually cannot be removed for reroofing without damaging the sheathing. For this reason, some jurisdictions don’t permit peel-and-stick to be applied directly to a roof deck. (Note: If it is allowed in your jurisdiction and you are reroofing over an existing layer, check with local code. Installing a second layer of peel-and-stick over the existing layer may be permissible, provided laps are offset between the existing and new layers.)
Single-layer underlayment. The default system is a single-layer underlayment over a sealed roof deck, as shown in the illustration above. To make this a complete waterproofing system, the joints in the roof deck must be sealed with peel-and-stick flashing tape or with spray foam from the attic side (see “Sealing the Roof Deck,” above). And over the top of the underlayment, full sheets of self-adhering waterproofing membrane, or the cap sheet for a built-up roof, must be installed. (When completed, the underlayment serves as a bond breaker that allows for roof demo prior to future reroofing.)
Underlayment material. Standard 30-lb. felt is common, but is far from the best choice. Felt has extremely limited tear-resistance, making it vulnerable during the installation of tile. Tile is heavy and difficult to handle gingerly enough to avoid abrasion. Felt also has limited UV resistance (maximum 30-day exposure).
A synthetic underlayment will provide a big jump up in quality. Synthetics are made with polypropylene, polyester, or fiberglass—all of which provide much greater tear and abrasion resistance than felt. Synthetics are also relatively impervious to UV exposure and can often be left to weather for months. And because synthetic underlayment rolls are generally wider and longer than rolls of asphalt felt, application is often faster (see “Do Synthetic Underlayments Make for Better Roofs?” Jan/13). Of course, synthetics cost two to four times more than felt (depending on thickness and other properties of the specific product), but they also carry warranties of at least 25 years.
Built-up roofing (BUR) is a common substrate in high-wind regions when the tile is adhered with a two-part foam adhesive, which requires an adhered underlayment. However, traditional hot-mop systems may not be the best all-around choice. Asphalt becomes brittle with age and may be too inelastic for climates with routine freeze/thaw cycles. The fumes from molten asphalt are a suspected carcinogen; it can be harmful to workers, and some jurisdictions have rules about when, where, and if you can use hot asphalt. In some cases, you can comply by using a low-fuming product or a kettle that’s equipped with a filtration device. In other cases, you may need to switch to a cold-applied bitumen or a torch-down modified bitumen. (For more information, see “Built-Up Hot Mop Roofing,” Feb/05).
Flashing. A complete tile waterproofing system incorporates flashing interwoven with the underlayment. Metal flashing is required at junctures between the roof and sidewalls, at roof edges, in valleys, and around skylights, plumbing stacks, and other penetrations. Often these flashings are lapped over the underlayment shingle-style and sealed with peel-and-stick. On BUR applications, the metal is often sealed with cold-applied asphalt cement and a 4-inch or 6-inch cotton-mesh reinforcing fabric.
Edge trim. A lot of tile profiles also require a bird-stop. The traditional approach is to pile on a lot of mortar in the tile openings, but this is rather labor intensive. Metal bird-stop, nailed off at least every 18 inches along the eaves before tiles are installed, is typically more cost-effective. At rake edges, either curved tile (see illustration) or a raised-profile metal rake trim must be used to close off the gap between the roof deck and tile when battens are used.
CounterBatten Benefits
Traditional mission- and Spanish-style (barrel) roof tiles can be applied directly to the deck. But many of the flat-profile tiles have a head lug that requires installing them on battens. But there are advantages to battens, even if not required for the profile. The primary benefit is fewer penetrations through the waterproofing membrane. Typically, only three corrosion-resistant 8d ring-shank nails are needed per 36- or 48-inch batten (24-inch-on-center nailing minimum).
Horizontal battens over vertical counterbattens will promote positive drainage and are recommended in all climate zones, as this system provides plenty of drainage and airflow. But installing a double layer of battens is a lot more work. In wet regions where wind-driven rain is a primary concern, it may be more cost-effective to use horizontal battens with built-in standoffs (for example, Boral’s Elevated or Tru-Flow Batten systems).
Horizontal battens—typically 1x2s nailed directly to the roof deck—aren’t likely to provide adequate drainage for extreme weather events. While the butt ends of battens (maximum 4-foot battens allowed; spacing between courses depends on tile size) should be gapped about 1/2 inch, it’s a judgment call whether this will provide adequate drainage. If the roof is in an exposed coastal location subject to intense wind-driven rain, battens with built-in standoffs or a counterbatten system would be a much better choice. In a hot, dry, or even moderate climate, ordinary horizontal battens might be just fine.
In wet and windy climates, wood battens are going the way of organic felt. While western red cedar is the preferred type, it is still prone to decay and won’t last as long as the tile the battens support.
Tile for High Wind Zones
In hurricane zones, wind-borne projectiles smashing into a tile roof can be the cause of the roof’s demise (and if the waterproofing system fails, possibly the demise of the home’s interior, as well). Concrete and clay roof tile used in high-wind and hail zones should be rated for impact. The test—FM4473—evaluates the durability of the tiles when ice balls are fired at a test assembly. Class 3 tiles can withstand a test using 1 3/4-inch-diameter ice balls; Class 4 materials can withstand impact from 2-inch-diameter ice balls.
Securing tile. Two fasteners per tile will provide the required uplift resistance for a 130-mph wind zone. Hot-dipped galvanized, ring-shank nails (minimum 10d, or .121 inch, with a 5/16-inch, full-round head) or minimum #8 course-thread screws fit the bill. Nails and screws must penetrate the roof deck or batten by at least 3/4 inch.
In a high wind, the most intense uplift pressures on roofing are along eaves edges and along hips and ridges. Mortar-set tile, or mortar-set hip and ridge tile, is typically not permitted in high-wind zones—only an approved 2-part foam tile adhesive or mechanical fasteners are. Often a combination of nails or screws, hurricane clips or twist-wire connectors (see illustration above), and two-part foam for securing overlapping tiles is the fastest and most reliable system.
Cold-Climate Concrete Tile
In cold climates, the steeper the roof, the better. A steeper roof will reduce snow loading as well as promote air flow through roof venting.
Build a “cold roof” using a counterbatten system, whether or not the attic is ventilated. Use 2-by vertical battens with the eaves intake and ridge outlet baffled to keep out wind (see “Cold-Climate Tile Roof,” above). Depending on snow accumulation and roof pitch, 2x cross battens may be required to support snow loads. In extremely cold and snowy climates, or with long, low pitch (around 4:12) roofs that require more ventilation space to promote airflow, vertical battens greater than 1 1/2 inches (for example, 2x4s on edge) may be required. Be sure to consult an engineer for this application. Brackets may be required to prevent the battens from tipping under live-load conditions.
When the attic is ventilated, install ridge boards with standoff brackets to allow attic airflow to exhaust, as shown in the illustration above.
Underlayment. Best practice calls for a double layer of 30-lb. felt. Under the International Residential Code, “in areas where there has been a history of ice forming along the eaves,” a self adhering “ice barrier” is also required for the first 24 inches inside (or above) the exterior wall line. Some code jurisdictions may require more ice protection.
Valleys. While not required by code, peel-and-stick is recommended along valleys. Long valleys are also difficult to vent. The battens running along the valley should be segmented, and vertical battens should be gapped so they do not intersect the diagonal valley battens. Closed valleys using “WW” metal (with added standoffs to support cross battens), will be less likely to get clogged with debris. Valley metal for tile roofs needs to have upturned edges to contain the water flowing down them.
Sidewall flashing. Extend underlayment at least 4 inches up the wall and add a wide peel-and-stick that extends onto the roof plane as well as up the wall. The vertical leg should extend at least 4 inches above the top of the horizontal cross batten. Like valley metal, a metal flashing with an upturned edge to contain water, and padded out from the wall to allow for a robust counterflashing, must be installed as shown in the “Sidewall Flashing” illustration on page 46.
Flashing for roof penetrations needs to not only keep water out of the roof deck, but must also keep water from getting under the tile. In essence, you’re creating a dual-layer flashing around penetrations. A conformable metal, such as lead, may be needed to seal the tile on top, depending on the profile. Crickets are a must above chimneys, skylights, and other large penetrations projecting through the roof.
Vents for combustion heating appliances should be boxed in a chimney to isolate them from the roof and reduce the chance that snow will melt around them. Preferably, the stack should be placed high on the roof, with the top of the stack above the ridge to prevent heated exhaust air from blowing across the roof surface and melting snow.
Snow retention brackets must be designed for tile and must hook over horizontal cross battens. Brackets designed for membrane roofs with a flat leg running along the roof line won’t be adequate to support the loads.
Tile Roof Resources
For more details, anyone designing or installing tile roofs should consult these important resources (available free as downloadable PDFs from the Tile Roofing Institute).
For high-wind installations, see FRSA/TRI Concrete and Clay Roof Tile Installation Guide for Florida (5th Edition, 2014)
For cold-climate applications, see Installation Manual for Cold and Snow Regions
.
In addition, IBHS, the Insurance Institute for Business and Home Safety, provides best-practice guidelines for homes in hurricane regions under the Fortified Home program. See Fortified Home: Hurricane Standards (free PDF).


