After framing and roofing, there is no step more basic to building a house than installing windows. Most windows today have an integral attachment flange, so this article will focus on that type of window. In 2016, JLC published two articles by Gene Summy, a contractor and building inspector from Laguna Niguel, Calif., that addressed two different approaches to installing flanged windows (see “Installing Flanged Windows: Two Strategies Compared,” Jan/16, and “Installing Flanged Windows Part 2,” Apr/16). Those articles contain much greater detail about subsequent sealing and testing, and we encourage folks to read them for more information. Our goal here is to present streamlined versions of the two strategies side by side for readers to evaluate and choose between.
Both installation methods depend on a combination of self-adhered flashing tape (SAF) and sealant. SAF comes in many different configurations from many different manufacturers. Regardless of the type of SAF that is used, the installer should always go over the tape with a J-roller or similar tool to ensure full adhesion.
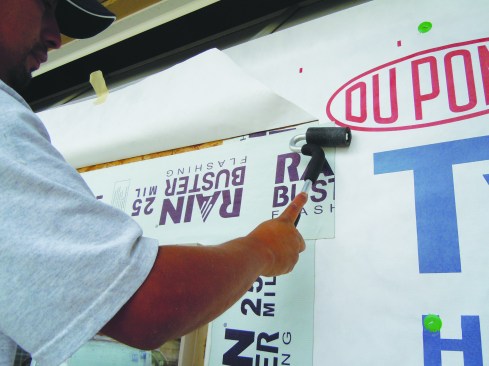
Rolling SAF is a must. To ensure proper adhesion and to eliminate wrinkles, use a J-roller to apply adequate pressure to the SAF.
Properly applied sealant also plays an indispensable role in window installation, and selecting the right sealant is important. Window manufacturers use a variety of materials for the window cladding and flanges, and some sealants may not be compatible with certain windows. Always follow the manufacturer’s specific sealant recommendations to avoid an adverse reaction between the sealant and the flange material.

Tim Healey
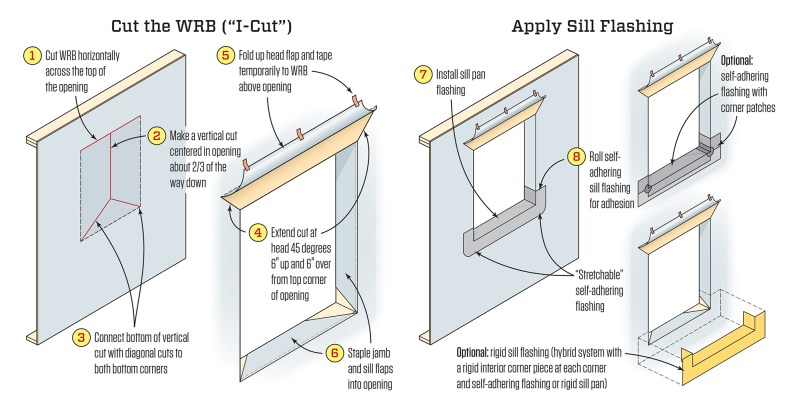
Illustrations based on AAMA 2400-10 (Method A-1)
Method 1 (above) is usually associated with East Coast installers. After prepping the opening, the installer applies a bead of sealant either to the back of the outside edge of the window flange or directly on top of the WRB, leaving wide drainage gaps along the bottom edge. If the latter strategy is chosen, it helps to first dry fit the window and draw a line around the perimeter of the window flange. The bead of sealant should go just inside that line. Press the window into place and make sure it is level and square, fasten the corners with truss-head screws or roofing nails, and confirm that the window operates properly. Drive fasteners in the remaining holes and smooth out excess sealant that has oozed from the flange. When sealant has cured, apply SAF to the sides of the window and then across the top of the window. Next, fold the WRB flap down and seal the corners. The advantage to this method is that the SAF seals directly to the window flange so you aren’t depending on sealant alone to keep water out.
Tim Healey
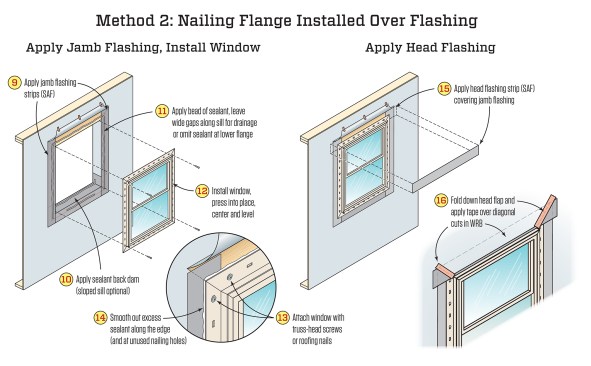
Illustrations based on AAMA 2400-10 (Method B-1)
Method 2 (above) is usually associated with West Coast installers. After prepping the opening, the installer applies SAF to both sides of the opening, and a bead of sealant either to the back of the outside edge of the window flange or directly on top of the SAF. If you’re applying caulk to the SAF, it helps to first dry fit the window and draw a line around the perimeter of the window flange; the bead of sealant should go just inside that line. Remember to leave wide gaps along the bottom. Press the window into place and make sure it is level and square, fasten the corners with truss-head screws or roofing nails, and confirm that the window operates properly. Drive fasteners in the remaining holes and smooth out excess sealant that has oozed from the flange. When sealant has cured, apply SAF across the top of the window. Then fold the WRB flap down and seal the corners. The advantage to this method is that it allows for quick inspection of the sealant coverage without disturbing the SAF should a leak be discovered.

Sealing the WRB. With both strategies, the WRB head flap folds down over the SAF at the head of the window. Flashing tape seals the flap to the head flashing.